background image

ENGLISH

  OPERATING THE MONITOR  21  

OPERATING THE MONITOR

To create the best picture, your iiyama LCD monitor has been preset at the factory with the COMPLIANT 

TIMING shown on page 37. You are also able to adjust the picture by following the button operation 

shown below. For more detailed adjustments, see page 28 for SCREEN ADJUSTMENTS.

   Press the MENU button to start the On Screen Display feature. There are additional 

Menu items which can be switched by using the   /   buttons.


Select the Menu item of the adjustment you want to make. Press the OK button on 

the remote control or ENTER button on the monitor and enter the menu page. Then, 

use the   /   buttons to highlight the desired adjustment item. 


Press the OK button on the remote control or ENTER button on the monitor again. 

Use the   /   buttons to make the appropriate adjustment or setting. 


Press the EXIT button to leave the menu, and the settings you just made would be  

automatically saved.

 

The EXIT button on the remote control can be used to return previous menu item.

 

Any changes are automatically saved in the memory when the On Screen Display disappears. 

Turning off the power should be avoided while using the Menu.

 

Adjustments for Image Position, Clock Frequency and Phase are saved for each signal timing. 

Except for these adjustments, all other adjustments have only one setting which applies to all 

signal timings.

NOTE

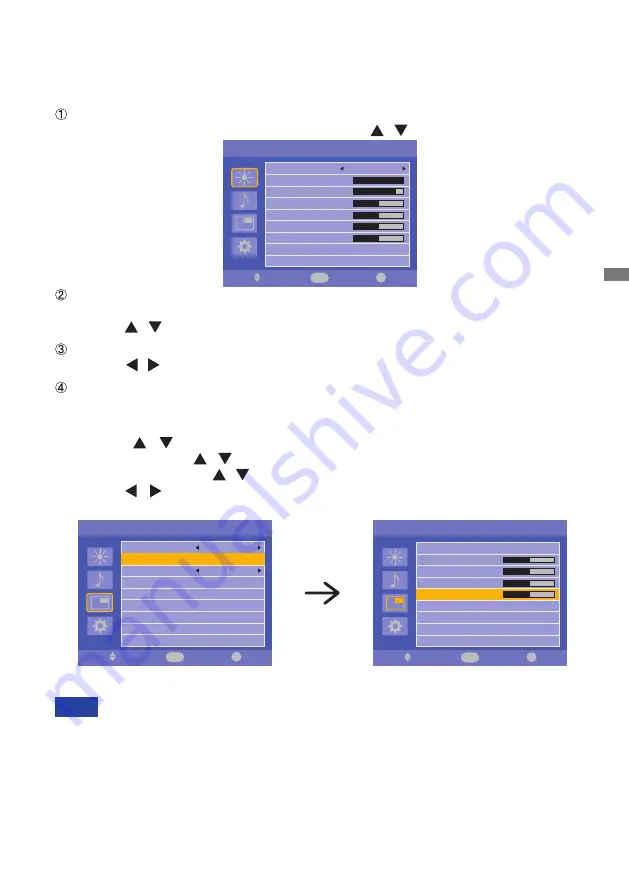
For example, to correct for vertical position, select Menu item of Screen. Select "Screen" by 

using the   /   buttons. Press the OK button on the remote control. Next, select "Adjust 

Screen" by using the   /   buttons. Press the OK button on the remote control. Then, select 

"V. Position" by using the   /   buttons. 
Use the


/


buttons to change the vertical position settings. The vertical position of the 

overall display should be changing accordingly while you are doing this.

Press the EXIT button on the remote control lastly, it ends, all changes are saved in the memory.

Picture

Move

Enter

ENTER

/OK

EXIT

Exit

Picture Mode

Backlight

Contrast

Brightness

Chroma

Phase

Sharpness

Color Temp.

Reset

Standard

100

80

50

50
50

5

Custom

Network Settings
Control Setting

RS-232C

1

D

r

o

ti

n

o

M


t

e

S
Energy Saving Settings
Aspect

Full

Freeze

Off

Setting

h

s

il

g

n

E

e

g

a

u

g

n

a

L

VGA Settings

VGA Settings

Phase

Auto Adjustment

H. Position

Clock Frequency

V. Position

Screen

Move

Enter

ENTER

/OK

EXIT

Exit

Aspect

Touch Feature

Normal

Off

Adjust Screen

Screen

Move

Enter

ENTER

/OK

EXIT

Exit

Phase

Clock Frequency

34

0

50

H. Position

Auto Adjustment

50

V. Position

Содержание ProLite TF3238MSC

Страница 1: ...ing the iiyama LCD monitor We recommend that you take a few minutes to read this comprehensive manual carefully before installing and switching on the monitor Please keep this manual in a safe place f...

Страница 2: ...com You can access the Web page of different countries from there CE MARKING DECLARATION OF CONFORMITY This LCD monitor complies with the requirements of the EC EU Directive 2014 30 EU EMC Directive...

Страница 3: ...NSTALLATION 10 CONTROLS REMOTE CONTROL 12 PREPARING THE REMOTE CONTROL 13 BASIC OPERATION 14 CONNECTING YOUR MONITOR 17 COMPUTER SETTING 19 OPERATING THE MONITOR 21 ADJUSTMENT MENU CONTENTS 23 SCREEN...

Страница 4: ...e fire electric shock or damage INSTALL THE MONITOR ON A FLAT STABLE SURFACE The monitor may cause an injury if it falls or is dropped DO NOT USE THE MONITOR NEAR WATER Do not use where water may be s...

Страница 5: ...you move the monitor turn off the power switch unplug the monitor and be sure the signal cable is disconnected If you do not disconnect them it may cause fire or electric shock UNPLUG THE MONITOR If...

Страница 6: ...htness on the screen depending on the desktop pattern you use Due to the nature of the LCD screen an afterimage of the previous screen may remain after switching the image when the same image is displ...

Страница 7: ...ver the screen is idle You could also turn off the monitor when not in use to assist the prevention Other ways to reduce the risk of Image Persistence will be to utilise the FAN on function if availab...

Страница 8: ...o protect the LCD panel do not scratch or rub the screen with a hard object Never use any of the following strong solvents These will damage the cabinet and the LCD screen Touching the cabinet with an...

Страница 9: ...power cable greater or equal to H05VVF 3G 0 75mm must be used Power Cable HDMI Cable DisplayPort Cable USB Cable IR Extender Cable Remote Control Battery 2pcs Clamper Safety Guide Quick Start Guide B...

Страница 10: ...NOTES ON TOUCH PANEL Permanent damage can occur if Sharp Edged Pointed or Metal items are used to activate Touch This could invalidate any remaining warranty We recommend to use conductive rubber tip...

Страница 11: ...CONTROLS AND CONNECTORS MONITOR Back Controller Front Power Indicator Green Normal Operation Orange Power Management Power Button Left Button Right Button Up Button Down Button MENU Menu Button ENTER...

Страница 12: ...DisplayPort Connector D sub VGA VGA Connector RS232C RS232C 9pin RS232C Connector USB USB Touch USB Connector External IR Mini jack IR Connector Line In Mini Jack Audio Input Connector Line Out Mini J...

Страница 13: ...with washer which L length is 10mm to fasten the monitor Using a screw longer than this may cause electric shock or damage because it may contact with the electrical parts inside the monitor CAUTION...

Страница 14: ...TOR 11 ROTATING THE DISPLAY It is designed to be compatible in both landscape and portrait modes A A Not Available ProLite TF3238MSC ProLite TF4338MSC A A Landscape Portrait Available A A Not Availabl...

Страница 15: ...tton Down Button Left Button Right Button VOLUME Decreases the sound volume VOLUME Increases the sound volume OK Confirms your selection or save changes INFO Provides source and resolution information...

Страница 16: ...over in the direction of the arrow Align and insert two AAA batteries according to their plus and minus ports as indicated in the remote control Replace the battery cover in the direction of the arrow...

Страница 17: ...turn On the monitor NOTE Even when using the power management mode or turning OFF the Power Switch the monitor will consume a small amount of electricity Disconnect the Power Cable from the power supp...

Страница 18: ...ct menu or setting or perform the adjustment by pressing the Button while the menu page is displayed on the screen Move the cursor vertically Select adjustment by pressing the Button while the menu pa...

Страница 19: ...is not displayed on the screen Switch the input signal Press the VIDEO SOURCE Button on the monitor or INPUT Button on the Remote Control to display the Input signal menu when the menu page is not di...

Страница 20: ...computers contact your local iiyama dealer or regional iiyama office for a suitable adaptor Make sure you tighten the finger screws at each end of the Signal Cable When USB cable connected than wait...

Страница 21: ...P environment highlight Auto Setup and select Off Contact your ITS administrator for information on the IP Address Subnet Mask Default Gateway and Primary DNS settings and enter it accordingly Control...

Страница 22: ...lation on Windows XP The monitor Information File for iiyama monitors may be necessary for your computer and obtained via the Internet using the address http www iiyama com For additional information...

Страница 23: ...orted Kernel version 4 4 3 18 3 0 3 14 3 0 4 4 Note Driver supports multi touch OS Version Mac OS Mac OS 10 9 Mavericks 10 10 Yosemite 10 11 El Capitan 10 12 Sierra 10 13 High Sierra Supported touches...

Страница 24: ...using the Menu Adjustments for Image Position Clock Frequency and Phase are saved for each signal timing Except for these adjustments all other adjustments have only one setting which applies to all s...

Страница 25: ...n Lock function Remote Control Button Pressing and holding the MENU and buttons for about 5 seconds will lock unlock the Remote Control Button Lock function Available Back Controller only PALM REJECTI...

Страница 26: ...rong Backlight Brightness of back light is reduced Picture Too weak Too strong Custom R G B Neutral Warm Cool Color Temp 3 Phase Purplish Greenish Picture Move Enter ENTER OK EXIT Exit Picture Mode Ba...

Страница 27: ...o weak Too strong Too soft Too loud Mute Off On Turn off the sound temporarily Return the sound volume to the previous level Speaker Line out Internal Select the Internal Speaker Select the External S...

Страница 28: ...the screen in the vertical direction keeping the same aspect ratio 16 10 1 Displays all picture in 16 10 aspect ratio 5 4 1 Displays all picture in 5 4 aspect ratio Touch Feature On Off Return to Menu...

Страница 29: ...nual If you are not connected contact your IT administrator for information on the IP Address Subnet mask Default gateway Primary DNS and Secondary DNS settings and enter them accordingly Italian Ital...

Страница 30: ...yed on the screen On Off OSD Rotation On Off Landscape Portrait Portrait display Landscape display See your graphic card user guide for more information about changing the resolution and refresh Model...

Страница 31: ...splaying the picture other than the screen adjustment pattern In this case manual adjustments are required There are two ways to adjust the screen One way is automatic adjustment for Position Clock Fr...

Страница 32: ...re may flicker during the Clock Frequency H V Position adjustment In case the picture frame is bigger or smaller than the data display area after the Clock Frequency adjustment repeat steps from 2 Str...

Страница 33: ...he refresh rate of computer to low 60Hz and repeat steps from again Adjust the H Position after the Phase adjustment if the horizontal position moves during the adjustment Adjust the Brightness and Co...

Страница 34: ...than 1 0W The screen becomes dark and the power indicator turns to orange From Power Management Mode the image reappears in several seconds when either the keyboard or the mouse are touched again The...

Страница 35: ...ck If the monitor fails to operate correctly please follow the steps below for a possible solution 1 Perform the adjustments described in OPERATING THE MONITOR depending on the problem you have If the...

Страница 36: ...o response The USB Cable is firmly seated in the socket Touch screen driver software is installed The touch position does not deviate The calibration function set up correctly For better environment p...

Страница 37: ...Resolution 1920 1080 2 1 MegaPixels Input Connector VGA DVI D HDMI 2 DisplayPort Input Audio Connector mini jack LAN RJ45 Serial Port RS 232C In Plug Play VESA DDC2BTM Input Sync Signal Separate sync...

Страница 38: ...nput Connector VGA DVI D HDMI 2 DisplayPort Input Audio Connector mini jack LAN RJ45 Serial Port RS 232C In Plug Play VESA DDC2BTM Input Sync Signal Separate sync TTL Positive or Negative Input Video...

Страница 39: ...3 0 100 0mm 3 9 400 0mm 15 7 200 0mm 7 9 400 0mm 15 7 174 25mm 6 8 20 0mm 0 8 125 0mm 4 9 174 25mm 6 8 200 0mm 7 9 4xM6 SCREW HOLE VESA MOUNT 987 5mm 38 9 943 5mm 37 1 294 0mm 11 6 672 0mm 26 5 36 0mm...

Страница 40: ...4 500MHz SXGA 1280 1024 63 981kHz 60 020Hz 108 000MHz 79 976kHz 75 025Hz 135 000MHz WSXGA 1680 1050 65 290kHz 59 954Hz 146 250MHz Full HD 1920 1080 67 500kHz 60 000Hz 148 500MHz SD 480p 60Hz 31 469kHz...

Отзывы: