background image

ENGLISH

6  BEFORE YOU OPERATE THE MONITOR

FITTING AND REMOVAL OF BASE

CAUTION

 Put the monitor on a stable surface. The monitor may cause injury or damage if it 

falls or is dropped.

 Do not give a strong impact to the monitor. It may cause damage.

 Unplug the monitor before removal or installation to avoid electric shock or damage.

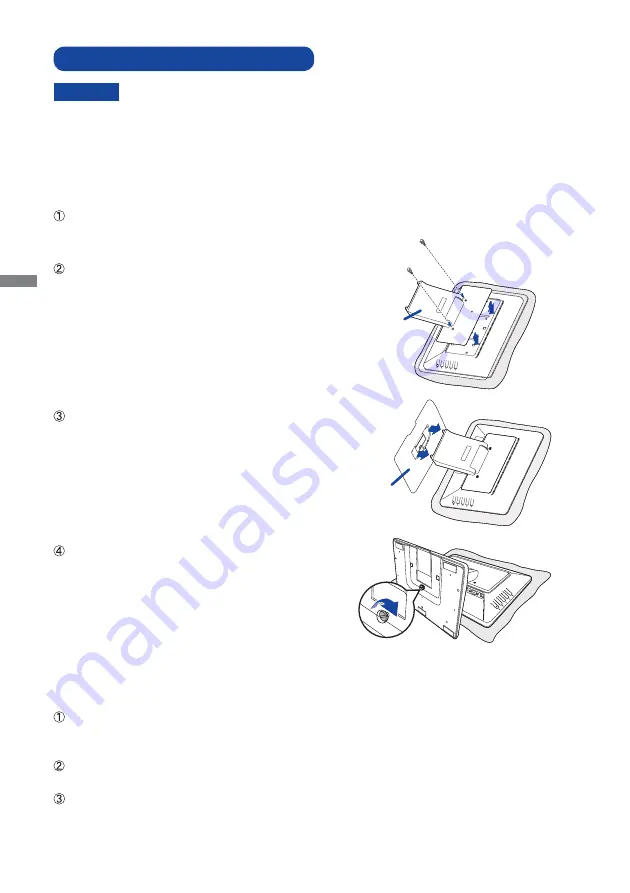
<Removal>


Put a piece of soft cloth on the table beforehand to 
prevent  the  monitor  from  being  scratched.  Lay  the 
monitor fl at on a table with front face down. 

  Pull  the  knob  upwards,  then  unfix  the  screw  and 

remove the Stand-Base.

  Remove the screws and the Stand.

<Installation>


Put a piece of soft cloth on the table beforehand to 
prevent  the  monitor  from  being  scratched.  Lay  the 
monitor fl at on a table with front face down. 

  Align the tabs on the stand with the grooves on the 

back of the monitor, and then place the stand on the 
back of the monitor. Attach the stand to the back of 
the monitor by tightening the supplied screws.

  Align the tabs on the stand with the grooves on the 

base, and then place the Stand-Base on the stand.

  Attach the Stand-Base to the stand by tightening the 

thumb screw.

Screw

Stand 

Stand-Base

Thumb screw for Stand-Base fi xing

Содержание ProLite T1721MSC

Страница 1: ...ing the iiyama LCD monitor We recommend that you take a few minutes to read this comprehensive manual carefully before installing and switching on the monitor Please keep this manual in a safe place f...

Страница 2: ...ENGLISH...

Страница 3: ...CONFORMITY This LCD monitor complies with the requirements of the EC EU Directive 2014 30 EU EMC Directive 2014 35 EU Low Voltage Directive 2009 125 EC ErP Directive and 2011 65 EU RoHS Directive The...

Страница 4: ...PECIAL NOTES ON TOUCH PANEL 5 WALL MOUNTING 5 BUILT IN EQUIPMENT 5 FITTING AND REMOVAL OF BASE 6 CONTROLS AND CONNECTORS 7 CONNECTING YOUR MONITOR 8 COMPUTER SETTING 9 ADJUSTING THE VIEWING ANGLE 10 O...

Страница 5: ...WATER Do not use where water may be splashed or spilt onto the monitor as it may cause re or electric shock OPERATE UNDER THE SPECIFIED POWER SUPPLY Be sure to operate the monitor only with the speci...

Страница 6: ...CT THE CABLES WHEN YOU MOVE THE MONITOR When you move the monitor turn o the power switch unplug the monitor and be sure the signal cable is disconnected If you do not disconnect them it may cause re...

Страница 7: ...nitor when cleaning unplug the power cable immediately and contact your dealer or iiyama service center To protect the Touch screen surface do not scratch or rub the screen with a hard object Never us...

Страница 8: ...Adapter Type Name ADP 40DD B P N ADP 40GD BG DELTA ELECTRONICS INC 3 An approved power cord greater or equal to H05VVF 3G 0 75mm2 must be used AC Adapter Power Cable VGA D sub Signal Cable DVI D Sign...

Страница 9: ...Screw Chassis Mounting Stage L WARNING Permanent damage can occur if Sharp Edged Pointed or Metal items are used to activate Touch This could invalidate any remaining warranty We recommend to use a pl...

Страница 10: ...ull the knob upwards then unfix the screw and remove the Stand Base Remove the screws and the Stand Installation Put a piece of soft cloth on the table beforehand to prevent the monitor from being scr...

Страница 11: ...ton Down Right Button Return Exit Button Power Switch Power Indicator Green Lighting Normal operation Green Flash Power Management Keyhole for Security Lock Audio Connector USB Connector VGA D sub min...

Страница 12: ...ower supply Turn on your monitor and computer The signal cables used for connecting the computer and monitor may vary with the type of computer used An incorrect connection may cause serious damage to...

Страница 13: ...oftware Touch screen driver software and system may not start when you start your computer while touching he screen Touch screen driver software may not run due to the power saving function depending...

Страница 14: ...el so that the monitor does not topple when you change the monitor s angle You are able to adjust the monitor s angle up to 70 degrees upward 10 degrees downward Do not touch the LCD screen when you c...

Страница 15: ...tton operations are aborted during adjustment On Screen Display disappears when the time set for the OSD Time has passed button can be used to return previous menu item Any changes are automatically s...

Страница 16: ...SWITCH is Unlocked O On The OSD menu is Locked The OSD menu is Unlocked LOCK MODE Pressing and holding of the Button for 3 4 seconds when the Menu is not displayed The OSD menu is not displayed when t...

Страница 17: ...when you are using the monitor in a dark room and feel the screen is too bright Backlight Brightness Contrast Sharpness PICTURE Backlight Sharpness 0 1 2 3 4 You can change the picture quality from 0...

Страница 18: ...Pixel Clock and Phase automatically 1 For best results use the Auto Adjust in conjunction with the adjustment pattern See page 18 for SCREEN ADJUSTMENTS 2 See page 18 for SCREEN ADJUSTMENTS DISPLAY D...

Страница 19: ...Standard Typical Blue light is reduced Standard Low Blue Light Picture Mode Adjustment Item Problem Option Button to Press INPUT INPUT VGA DVI When only one of the two signal inputs is connected to t...

Страница 20: ...D V Position Reset Factory preset data is restored Language English Deutsch English German Fran ais French Italiano Italian Espa ol Spanish OTHER Reset OSD Time English OSD H Position OSD V Position L...

Страница 21: ...ATION INFORMATION VGA 800x600 60 2Hz See your graphic card user guide for more information about changing the resolution and refresh NOTE Displays information regarding the current input signal coming...

Страница 22: ...s case manual adjustments are required There are two ways to adjust the screen One way is automatic adjustment for H V Position Pixel Clock and Phase The other way is performing each adjustment manual...

Страница 23: ...cture may icker during the Pixel Clock H V Position adjustment In case the picture frame is bigger or smaller than the data display area after the Pixel Clock adjustment repeat steps from 2 Stretch th...

Страница 24: ...he refresh rate of computer to low 60Hz and repeat steps from again Adjust the H Position after the Phase adjustment if the horizontal position moves during the adjustment Adjust the Brightness and Co...

Страница 25: ...duces the power consumption to less than 3W The screen becomes dark From Power Management Mode the image reappears in several seconds when either the keyboard or the mouse are touched again The power...

Страница 26: ...monitor is in power management mode touch the keyboard or the mouse T h e s c r e e n position is not in the center The signal timing of the computer is within the speci cation of the monitor The scr...

Страница 27: ...ENGLISH RECYCLING INFORMATION 23 For better environment protection please don t dispose your monitor Please visit our web site www iiyama com recycle for monitor recycling RECYCLING INFORMATION...

Страница 28: ...een Size 338 0mm W 270 5mm H 13 3 W 10 6 H Power Source 12VDC 2A Environmental Considerations Approvals CB CE T V Bauart CU cULus Tilt Angle USB peripherals Audio equipment are not connected NOTE Brig...

Страница 29: ...9 940Hz 75 000Hz 70 080Hz 56 250Hz 60 317Hz 75 000Hz 60 004Hz 75 029Hz 60 020Hz 75 025Hz VESA SVGA VGA XGA 1024 768 640 480 800 600 Horizontal Frequency 31 469kHz 37 500kHz 31 470kHz 35 156kHz 37 879k...

Отзывы: