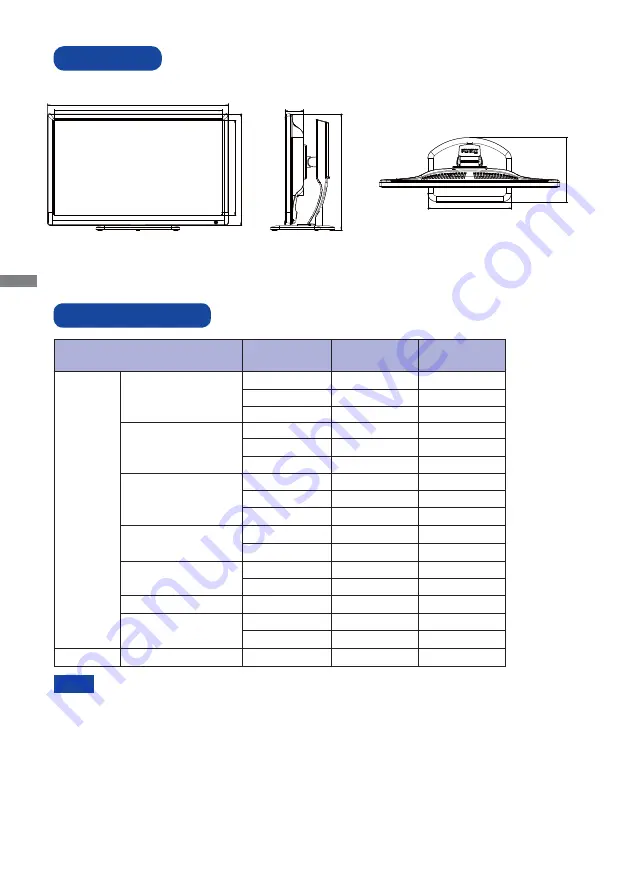
background image

ENGLISH

24  APPENDIX

DIMENSIONS

M089A23

COMPLIANT TIMING

Dot Clock

25.175MHz

31.500MHz

31.500MHz

36.000MHz

40.000MHz

49.500MHz

65.000MHz

75.000MHz

78.750MHz

108.000MHz

135.000MHz

106.500MHz

136.750MHz

146.250MHz

138.500MHz

285.50MHz

21.053MHz

Vertical

Frequency

59.940Hz

75.000Hz

72.809Hz

56.250Hz

60.317Hz

75.000Hz

60.004Hz

70.069Hz

75.029Hz

60.020Hz

75.025Hz

59.887Hz

74.984Hz

60.000Hz

59.930Hz

119.98Hz

56.424Hz

VESA

SVGA

VGA

XGA

1024 × 768

640 × 480

800 × 600

Horizontal 

Frequency

31.469kHz

37.500kHz

37.861kHz

35.156kHz

37.879kHz

46.875kHz

48.363kHz

56.476kHz 

60.023kHz

63.981kHz

79.976kHz

55.935kHz

70.635kHz

65.290kHz

66.590kHz

137.260kHz

24.827kHz

Video Mode

SXGA

1280 × 1024

*

DVI input only. Use the attached DVI-D dual-link signal cable.

*

2

 Digital input is not compliant.

*

1

*

2

PC9801

640 × 400

WXGA+ 1440 × 900

WSXGA+ 1680 × 1050

Full HD

1920 × 1080

PC Input

NOTE

600.0mm/23.6”

647.0mm/25.5”

338.0mm/13.3”

399.5mm/15.7”

66.0mm/2.6”

415.5mm/16.4”(522.5mm/20.6”)

300.0mm/11.8”

230.0mm/9.1”

(    ) : Maximum adjustment range

Содержание ProLite GB2773HS

Страница 1: ...hoosing the iiyama LCD monitor We recommend that you take a few minutes to read carefully through this brief but comprehensive manual before installing and switching on the monitor Please keep this manual in a safe place for your future reference ...

Страница 2: ......

Страница 3: ...e Web page of different countries from there CE MARKING DECLARATION OF CONFORMITY This LCD monitor complies with the requirements of the EC EU Directive 2004 108 EC EMC Directive 2006 95 EC Low Voltage Directive 2009 125 EC ErP Directive and 2011 65 EU RoHS Directive The electro magnetic susceptibility has been chosen at a level that gives correct operation in residential areas business and light ...

Страница 4: ... PACKAGE 4 WALL MOUNTING 5 FITTING AND REMOVAL OF BASE 6 CONTROLS AND CONNECTORS 7 CONNECTING YOUR MONITOR 8 COMPUTER SETTING 9 ADJUSTING THE HEIGHT AND THE VIEWING ANGLE 9 PANEL ROTATION 9 OPERATING THE MONITOR 10 ADJUSTMENT MENU CONTENTS 11 SCREEN ADJUSTMENTS 17 POWER MANAGEMENT FEATURE 20 TROUBLE SHOOTING 21 RECYCLING INFORMATION 22 APPENDIX 23 SPECIFICATIONS 23 DIMENSIONS 24 COMPLIANT TIMING 2...

Страница 5: ...ENGLISH ...

Страница 6: ...y cause fire electric shock or damage INSTALL THE MONITOR ON A FLAT STABLE SURFACE The monitor may cause an injury if it falls or is dropped DO NOT USE THE MONITOR NEAR WATER Do not use where water may be splashed or spilt onto the monitor as it may cause fire or electric shock OPERATE UNDER THE SPECIFIED POWER SUPPLY Be sure to operate the monitor only with the specified power supply Use of an in...

Страница 7: ...MOVE THE MONITOR When you move the monitor turn off the power switch unplug the monitor and be sure the signal cable is disconnected If you do not disconnect them it may cause fire or electric shock UNPLUG THE MONITOR If the monitor is not in use for a long period of time it is recommended that it is left unplugged to avoid accidents HOLD THE PLUG WHEN DISCONNECTING To disconnect the power cable o...

Страница 8: ...e it by yourself SPECIAL NOTES ON LCD MONITORS If you have to return your unit for service and the original packaging has been discarded please contact your dealer or iiyama service center for advice or replacement packaging WARNING If you drop any materials or liquids such as water into the monitor when cleaning unplug the power cable immediately and contact your dealer or iiyama service center C...

Страница 9: ...ay Digital Character Smoothing Automatic Set up Stereo Speakers 2 2 5W Stereo Speakers Plug Play VESA DDC2B Compliant Windows XP Vista 7 8 Compliant Power Management ENERGY STAR VESA DPMS Compliant VESA Mounting Standard 100mm 100mm Compliant Keyhole for Security Lock The rating of the Power Cable enclosed in 120V area is 10A 125V If you are using a power supply higher than this rating then a powe...

Страница 10: ... Screw with washer which L length is 7mm to fasten the monitor Using the screw longer than this may cause electric shock or damage because it may contact with the electrical parts inside the monitor Please check if the wall or ceiling can support the weight of the monitor before mounting it WALL MOUNTING WARNING Screw Chassis Mounting Stage L ...

Страница 11: ... a table with front face down B Remove thumb screw to remove base from monitor column Installation A Put a piece of soft cloth on the table beforehand to prevent the monitor from being scratched Lay the monitor flat on a table with front face down B Lift the arm of the stand C Hold the monitor and push the Stand Base D Use thumb screw provided to secure base to monitor column Stopper Put the monit...

Страница 12: ...st Button Scroll down i Style Color Button Menu Button Speakers Keyhole for Security Lock You can fasten a security lock and cable to prevent the monitor from being removed without your permission Headphone connector EARPHONE Audio Connector AUDIO IN HDMI Connector HDMI DVI D 24pin Connector DVI D SUB mini 15pin Connector VGA Cable Holes AC Connector AC POWER IN Front Back NOTE NOTE 100 ...

Страница 13: ... type of computer used An incorrect connection may cause serious damage to both the monitor and the computer The cable supplied with the monitor is for a standard connector If a special cable is required please contact your local iiyama dealer or regional iiyama office For connection to Macintosh computers contact your local iiyama dealer or regional iiyama office for a suitable adaptor Make sure ...

Страница 14: ... panel so that the monitor does not topple when you change the monitor s height or angle You are able to adjust the monitor s height up to 107mm minimum angle up to 45 degrees right and left 17 degrees upward Do not touch the LCD screen when you change the height or the angle It may cause damage or break the LCD screen Careful attention is required not to catch your fingers or hands when you chang...

Страница 15: ...ically saved in the memory when the On Screen Display disappears Turning off the power should be avoided while using the Menu Adjustments for H V Position Clock and Phase are saved for each signal timing Except for these adjustments all other adjustments have only one setting which applies to all signal timings For example to correct for vertical position select Menu item of Manual Image Adjust an...

Страница 16: ...ton to Press Auto Image Adjust Auto Image Adjust Auto Image Adjust Adjust H V Position Clock and Phase automatically For best results use the Auto Image Adjust in conjunction with the adjustment pattern See page 17 for SCREEN ADJUSTMENTS Only Analog Input You can skip the Menu items and display an adjustment scale directly by using the following button operations Auto Image Adjust Pressing and hol...

Страница 17: ...ource and select automatically Select the HDMI input HDMI NOTE Volume Too soft Too loud Adjustment Item Problem Option Button to Press Audio Adjust Audio Adjust Mute You can skip the Menu items and display an adjustment scale directly by using the following button operations Audio Adjust Press the Button when the Menu is not displayed Mute Pressing and holding of the Button for about 2 seconds whe...

Страница 18: ...s environment and monitor default setting Text For text editing and viewing in a word processing environment Game For PC game environment Cinema For movie and video environment Scenery For displaying outdoor scenery images Information Information Information H Frequency V Frequency Resolution Pixel Clock Model Number 67 56KHz 60 0Hz 1920 x 1080 148 5MHz GB2773HS Exit See your graphic card user gui...

Страница 19: ...4 3 5 4 or 16 10 4 Set the screen resolution at less than 1920x1080 Expansion display Full Screen Over Screen Expansion display of Aspect Adjustment Item Problem Option Button to Press Manual Image Adjust Manual Image Adjust Clock 1 H V Position 1 2 H Position V Position Phase 1 Adjust the picture quality at resolutions of less 1920 x 1080 You can change the picture quality 3 steps Sharpness Aspec...

Страница 20: ...Adjustment Item Problem Option Button to Press Setup Menu Setup Menu Language Select OSD Position OSD Time Out OSD Background LED Retune the background of OSD Off The background of OSD is mode transparent On The Power Indicator is turned On Off The Power Indicator is rurned Off On Turn Off the Power Indicator when you are bothered by the light NOTE Adjustment Item Problem Option Button to Press Me...

Страница 21: ...l be deactivated by pressing the front buttons and again for 10 seconds Power Switch 1 The power switch lock will be activated by pressing the front buttons and for 10 seconds Locking the power switch means that won t be able to turn off the Monitor while the power switch is locked If presses the power switch message Power Button Locked will appear on the screen 2 The power switch lock will be dea...

Страница 22: ... other than the screen adjustment pattern In this case manual adjustments are required There are two ways to adjust the screen One way is automatic adjustment for Position Clock and Phase The other way is performing each adjustment manually Perform the Auto Image Adjust first when the monitor is connected to a new computer or resolution is changed If the screen has a flicker or blur or the picture...

Страница 23: ...k H Position and V Position adjustment In case the picture frame is bigger or smaller than the data display area after the Clock adjustment repeat steps from C 2 Stretch the right side of the picture frame to the right edge of the display area by adjusting the Clock C Pressing and holding of the Button for about 2 seconds Auto Image Adjust D Adjust the image manually by following procedure below w...

Страница 24: ...he refresh rate of computer to low 60Hz and repeat steps from C again Adjust the H Position after the Phase adjustment if the horizontal position moves during the adjustment G Adjust the Phase to correct horizontal wavy noise flicker or blur in the zebra pattern NOTE H Adjust the Brightness and Color to get the desired picture after you complete the Clock and Phase adjustments Put back your favori...

Страница 25: ...e screen becomes dark and the power indicator turns to orange From Power Management Mode the image reappears in several seconds when either the keyboard or the mouse are touched again The power management feature of this product complies with power saving requirement of ENERGY STAR and VESA DPMS When activated it automatically reduces unnecessary power consumption of the monitor when your computer...

Страница 26: ...reen saver is in active mode touch the keyboard or the mouse Increase the Contrast and or Brightness The computer is ON The Signal Cable is properly connected The signal timing of the computer is within the specification of the monitor If the monitor is in power management mode touch the keyboard or the mouse The computer is ON The Signal Cable is properly connected The signal timing of the comput...

Страница 27: ...equipment is within the specification of the monitor The audio output level of the audio equipment is within the specification of the monitor The Audio Cable is properly connected The sound is too loud or too quiet A strange noise is heard For better environment protection please don t dispose your monitor Please visit our web site www iiyama com recycle for monitor recycling RECYCLING INFORMATION...

Страница 28: ...nsions Net Weight 647 0 415 5 522 5 230 0mm 25 5 16 4 20 6 9 1 W H D 7 4kg 16 3lbs Upward 17 degrees Left Right 45 degrees each Viewable angle Right Left 85 degrees each Up Down 80 degrees each Typical Maximum Screen Size 597 9mm W 336 3mm H 23 5 W 13 2 H Power Source 100 240VAC 50 60Hz 0 9A Environmental Considerations Approvals CE TÜV Bauart GOST R ENERGY STAR Tilt Angle Brightness Contrast rati...

Страница 29: ...z 119 98Hz 56 424Hz VESA SVGA VGA XGA 1024 768 640 480 800 600 Horizontal Frequency 31 469kHz 37 500kHz 37 861kHz 35 156kHz 37 879kHz 46 875kHz 48 363kHz 56 476kHz 60 023kHz 63 981kHz 79 976kHz 55 935kHz 70 635kHz 65 290kHz 66 590kHz 137 260kHz 24 827kHz Video Mode SXGA 1280 1024 1 DVI input only Use the attached DVI D dual link signal cable 2 Digital input is not compliant 1 2 PC9801 640 400 WXGA...

Отзывы: