Misprints, errors and technical changes reserved
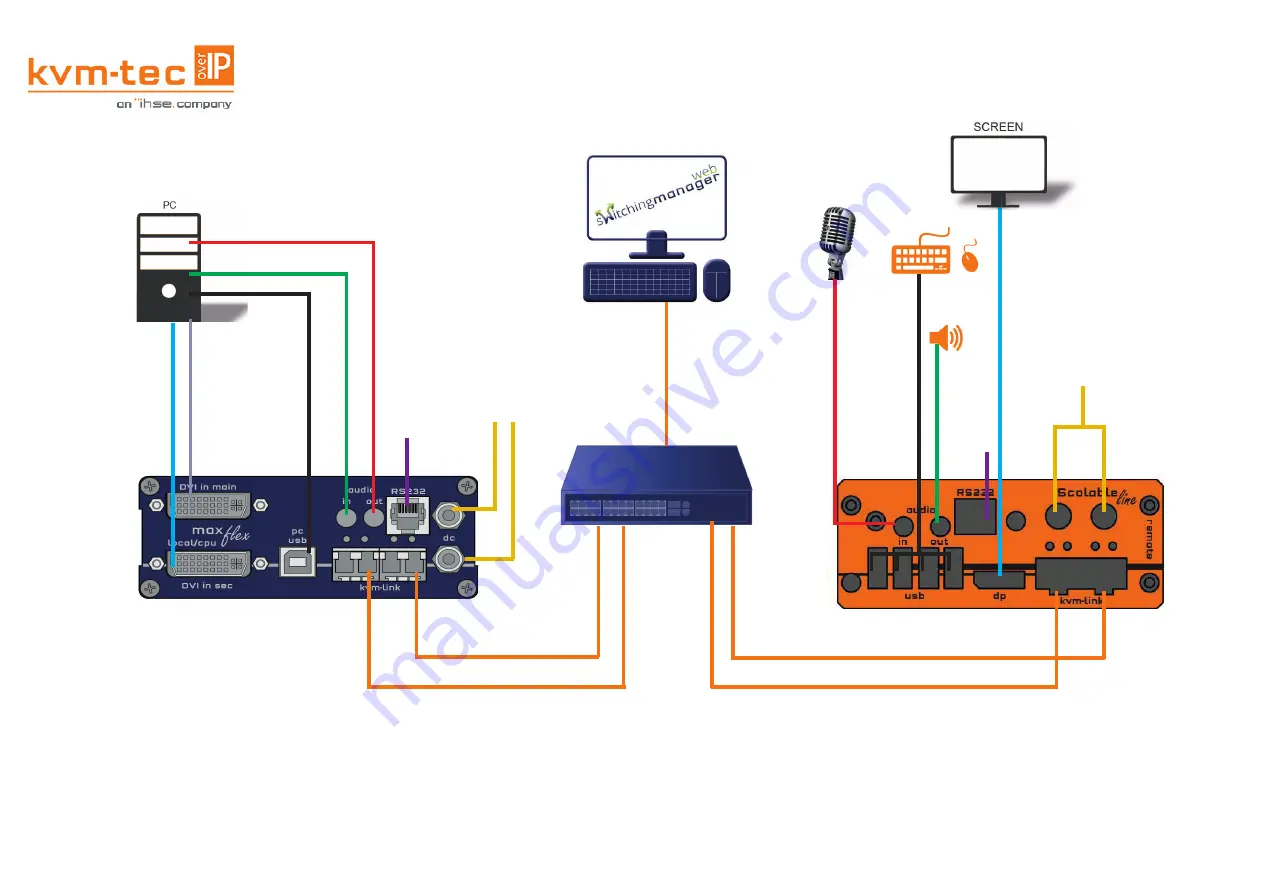
1. Connect the CON/Remote and the CPU/Local Unit with the supplied 12V 3A power supply.
2. Now connect the USB cable to a USB socket of your PC and connect the other end of the USB cable to the Local Unit.
Connect the keyboard and mouse to the Remote Unit.
3. Connect the Local and the Remote Unit with a network fi ber cable.
4.Connect the Local Unit with a DVI compatible cable to the PC and connect the monitor on the remote side with the DP
cable.
5. Connect the Audio cable from PC to Local Extender and connect the Audio cable from Remote Extender to Speaker
6. Connect the Audio Cable from Microphone to Remote Extender and connect the Audio cable from Local Extender to PC.
HAVE FUN - Your kvm-tec Extender is now in use for many years (MTBF approx. 10 years)!
DP out to Monitor
USB from keyboard and mouse
power supply
for 12V 3A
Audio out to loudspeaker
power supply
for 12V 3A
DVI in 1 to PC
USB to PC
Audio in from PC
Audio out to PC
Audio in from Microphon
RS232
plug
RS232
plug
DVI in 2 to PC DVI in 2 from PC - not in use in this version
Duplex multimode
OM4-fi bercable (LC)
up to 300m/984ft main link 1
Duplex multimode OM4-fi bercable (LC)
up to 300m(984ft main link 1
Duplex multimode OM4-fi bercablel (LC)
bis zu 300m main link 2
Duplex multimode OM4-fi bercable (LC)
up to 300m/984ft main link 2
10G Switch
Is the Switching Manager confi gured correctly?
A test for the correct confi guration of the network switch (Layer3)
is built into the Switching Manager.
You can fi nd this test under „General Settings


