background image

iBTW39

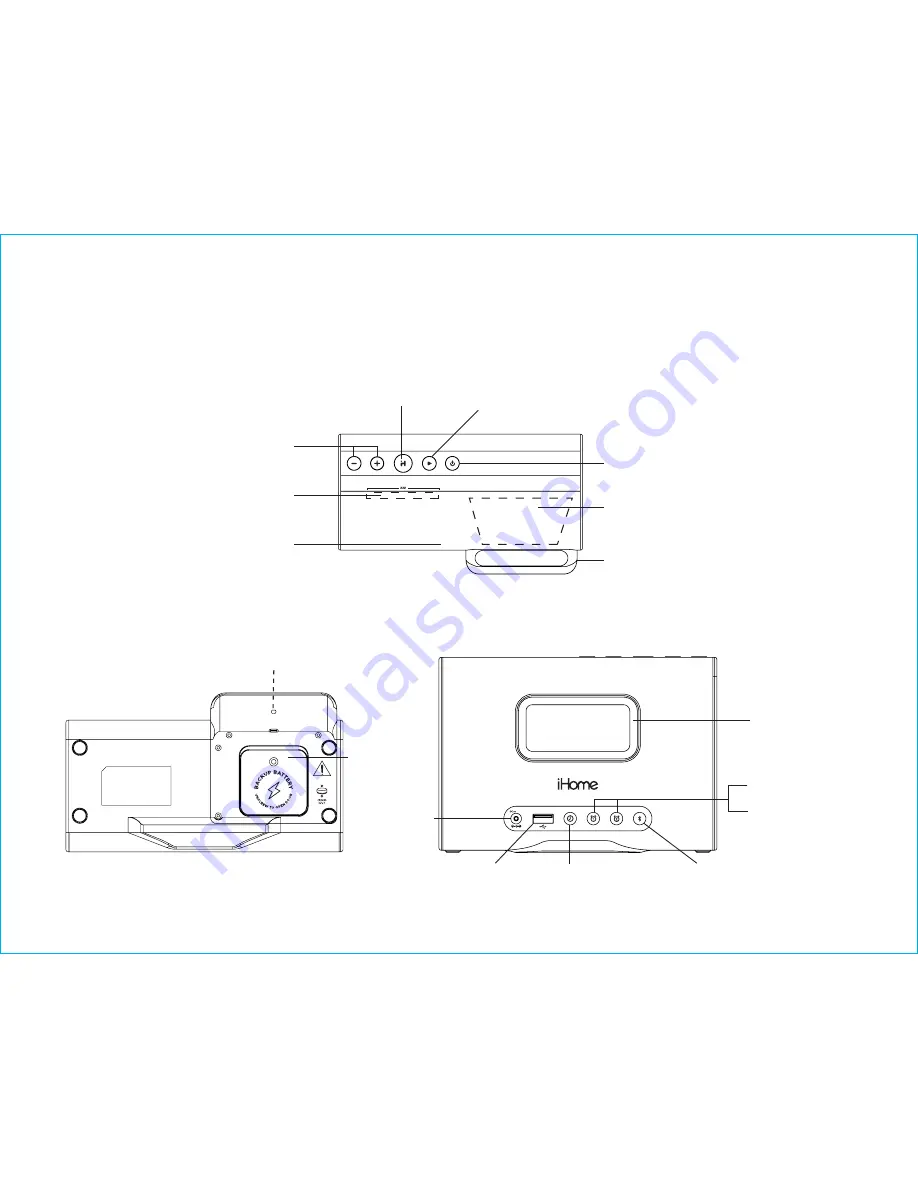
Meet Your iBTW39

Top

Bottom

Back

Bluetooth

Pairing Button

Snooze/Display 

Dimmer Cap Touch Button

(Beneath Fabric)

Microphone

Alarm 1 Button

Speaker

Alarm 2 Button

Power Button

Play/Pause/Voice Control Button

Smart Button

DC Jack

Battery Door

USB Charging Port

Backup Battery Compartment

Time Set Button

+/– Settings/Volume 

Buttons

Wireless Charging Pad

(under fabric)

Wireless Charging Indicator

(below charging rest)

Device Charging Rest

9V, 3A

2

Содержание iBTW39

Страница 1: ...Model iBTW39 instruction manual Questions Contact Customer Service at 1 800 288 2792 Bluetooth Bedside Home Office Speaker System with Qi Wireless Charging ...

Страница 2: ...th audio device It will also wirelessly charge compatible devices For more features download the iHome Enhance app to extend the possibilities of this product This instruction booklet explains the basic operation and care of the unit Please read it carefully and keep for future reference 1 Included iBTW39 system 100V 240V universal AC adapter ...

Страница 3: ...crophone Alarm 1 Button Speaker Alarm 2 Button Power Button Play Pause Voice Control Button Smart Button DC Jack Battery Door USB Charging Port Backup Battery Compartment Time Set Button Settings Volume Buttons Wireless Charging Pad under fabric Wireless Charging Indicator below charging rest Device Charging Rest 9V 3A 2 ...

Страница 4: ...Display Low Backup Battery Indicator Red LED Connect the AC adaptor Powering Up the Unit Connect the included AC adapter to the DC jack located on the back of the unit and connect the other end to a working wall outlet not controlled by a light switch A CR2450 3V battery is included for battery backup See page 11 for more on installing and replacing backup batteries ...

Страница 5: ... yes when asked if you want to pair Once connected the iHome Enhance app will automatically sync the clock on your iBTW39 You can also use the app to set alarms configure the Smart Button and more The Smart Button is a customizable preset for music and smart home control Learn more and configure the button in your iHome Enhance app Note Smart Button requires an active Bluetooth connection and the ...

Страница 6: ...elease the Time Set Button to confirm the current month setting The Date will flash on the display Press the or Buttons to set the correct date hold for rapid adjustment 7 Press and release the Time Set Button to confirm the date 2 beeps will sound to indicate time setting mode is complete Setting and Using the Alarm This unit features dual alarms which can be set to different times and alarm sour...

Страница 7: ...f the four built in wake to tones t1 t4 5 Press the Alarm Button to confirm the alarm source The volume display will flash 6 Press the or Buttons to adjust the alarm volume Note that the alarm volume setting is stored separately from other volume settings 7 Press the Alarm Button to confirm the alarm settings and exit alarm setting mode 2 beeps will confirm alarm setting is complete The alarm icon...

Страница 8: ...n to confirm Snooze setting 2 beeps will sound 4 While the alarm is sounding touch and release the Snooze Display Dimmer Button to temporarily silence the alarm for the set duration 9 minutes is the default Snooze can be used several times during the 1 hour alarm sounding time 5 To adjust the brightness of the display touch and release the Snooze Display Dimmer Button during normal operation when ...

Страница 9: ...tooth Button after powering on see step 3 below 3 Press and hold the Bluetooth Button on back of the iBTW39 for 2 seconds PAIR will appear on the display and the Bluetooth indicator will flash blue a voice prompt will announce PAIRING indicating the iBTW39 is in pairing mode 4 Select iHome iBTW39 in your device s Bluetooth menu to connect device If prompted for a passcode enter 1234 on your device...

Страница 10: ...play Press the Button to answer the call press and hold the Button to ignore the call 2 Press the Button to end the call and resume previous function Using the Voice Control feature NOTE The unit must be powered on and linked to an iOS or Android Bluetooth device to use Voice Control Press and hold the Button for 2 seconds CALL will appear on the display Wait for a beep to activate voice control w...

Страница 11: ...looking finishes will charge normally Place Qi compatible device on charging rest with front facing you Check the green wireless charging indicator LED below the charging rest Rapid blinking green LED Device is not charging properly Reposition device Slow blinking green LED Device is charging properly Solid green LED Device is charged some devices do not support this feature Note The wireless char...

Страница 12: ...t is located on the bottom of the unit 1 Please make sure the AC adaptor is connected otherwise all settings may be lost during battery replacement 2 Use a Phillips screwdriver to remove the battery compartment cover located on the bottom of the unit 3 Remove exhausted battery Insert 1 CR2450 battery checking that the side is facing you Replace the compartment door Do not over tighten Note Make su...

Страница 13: ...nnected to an outlet controlled by a switch Make sure volume is up on your Bluetooth device and on unit Unit doesn t respond locked up or frozen The unit may need to be reset To do so unplug the unit from power source and remove the backup battery Let unit stand for 2 minutes Re install backup battery and connect unit to power source You will need to reset the clock Bluetooth and any other setting...

Страница 14: ...ded by the product manufacturer 9 Lightning and Power Surge Protection Unplug the unit from the wall socket and disconnect the antenna or cable system during a lightning storm or when it is left unattended and unused for long periods of time This will prevent damage to the product due to lightning and power line surges 10 Overloading Do not overload wall sockets extension cords or integral conveni...

Страница 15: ...r is encouraged to try to correct the interference by one or more of the following measures Reorient or relocate the receiving antenna Increase the separation between the equipment and receiver Connect the equipment into an outlet on a circuit different from that to which the receiver is connected Consult the dealer or an experienced radio TV technician for help CAN ICES 3 B NMB 3 B CAN RSS 216 CN...

Страница 16: ... 2018 SDI Technologies Inc All rights reserved Questions Visit www ihome com or call 1 800 288 2792 Toll Free iBTW39 09262018 B Printed in China ...

Отзывы: