A CAUTION
Crashing down items
doubt the safety of a possible installation form
A CAUTION
When rigging the device, make sure there is no highly
(decoration articles, etc.) within a distance of min.
Mount the projector with the mounting
During overhead installation the projector must be always secured by a safety rope which is designed
to hold the twelvefold weight of the device
elements may be used. Hang up the safety rope in the hole of the mounting bracket. Direct the rope
over the truss or an appropriate fastening point
the locking nut. A safety rope once exposed to falling load or damaged may not be used furthermore
Adjust the desired inclination angle via the mounting
1.1.3. Cleaning and Maintenance
Contaminations like dust should be removed
not use alcohol or solvents under any circumstances
mechanical facilities are inspected by a skilled person once a year.
•
Ensure all screws attached to the
corroded.
•
Make sure there are no deformations of the housing, attachment and installation spot.
This also includes the ceiling, the suspension and the truss
•
Electrical connection cables may not have an
fatigue e.g. porous connections
Important:
Damages caused by the disregard of this user manual are not subject to
warranty. The dealer will not accept liability for any resulting defects or problems.
Make sure the electrical connection is carried out
and mechanical connections have to be carried out according to the European safety
standards.
2. Introduction
Congratulations to your purchase and thank you for selecting one of our products.
The Strip Blinder UV is a powerful silent lighting device. For successful installation and secure
operation and secure please read the user manual before starting operating
5 / 10
S T R I P B L I N D E R U V 5 X 4
items can cause serious injuries! Do not install the projector, if you
doubt the safety of a possible installation form!
the device, make sure there is no highly-inflammable material
(decoration articles, etc.) within a distance of min. 1.5 m.
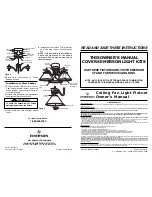
Mount the projector with the mounting-bracket to your trussing system using an appropriate clamp.
During overhead installation the projector must be always secured by a safety rope which is designed
to hold the twelvefold weight of the device. Only safety ropes with quick-release safety fastener
Hang up the safety rope in the hole of the mounting bracket. Direct the rope
over the truss or an appropriate fastening point. Hang up the end in the fastening element and tie up
A safety rope once exposed to falling load or damaged may not be used furthermore
Adjust the desired inclination angle via the mounting-bracket and tighten the screw.
Cleaning and Maintenance
Contaminations like dust should be removed regularly from the device. Use a damp, lint free, cloth. Do
not use alcohol or solvents under any circumstances. Please make sure that safety
are inspected by a skilled person once a year.
Ensure all screws attached to the device or parts of the device are very tight and not
there are no deformations of the housing, attachment and installation spot.
This also includes the ceiling, the suspension and the truss.
Electrical connection cables may not have any damages, depositions or signs of material
fatigue e.g. porous connections.
Damages caused by the disregard of this user manual are not subject to
warranty. The dealer will not accept liability for any resulting defects or problems.
electrical connection is carried out by qualified personnel
and mechanical connections have to be carried out according to the European safety
Congratulations to your purchase and thank you for selecting one of our products.
is a powerful silent lighting device. For successful installation and secure
operation and secure please read the user manual before starting operating with the device.
S T R I P B L I N D E R U V 5 X 4 W
install the projector, if you
inflammable material
bracket to your trussing system using an appropriate clamp.
During overhead installation the projector must be always secured by a safety rope which is designed
release safety fastener
Hang up the safety rope in the hole of the mounting bracket. Direct the rope
Hang up the end in the fastening element and tie up
A safety rope once exposed to falling load or damaged may not be used furthermore.
bracket and tighten the screw.
regularly from the device. Use a damp, lint free, cloth. Do
safety-related and
device or parts of the device are very tight and not
there are no deformations of the housing, attachment and installation spot.
y damages, depositions or signs of material
Damages caused by the disregard of this user manual are not subject to
warranty. The dealer will not accept liability for any resulting defects or problems.
by qualified personnel. All electrical
and mechanical connections have to be carried out according to the European safety
Congratulations to your purchase and thank you for selecting one of our products.
is a powerful silent lighting device. For successful installation and secure
with the device.


