background image

26

Managing Access in App

3

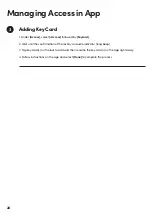
Adding Key Card

1. Under 

[Access]

, select 

[+Access]

 followed by 

[Keycard]

.

2. Wait until the confirmation of the lock by an audio indicator (long beep).

3. Tap key card(s) on the lock to add and then rename the key card(s) on the App right away.

4. Follow instructions on the app and select 

[Done]

 to complete the process.

Содержание RW1

Страница 1: ...1 Version 0 1 12 21 Installers User guide Rim Lock for Wooden Door RW1...

Страница 2: ...manual Please refer to our website igloohome co support for the latest version of the manual Welcome This guide will get you up and running with your Rim Lock for Wooden Door In the meantime you shoul...

Страница 3: ...cing Batteries 8 Installation Instructions 9 User Guide Lock Anatomy 14 Features 15 Unlocking from the Outside 17 Unlocking from the Inside 19 Locking from the Outside 22 Locking from the Inside 23 Ap...

Страница 4: ...ncluded Front Assembly BackAssembly Base Plate AAAlkaline Batteries x4 Installation Guide Drill Sheet Screws RFID Tags x2 RFID Stickers x2 Shim Plates Striker 1 5mm x2 2 5mm x2 3 5mm x2 X 4 X 4 X 2 X...

Страница 5: ...nt Assembly Material Aluminum DC ABS PC BackAssembly Material Zinc ABS Stainless Steel Weight Net 1 4kg Gross 1 5kg Unlock Mechanism Bluetooth PIN code RFID Tags Stickers Front Back Side 179mm 73mm 24...

Страница 6: ...6 Measurements Supported Wooden DoorThickness 25 60 mm 30mm Backset 50mm default DoorThickness InstallationGuide Requirements a Clearance a c b 90mm b c 179mm...

Страница 7: ...k Orientation BackAssemblyOrientation Left Hand Installation LH LockAssembly Orientation Right Hand Installation RH LockAssembly Orientation Outside Hinge Hinge Outside Hinge is on your right Hinge is...

Страница 8: ...8 Installing Replacing Batteries Install or replace with 4 new AA alkaline batteries Remove the battery cover by sliding it off Close the battery cover by sliding it back into place Battery Cover...

Страница 9: ...ring the BackAssembly Remove both screws from the back assembly in order to remove the base plate Screws PHM4X33 Door Preparation Using the provided drill sheet drill a 32mm diameter hole where the lo...

Страница 10: ...with the provided screws NOTE The length of screws to be used depends on the thickness of your door Installing the Front Assembly Screws Screws BHM5X25 x2 for24 35mm door STFH4X20 x6 BHM5X35 x2 for35...

Страница 11: ...x4 5 Align the back assembly with the base plate and secure it with four screws 6 Installing the BackAssembly Inserting the Connecting Cable Insert the connecting cable firmly into the back assembly...

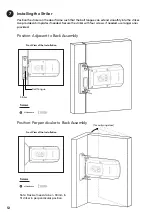
Страница 12: ...eded Secure the striker with four screws if needed use longer ones provided Screws STFH4X25 x4 Front View of the Installation Position Adjacent to Back Assembly Screws STFH4X25 x4 Front View of the In...

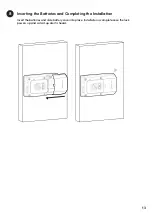
Страница 13: ...13 Inserting the Batteries and Completing the Installation Insert the batteries and slide battery cover into place Installation is complete once the lock powers up and a start up alert is heard 8...

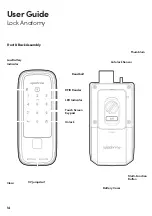
Страница 14: ...nt BackAssembly Touch Screen Keypad Unlock 9V Jumpstart Clear Multi Function Button Low Battery Indicator Auto lock Sensor Battery Cover User Guide Lock Anatomy LED Indicator Thumbturn Deadbolt RFID R...

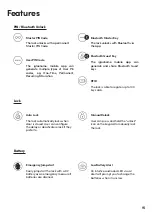
Страница 15: ...uetooth Master Key The lock unlocks with Bluetooth via the app Master PIN Code The lock unlocks with a permanent Master PIN Code User PIN Code The igloohome mobile app can generate multiple types of U...

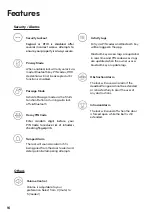
Страница 16: ...bled Volume Control Volume is adjustable to your preference Select from 0 mute to 5 loudest Others Security Alarms Passage Mode Activate Passage mode via the Multi Function Button or turning auto lock...

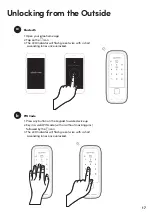
Страница 17: ...n twice with 4 short ascending tones once unlocked Bluetooth Rim Lock for Wooden Door Home PIN Code 1 Press any button on the keypad to wake device up 2 Key in a valid PIN code with or without masking...

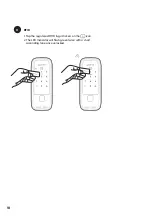
Страница 18: ...18 c RFID 1 Tap the registered RFID tags stickers on the icon 2 The LED Indicator will flash green twice with 4 short ascending tone once unlocked...

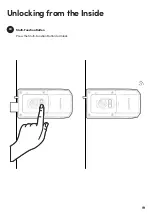
Страница 19: ...19 Unlocking from the Inside Multi Function Button a Press the Multi Function Button to Unlock...

Страница 20: ...20 b Bluetooth Unlock 1 Open your igloohome app 2 Tap on icon 3 The LED indicator will flash green twice with 4 short ascending tones once unlocked Rim Lock for Wooden Door Home...

Страница 21: ...21 Thumbturn Twist the thumbturn in an anti clockwise direction to unlock c...

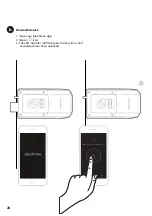
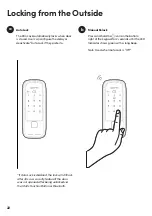
Страница 22: ...refer to Manual Relock b Press and hold the icon on the bottom right of the keypad for 2 seconds until the LED Indicator shows green with a long beep Note Used when Auto Lock is Off If Auto Lock is di...

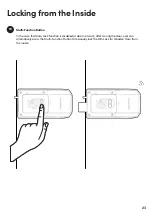
Страница 23: ...lti Function Button a In the case that Auto Lock function is disabled or does not work after closing the door user can alternatively press the Multi Function Button to manually lock the Rim Lock for W...

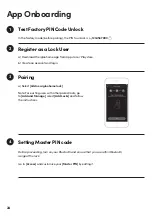
Страница 24: ...ccount and login Register as a Lock User 2 Pairing 3 4 Setting Master PIN code a Select Add new igloohome lock Note For existing users with other paired locks go to Add and Manage select Add Locks and...

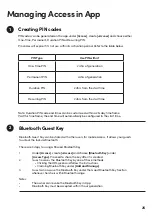
Страница 25: ...uests to unlock the lock via Bluetooth There are 3 steps to using a Shared Bluetooth Key 1 Under Access create Access and choose Bluetooth Key under Access Type Proceed to share the key after it is cr...

Страница 26: ...t Access followed by Keycard 2 Wait until the confirmation of the lock by an audio indicator long beep 3 Tap key card s on the lock to add and then rename the key card s on the App right away 4 Follow...

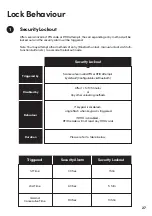
Страница 27: ...e triggered Note You may attempt other methods of entry Bluetooth unlock manual unlock via Multi Function button etc to override the lockout mode 5 consecutive invalid PIN orRFID attempts by default C...

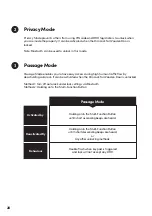
Страница 28: ...c flow by deactivating auto lock It can be activated when the Rim Lock for Wooden Door is unlocked Method 1 Turn off auto lock under lock settings via Bluetooth Method 2 Holding on to the Multi Functi...

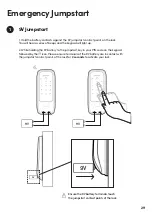
Страница 29: ...keypad will light up 2 While holding the 9V battery to the jumpstart key in your PIN code on the keypad followed by the icon Please ensure terminals of the 9V battery are in contact with the jumpstar...

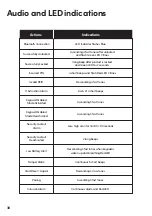
Страница 30: ...4 fast tones Actions Indications ObstructionAlarm Keypad Disabled ModeActivated Keypad Disabled Mode Deactivated Security Lockout Alarm Security Lockout Deactivated Low BatteryAlert 6 sets of4 short b...

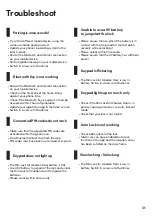
Страница 31: ...eries Bluetooth Key is not working Make sure that the generated PIN codes are activated within the given hours Do a Bluetooth Unlock to refresh the app PIN codes may have been customised or expired Ge...

Страница 32: ...lation Ifthisequipmentdoescauseharmfulinterferencetoradioortelevisionreception whichcanbe determinedbyturningtheequipmentoffandon theuserisencouragedtotrytocorrecttheinterferenceby oneormoreofthefollo...

Страница 33: ...32 For enquiries go to igloohome co support...

Отзывы: