


IFBR1C, IFBR1C-941, IFBR1C-VHF
IFBlue
6
3. Press and hold DOWN to clear the preset.
The E will appear and the preset number will blink,
indicating that the slot is now empty.
Setup Pages
Circular Navigation of Setup Pages
To access the setup pages, hold down the
PRESET
button while powering on. From there, use the
FREQ
or
PRESET
buttons to navigate circularly among the
setup pages. To leave the setup pages, power off and
on again.
Battery Type Selection
To access the battery selection option, hold down the
PRESET
button while powering on. bat L (Lithium) is the
default option. Use the
UP
or
DOWN
arrow to select Lithium
or
Alkaline.
Press the FREQ button to access aditional
setup items or turn the unit off to save the settings.
Backlight Settings
Press the
PRESET
button while powering on the re-
ceiver. Press
PRESET
again until the backlight time out
menu shows on screen. Use the
UP
and
DOWN
arrow
buttons to scroll through the options:
bL
: Backlight always on; default setting
bL 30
: Backlight times out after 30 seconds
bL 5
: Backlight times out after 5 seconds
Press the PRESET button to access aditional setup
items or turn the unit off to save the settings.
LED On/Off
Press the
PRESET
button while powering on the receiv-
er. Press the
FREQ
button to scroll through the setup
menu to the LED on/off page. Use the
UP
and
DOWN
arrow buttons to select LEDs ON or OFF.
Press the PRESET button to access aditional setup
items or turn the unit off to save the settings.
Locale (941 band only)
Press the
PRESET
button while powering on the
receiver. Press the
FREQ
button to scroll through the
setup menu to the Locale page “LC”. Use the
UP
and
DOWN
arrow buttons to select CA (Canada) or “=” all
other locations.
Press the
PRESET
button to access aditional setup
items or turn the unit off to save the settings.
IR Sync Testing
One IFBR1C can now be used to test another for IR
communication. To use this feature, have two units
available and select one as the tester.
On this unit, press the
PRESET
button while powering
on the receiver. Press the
FREQ
button to select the IR
Firmware Updates
Use the free IFBlue Updater to install firmware updates.
The Updater (for both Windows and macOS), firmware
update files and change notes are available from the
IFBlue website:
www.IFBlue.com
.
1) Open the battery door and connect the IFBR1C to
your Windows or macOS computer with a USB cable.
The cable must have a micro-B male connector to mate
with the USB jack in the IFBlR1C.
2) Turn the IFBR1C on. Use the IFBlue Firmware
Update Wizard to open the firmware file and install the
new firmware version.
test page where “lr” shows on the screen. This unit is
now ready to initiate the test.
Use the second unit as the one being tested. Power it
on normally - any display page is fine on the unit being
tested.
To start a test, hold the unit being tested up to the tester
so that IR windows face each other and are within a few
inches apart, and you can see the display on the tester.
Press the
UP
arrow button on the tester unit to begin.
Within 2 seconds the tester will indicate success: “Ir y”
and the power LED will turn green; or failure: “Ir n” and
the power LED will turn red. If the test fails, it might be
useful to adjust the positions of the units’ IR windows
and try again.
NOTE: Even though the unit being tested displays “Ir y” on
a successful test, mirroring the tester’s display, it is not then
configured as a tester.
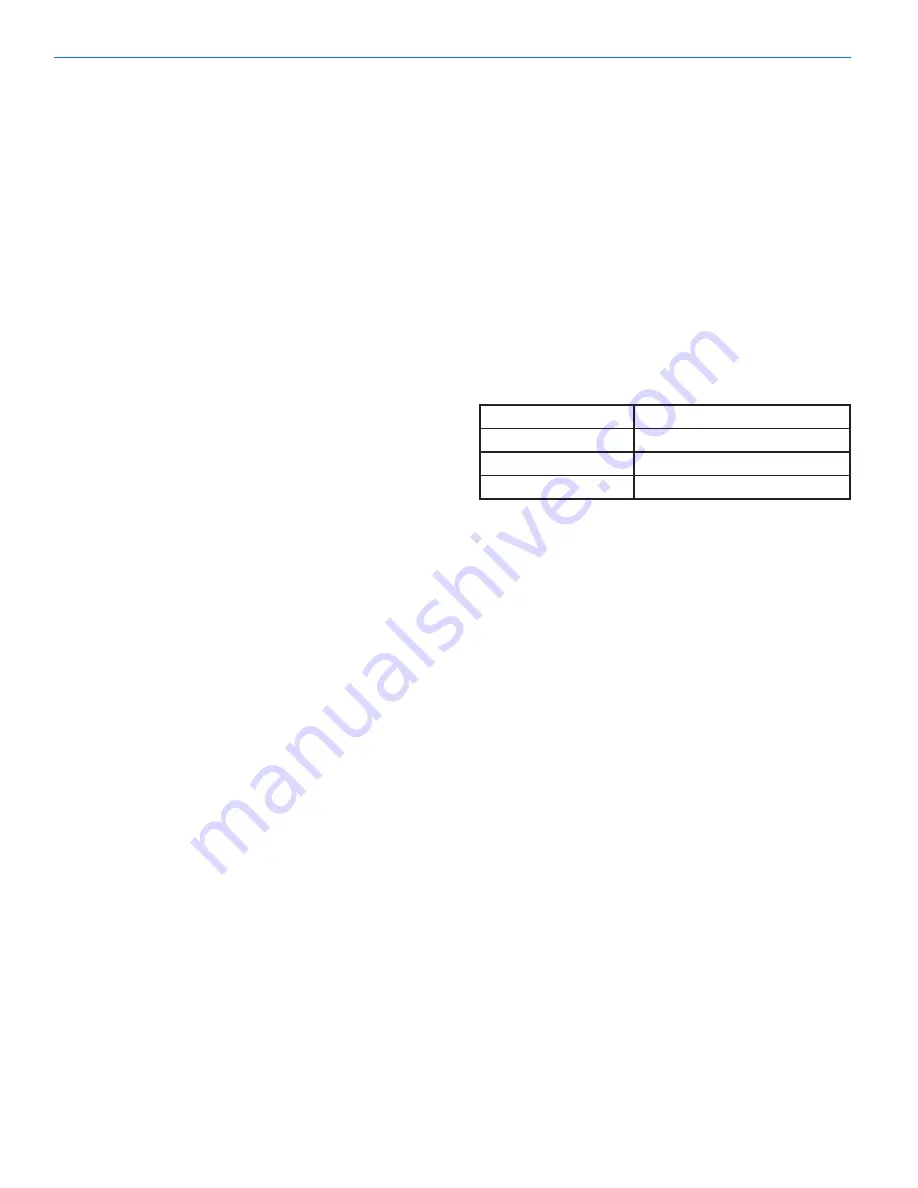
Symbol
Meaning
Blinking minus sign
Test is in progress (LED off)
y
Test passed (LED green)
n
Test failed (LED red)
When finished, press the
PRESET
button on the tester
unit to access additional setup items or turn the unit off
Содержание IFBR1C
Страница 10: ...IFBR1C IFBR1C 941 IFBR1C VHF IFBlue 10...
Страница 11: ...IFB Receiver Rio Rancho NM 11...


