background image


IMBA-C2460 ATX Motherboard 

Page v 

Table of Contents 

1 INTRODUCTION .......................................................................................................... 1


1.1


I

NTRODUCTION

 ........................................................................................................... 2


1.2


F

EATURES

 ................................................................................................................... 3


1.3


C

ONNECTORS

 ............................................................................................................. 4


1.4


D

IMENSIONS

 ............................................................................................................... 5


1.5


D

ATA 

F

LOW

 ................................................................................................................ 6


1.6


T

ECHNICAL 

S

PECIFICATIONS

 ...................................................................................... 7


2 PACKING LIST ........................................................................................................... 10


2.1


A

NTI

-

STATIC 

P

RECAUTIONS

 ....................................................................................... 11


2.2


U

NPACKING 

P

RECAUTIONS

 ........................................................................................ 11


2.3


P

ACKING 

L

IST

 ........................................................................................................... 12


2.4


O

PTIONAL 

I

TEMS

 ...................................................................................................... 13


3 CONNECTORS ........................................................................................................... 15


3.1


P

ERIPHERAL 

I

NTERFACE 

C

ONNECTORS

 ..................................................................... 16


3.1.1 IMBA-C2460 Layout ........................................................................................ 16


3.1.2 Peripheral Interface Connectors ..................................................................... 17


3.1.3 External Interface Panel Connectors ............................................................... 18


3.2


I

NTERNAL 

P

ERIPHERAL 

C

ONNECTORS

 ...................................................................... 19


3.2.1 +12V ATX Power Connector ........................................................................... 19


3.2.2 Additional Power Connector ........................................................................... 20


3.2.3 ATX Power Connector ..................................................................................... 20


3.2.4 Battery Connector ............................................................................................ 22


3.2.5 Chassis Intrusion Connector ............................................................................ 23


3.2.6 DDR4 DIMM Slots ........................................................................................... 24


3.2.7 Digital I/O Connector ...................................................................................... 25


3.2.8 DisplayPort Connector .................................................................................... 26


3.2.9 EC Debug Connector ....................................................................................... 27


3.2.10 Fan Connector (CPU) .................................................................................... 28


Содержание IMBA-C2460

Страница 1: ...IMBA C2460 ATX Motherboard Supports 14nm LGA1151 Intel Xeon E 8th 9th Gen Intel Core i9 i7 i5 i3 Celeron and Pentium Processor DDR4 Triple Independent Display Dual GbE LAN M 2 USB 3 2 Gen 2 10Gb s SA...

Страница 2: ...IMBA C2460 ATX Motherboard Page ii Revision Date Version Changes November 2 2020 1 00 Initial release...

Страница 3: ...ges arising out of the use or inability to use the product or documentation even if advised of the possibility of such damages This document contains proprietary information protected by copyright All...

Страница 4: ...l injury Warnings should be taken seriously CAUTION Cautionary messages should be heeded to help reduce the chance of losing data or damaging the product NOTE These messages inform the reader of essen...

Страница 5: ...ONNECTORS 15 3 1 PERIPHERAL INTERFACE CONNECTORS 16 3 1 1 IMBA C2460 Layout 16 3 1 2 Peripheral Interface Connectors 17 3 1 3 External Interface Panel Connectors 18 3 2 INTERNAL PERIPHERAL CONNECTORS...

Страница 6: ...ial Port Connectors RS 232 422 485 44 3 2 26 SMBus Connector 45 3 2 27 SPI Flash Connector 46 3 2 28 SPI Flash Connector EC 47 3 2 29 TPM Connector 48 3 2 30 USB 2 0 Connectors 49 3 2 31 USB 3 2 Gen 1...

Страница 7: ...Help 78 5 1 4 Unable to Reboot after Configuration Changes 78 5 1 5 BIOS Menu Bar 78 5 2 MAIN 79 5 3 ADVANCED 80 5 3 1 CPU Configuration 81 5 3 2 PCH FW Configuration 83 5 3 2 1 PTT Configuration 84 5...

Страница 8: ...ion 115 5 5 SECURITY 116 5 6 BOOT 117 5 7 SAVE EXIT 119 A REGULATORY COMPLIANCE 120 B PRODUCT DISPOSAL 122 C BIOS OPTIONS 124 D DIGITAL I O INTERFACE 127 E WATCHDOG TIMER 130 F INTEL MATRIX STORAGE MA...

Страница 9: ...onnector Location 26 Figure 3 10 EC Debug Connector Location 27 Figure 3 11 CPU Fan Connector Location 28 Figure 3 12 System Fan Connector Locations 29 Figure 3 13 Front Panel Audio Connector Location...

Страница 10: ...Connector 54 Figure 3 37 COM1 Serial Port Pinout Locations 56 Figure 3 38 VGA Connector 57 Figure 4 1 Disengage the CPU Socket Load Lever 61 Figure 4 2 Remove Protective Cover 62 Figure 4 3 Insert th...

Страница 11: ...uts 29 Table 3 11 System Fan SYS_FAN2 Connector Pinouts 29 Table 3 12 Front Panel Audio Connector Pinouts 30 Table 3 13 Front Panel Connector Pinouts 31 Table 3 14 I2 C Connector Pinouts 32 Table 3 15...

Страница 12: ...r Pinouts 54 Table 3 34 USB 2 0 Port Pinouts 55 Table 3 35 PS 2 Connector Pinouts 55 Table 3 36 COM1 Connector Pinouts 56 Table 3 37 VGA Connector Pinouts 57 Table 4 1 AT ATX Power Mode Switch Setting...

Страница 13: ...Settings 92 BIOS Menu 14 Serial Port Console Redirection 93 BIOS Menu 15 Legacy Console Redirection Settings 96 BIOS Menu 16 USB Configuration 97 BIOS Menu 17 CSM Configuration 98 BIOS Menu 18 NVMe Co...

Страница 14: ...IMBA C2460 ATX Motherboard Page xiv BIOS Menu 31 Security 116 BIOS Menu 32 Boot 117 BIOS Menu 33 Save Exit 119...

Страница 15: ...IMBA C2460 ATX Motherboard Page 1 Chapter 1 1 Introduction...

Страница 16: ...pset supports six SATA 6Gb s drives Moreover the IMBA C2460 includes DP HDMI and VGA interfaces for triple independent display The IMBA C2460 provides two GbE interfaces through the Intel I219LM with...

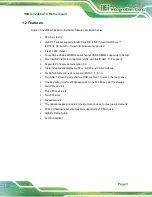
Страница 17: ...rs LAN1 with Intel AMT 11 0 support Supports PCI Express Generation 3 0 Triple independent display by DP HDMI and VGA interfaces Six SATA 6Gb s connectors support RAID 0 1 5 10 Two USB 3 2 Gen 2 ports...

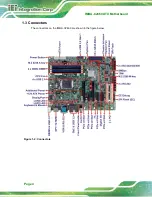
Страница 18: ...IMBA C2460 ATX Motherboard Page 4 1 3 Connectors The connectors on the IMBA C2460 are shown in the figure below Figure 1 2 Connectors...

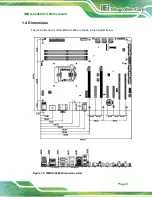
Страница 19: ...IMBA C2460 ATX Motherboard Page 5 1 4 Dimensions The main dimensions of the IMBA C2460 are shown in the diagram below Figure 1 3 IMBA C2460 Dimensions mm...

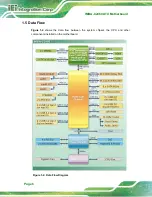
Страница 20: ...IMBA C2460 ATX Motherboard Page 6 1 5 Data Flow Figure 1 4 shows the data flow between the system chipset the CPU and other components installed on the motherboard Figure 1 4 Data Flow Diagram...

Страница 21: ...4 4 5 and OpenCL 1 2 2 0 2 1 Display Output Triple independent display One VGA up to 1920x1080 60Hz One DP up to 4096x2304 60Hz One HDMI up to 4096x2304 30Hz One DisplayPort internal up to 4096x2304...

Страница 22: ...pin wafer connector Keyboard Mouse One PS 2 keyboard mouse connector One internal keyboard and mouse connector 6 pin wafer LAN LED Two 2 pin headers for LAN1 LED and LAN2 LED Serial ATA Six SATA 6Gb...

Страница 23: ...A 5VSB 0 16A 3 0 GHz Intel Core i5 8500 CPU with four 16 GB 2400 MHz DDR4 memory Operating Temp 20 C 60 C Storage Temp 30 C 70 C Operating Humidity 5 95 non condensing Physical Specifications Dimensio...

Страница 24: ...IMBA C2460 ATX Motherboard Page 10 Chapter 2 2 Packing List...

Страница 25: ...ic discharge Self grounding Touch a grounded conductor every few minutes to discharge any excess static buildup Use an anti static pad When configuring any circuit board place it on an anti static mat...

Страница 26: ...ntact the IEI reseller or vendor the IMBA C2460 was purchased from or contact an IEI sales representative directly by sending an email to sales ieiworld com The IMBA C2460 is shipped with the followin...

Страница 27: ...h bracket P N 19800 003100 100 RS USB 3 2 cable with bracket 457 mm P N 19800 010500 200 RS SATA power cable P N 32102 000100 200 RS Serial port cable P 2 54 230 mm P N 32205 000702 200 RS High perfor...

Страница 28: ...IMBA C2460 ATX Motherboard Page 14 Item and Part Number Image 20 pin Infineon TPM 2 0 module software management tool firmware v5 5 P N TPM IN02 R20 Table 2 2 Optional Items...

Страница 29: ...IMBA C2460 ATX Motherboard Page 15 Chapter 3 3 Connectors...

Страница 30: ...16 3 1 Peripheral Interface Connectors This chapter details all the peripheral interface connectors 3 1 1 IMBA C2460 Layout The figures below show all the peripheral interface connectors Figure 3 1 P...

Страница 31: ...n socket CHA_DIMM0 CHA_DIMM1 CHB_DIMM0 CHB_DIMM1 Digital I O connector 10 pin header DIO1 DisplayPort connector 180 DisplayPort DP1 EC debug connector 18 pin header CN1 Fan connector CPU 4 pin wafer C...

Страница 32: ...er COM5 COM6 SMBus connector 4 pin wafer SMB1 SPI flash connector 8 pin header JSPI1 SPI flash connector EC 8 pin header JSPI2 TPM connector 20 pin header TPM1 USB 2 0 connectors 8 pin header USB1 USB...

Страница 33: ...ear Panel Connectors 3 2 Internal Peripheral Connectors The section describes all of the connectors on the IMBA C2460 3 2 1 12V ATX Power Connector CN Label CPU12V1 CN Type 4 pin Molex power connector...

Страница 34: ...ional power connector provides extra 12V and 5V power to the system Figure 3 3 Additional Power Connector Location Pin Description 1 12V 2 GND 3 GND 4 5V Table 3 4 Additional Power Connector Pinouts 3...

Страница 35: ...Connector Location Pin Description Pin Description 1 3 3V 13 3 3V 2 3 3V 14 12V 3 GND 15 GND 4 5V 16 PS_ON 5 GND 17 GND 6 5V 18 GND 7 GND 19 GND 8 Power good 20 5V 9 5VSB 21 5V 10 12V 22 5V 11 12V 23...

Страница 36: ...tteries according to instructions and local regulations NOTE It is recommended to attach the RTC battery onto the system chassis in which the IMBA C2460 is installed CN Label BAT1 CN Type Battery hold...

Страница 37: ...ation See Figure 3 6 CN Pinouts See Table 3 6 The chassis intrusion connector is for a chassis intrusion detection sensor or switch that detects if a chassis component is removed or replaced Figure 3...

Страница 38: ...rboard Page 24 3 2 6 DDR4 DIMM Slots CN Label CHA_DIMM0 CHA_DIMM1 CHB_DIMM0 CHB_DIMM1 CN Type DDR4 DIMM slot CN Location See Figure 3 7 The DIMM slots are for DDR4 DIMM memory modules Figure 3 7 DDR4...

Страница 39: ...e 3 8 CN Pinouts See Table 3 7 The digital I O connector provides programmable input and output for external devices Figure 3 8 Digital I O Connector Location Pin Description Pin Description 1 GND 2 V...

Страница 40: ...oard Page 26 3 2 8 DisplayPort Connector CN Label DP1 CN Type 180 DisplayPort CN Location See Figure 3 9 The internal DisplayPort connector supports DisplayPort graphics interfaces Figure 3 9 DisplayP...

Страница 41: ...g connector is used for EC debug Figure 3 10 EC Debug Connector Location Pin Description Pin Description 1 EC_EPP_STB 2 EC_EPP_AFD 3 EC_EPP_PD0 4 NC 5 EC_EPP_PD1 6 EC_EPP_INIT 7 EC_EPP_PD2 8 EC_EPP_SL...

Страница 42: ...Label CPU_FAN1 CN Type 4 pin wafer p 2 54 mm CN Location See Figure 3 11 CN Pinouts See Table 3 9 The fan connector attaches to a CPU cooling fan Figure 3 11 CPU Fan Connector Location Pin Description...

Страница 43: ...12 CN Pinouts See Table 3 10 and Table 3 11 Each fan connector attaches to a system cooling fan The SYS_FAN1 provides smart fan function Figure 3 12 System Fan Connector Locations Pin Description 1 FA...

Страница 44: ...on See Figure 3 13 CN Pinouts See Table 3 12 This connector connects to speakers a microphone and an audio input Figure 3 13 Front Panel Audio Connector Location Pin Description Pin Description 1 MIC2...

Страница 45: ...el connector connects to the indicator LEDs and buttons on the computer s front panel Figure 3 14 Front Panel Connector Location Function Pin Description Function Pin Description Power LED 1 PWR_LED S...

Страница 46: ...N Type 4 pin wafer p 1 25 mm CN Location See Figure 3 15 CN Pinouts See Table 3 14 The I2 C connector is used to connect I2 C bus devices to the mainboard Figure 3 15 I2 C Connector Location Pin Descr...

Страница 47: ...gure 3 16 CN Pinouts See Table 3 15 The keyboard and mouse connector connects to a PS 2 Y cable that can be connected to a PS 2 keyboard and mouse Figure 3 16 Keyboard and Mouse Connector Location Pin...

Страница 48: ...Table 3 17 The LAN LED connectors are used to connect to the LAN LED indicators on the chassis to indicate users the link activities of the two LAN ports Figure 3 17 LAN LED Connector Locations Pin D...

Страница 49: ...ts See Table 3 18 The M 2 2230 slot is keyed in the A position The M 2 slot supports PCIe x1 and USB 2 0 interfaces Figure 3 18 M 2 2230 Slot Location Pin Description Pin Description 1 GND 2 3 3V 3 US...

Страница 50: ...P0 36 GND 37 PETN0 38 NC 39 GND 40 NC 41 PERP0 42 NC 43 PERN0 44 NC 45 GND 46 NC 47 PCIE_CLK 48 NC 49 PCIE_CLK 50 NC 51 GND 52 PLT_RST 53 NC 54 NC 55 PCIE_WAKE 56 W_DIS 57 GND 58 NC 59 NC 60 NC 61 NC...

Страница 51: ...Pinouts See Table 3 19 The M 2 2280 slot is keyed in the B position The M 2 slot supports PCIe x2 interfaces Figure 3 19 M 2 2280 Slot Location Pin Description Pin Description 1 GND 2 3 3V 3 USB2_DP...

Страница 52: ...P0 36 GND 37 PETN0 38 NC 39 GND 40 NC 41 PERP0 42 NC 43 PERN0 44 NC 45 GND 46 NC 47 PCIE_CLK 48 NC 49 PCIE_CLK 50 NC 51 GND 52 PLT_RST 53 NC 54 NC 55 PCIE_WAKE 56 W_DIS 57 GND 58 NC 59 NC 60 NC 61 NC...

Страница 53: ...tion See Figure 3 20 The PCI slot enables a PCI expansion module to be connected to the board Figure 3 20 PCI Slot Locations 3 2 20 PCIe x4 Slots CN Label PCIEX4_1 PCIEX4_2 PCIEX4_3 CN Type PCIe x4 sl...

Страница 54: ...ure 3 21 PCIe x4 Slot Locations 3 2 21 PCIe x8 Slots CN Label PCIEX8_1 PCIEX8_2 CN Type PCIe x16 slot x8 mode CN Location See Figure 3 22 The PCIe x8 expansion card slots are for PCIe x8 expansion car...

Страница 55: ...MBA C2460 ATX Motherboard Page 41 3 2 22 Power Button CN Label PWR_SW1 CN Type Push button CN Location See Figure 3 23 The on board power button controls system power Figure 3 23 Power Button Location...

Страница 56: ...drive connector CN Location See Figure 3 24 CN Pinouts See Table 3 20 The SATA drive connectors can be connected to SATA drives and support up to 6Gb s data transfer rate Figure 3 24 SATA 6Gb s Drive...

Страница 57: ...header p 2 54 mm CN Location See Figure 3 25 CN Pinouts See Table 3 21 Each of these connectors provides RS 232 connections Figure 3 25 RS 232 Serial Port Connector Location Pin Description Pin Descr...

Страница 58: ...s The communication protocol of the serial ports is set through the BIOS menu in Advanced F81866 Super IO Configuration Serial Port 5 6 Configuration Use the Transfer Mode BIOS option to configure the...

Страница 59: ...ed below RS 232 Pinouts RS 422 Pinouts RS 485 Pinouts Table 3 23 DB 9 RS 232 422 485 Pinouts 3 2 26 SMBus Connector CN Label SMB1 CN Type 4 pin wafer p 1 25 mm CN Location See Figure 3 27 CN Pinouts S...

Страница 60: ...Connector CN Label JSPI1 CN Type 8 pin header p 2 54 mm CN Location See Figure 3 28 CN Pinouts See Table 3 25 The SPI flash connector is used to flash the SPI ROM Figure 3 28 SPI Flash Connector Locat...

Страница 61: ...der p 2 54 mm CN Location See Figure 3 29 CN Pinouts See Table 3 26 The SPI flash connector is used to flash the EC ROM Figure 3 29 SPI EC Flash Connector Location Pin Description Pin Description 1 3...

Страница 62: ...3 30 CN Pinouts See Table 3 27 The TPM connector connects to a TPM module Figure 3 30 TPM Connector Location Pin Description Pin Description 1 LCLK 2 GND 3 LFRAME 4 KEY 5 LRERST 6 5V 7 LAD3 8 LAD2 9 3...

Страница 63: ...n See Figure 3 31 CN Pinouts See Table 3 28 The USB 2 0 connectors connect to USB 2 0 devices Each pin header provides two USB 2 0 ports Figure 3 31 USB 2 0 Connector Pinout Locations Pin Description...

Страница 64: ...s connector connects to USB 3 2 devices This connector provides two USB 3 2 Gen 1 5Gb s ports Figure 3 32 USB 3 2 Gen 1 Connector Location Pin Description Pin Description 1 VCC 11 USB_DATA 2 USB3_RX...

Страница 65: ...nal Peripheral Interface Connector 3 3 1 Audio Connector CN Label AUDIO_CV1 CN Type Audio jack CN Location See Figure 3 33 The audio jacks connect to external audio devices Line In port Light Blue Con...

Страница 66: ...here are four external USB 3 2 connectors on the IMBA C2460 The LAN1_USB1 connector supports USB 3 2 Gen 2 10Gb s connection while the LAN2_USB2 connector supports USB 3 2 Gen 1 5Gb s connection Pin D...

Страница 67: ...ector CN Label HDMI_DP1 CN Type HDMI DisplayPort CN Location See Figure 3 33 CN Pinouts See Table 3 32 and Table 3 33 The HDMI connector can connect to an HDMI device Pin Description Pin Description 1...

Страница 68: ...ace Pin Description Pin Description 1 HDMI_DATA2 13 NC 2 GND 14 NC 3 HDMI_DATA2 15 HDMI_SCL 4 HDMI_DATA1 16 HDMI_SDA 5 GND 17 GND 6 HDMI_DATA1 18 5V 7 HDMI_DATA0 19 HDMI_HPD 8 GND 20 HDMI_GND 9 HDMI_D...

Страница 69: ...35 The USB 2 0 connector can be connected to a USB 2 0 1 1 device Pin Description Pin Description 1 VCC 5 VCC 2 USB_DATA 6 USB_DATA 3 USB_DATA 7 USB_DATA 4 GND 8 GND Table 3 34 USB 2 0 Port Pinouts T...

Страница 70: ...CN Location See Figure 3 33 CN Pinouts See Table 3 36 and Table 3 37 The COM connector COM1 connects to a serial device that supports RS 232 communication Pin Description Pin Description 1 DCD 6 DSR 2...

Страница 71: ...nnect the VGA connector to the monitor before system booting as the VGA output function is supported via the eDP to VGA converter Pin Description Pin Description 1 RED 2 GREEN 3 BLUE 4 NC 5 GND 6 HOT...

Страница 72: ...IMBA C2460 ATX Motherboard Page 58 Chapter 4 4 Installation...

Страница 73: ...tband can help to prevent ESD from damaging the board Self grounding Before handling the board touch any grounded conducting material During the time the board is handled frequently touch any conducti...

Страница 74: ...the body and helps prevent ESD damage Place the IMBA C2460 on an anti static pad o When installing or configuring the motherboard place it on an anti static pad This helps to prevent potential ESD da...

Страница 75: ...lled DO NOT touch the pins at the bottom of the CPU When handling the CPU only hold it on the sides To install the CPU follow the steps below Step 1 Disengage the load lever by pressing the lever down...

Страница 76: ...r Step 4 Orientate the CPU properly The contact array should be facing the CPU socket WARNING DO NOT touch the pins at the bottom of the CPU When handling the CPU only hold it on the sides Step 5 Corr...

Страница 77: ...ly See Figure 4 3 Figure 4 3 Insert the Socket LGA1151 CPU Step 8 Close the CPU socket Close the load plate and pull the load lever back a little to have the load plate be able to secure to the knob E...

Страница 78: ...ing and is ONLY compatible with captive screw type cooling fans The cooling kit can be bought from IEI The cooling kit has a heat sink and fan WARNING Do not wipe off accidentally or otherwise the pre...

Страница 79: ...ur threaded screws on the corners of the cooling kit properly pass through the holes of the cooling kit bracket Step 4 Tighten the screws Use a screwdriver to tighten the four screws In a diagonal pat...

Страница 80: ...MM so the notch on the memory lines up with the notch on the memory socket See Figure 4 6 Step 3 Insert the DIMM Once aligned press down until the DIMM is properly seated Clip the two handles into pla...

Страница 81: ...tem configuration must be performed before installation 4 6 1 AT ATX Power Mode Setting The AT and ATX power mode selection is made through the AT ATX power mode switch which is shown in Figure 4 7 Fi...

Страница 82: ...Figure 4 8 Clear CMOS Button and Header Locations 4 6 3 Flash Descriptor Security Override Jumper The flash descriptor security override jumper J_FLASH1 allows to enable or disable the ME firmware upd...

Страница 83: ...he system power short pin 2 3 of the flash descriptor security override jumper Step 2 Update the BIOS and ME firmware and then turn off the system power Step 3 Remove the metal clip on the flash descr...

Страница 84: ...ts USB3 1 internal USB 3 2 Gen 1 ports Table 4 3 BIOS Options and Configured USB Ports Options Description 5V DUAL 5V dual default 5V 5V Table 4 4 USB Power Source Setup Please refer to Section 5 4 2...

Страница 85: ...ep 3 Connect the cable to the SATA disk Connect the connector on the other end of the cable to the connector at the back of the SATA drive See Figure 4 11 Step 4 Connect the SATA power cable Connect t...

Страница 86: ...IMBA C2460 ATX Motherboard Page 72 Figure 4 11 SATA Power Drive Connection The SATA power cable can be bought from IEI See Optional Items in Section 2 4...

Страница 87: ...er to find all the relevant software utilities and documentation Figure 4 12 IEI Resource Download Center 4 8 1 Driver Download To download drivers from IEI Resource Download Center follow the steps b...

Страница 88: ...h the following window You can download the entire ISO file or click the small arrow to find an individual driver and click the file name to download NOTE To install software from the downloaded ISO i...

Страница 89: ...MT must be enabled Step 4 Properly install the Intel Management Engine Components drivers from the iAMT Driver Utility directory in the driver CD Step 5 Configure the Intel Management Engine BIOS exte...

Страница 90: ...IMBA C2460 ATX Motherboard Page 76 Chapter 5 5 BIOS...

Страница 91: ...stem is turned on or 2 Press the DEL or F2 key when the Press DEL or F2 to enter SETUP message appears on the screen If the message disappears before the DEL or F2 key is pressed restart the computer...

Страница 92: ...dow press the ESC key 5 1 4 Unable to Reboot after Configuration Changes If the computer cannot boot after changes to the system configuration is made CMOS defaults Use the clear CMOS button described...

Страница 93: ...tel R Core TM CPU i3 8100 CPU 3 60GHz Speed 3600 MHz ID 0X906EA Stepping U0 Number of Processors 4Core s 4Thread s Microcode Revision D6 GT Info GT2 0x3E92 IGFX VBIOS Version 1019 Memory RC Version 0...

Страница 94: ...Make sure that the settings made are compatible with the hardware Aptio Setup Utility Copyright C 2020 American Megatrends Inc Main Advanced Chipset Security Boot Save Exit CPU Configuration PCH FW Co...

Страница 95: ...Intel R SpeedStep tm Enabled C states Disabled When enabled a VMM can utilize the additional hardware capabilities provided by Vanderpool Technology Select Screen Select Item Enter Select Change Opt F...

Страница 96: ...e processor package Intel R SpeedStep tm Enabled Use the Intel R SpeedStep tm option to enable or disable the Intel SpeedStep Technology which allows more than two frequency ranges to be supported Dis...

Страница 97: ...e This option does not disable Manageability Features in FW Select Screen Select Item EnterSelect F1 General Help F2 Previous Values F3 Optimized Defaults F4 Save ESC Exit Version 2 20 1271 Copyright...

Страница 98: ...f supported Select TPM device PTT or dTPM PTT Enables PTT in SkuMgr dTPM 1 2 Disables PTT in SkuMgr Warning PTT dTPM will be disabled and all data saved on it will be lost Select Screen Select Item En...

Страница 99: ...TM Support Note May cause in compatibility problems with insufficient resources in some pcie external card Select Screen Select Item EnterSelect F1 General Help F2 Previous Values F3 Optimized Defaul...

Страница 100: ...nables or Disables BIOS support for security device O S will not show Security Device TCG EFI protocol and INT1A interface will not be available Select Screen Select Item Enter Select Change Opt F1 Ge...

Страница 101: ...button is pressed Select Screen Select Item Enter Select Change Opt F1 General Help F2 Previous Values F3 Optimized Defaults F4 Save Exit ESC Exit Version 2 20 1271 Copyright C 2020 American Megatren...

Страница 102: ...976 V 12V 12 064 V DDR 1 196 V 5VSB 5 114 V 3 3V 3 310 V 3 3VSB 3 288 V Smart Fan Mode Configuration Smart Fan Mode Select Select Screen Select Item Enter Select Change Opt F1 General Help F2 Previou...

Страница 103: ...an Control Auto Mode Auto mode fan start temperature 50 Auto mode fan off temperature 40 Auto mode fan start PWM 30 Auto mode fan slope PWM 1 Smart Fan Mode Select Select Screen Select Item Enter Sele...

Страница 104: ...arallel ports and serial ports Aptio Setup Utility Copyright C 2020 American Megatrends Inc Advanced Super IO Configuration Super IO Chip F81866 Serial Port 1 Configuration Serial Port 2 Configuration...

Страница 105: ...Enter Select Change Opt F1 General Help F2 Previous Values F3 Optimized Defaults F4 Save Exit ESC Exit Version 2 20 1271 Copyright C 2020 American Megatrends Inc BIOS Menu 12 Serial Port n Configurati...

Страница 106: ...t F1 General Help F2 Previous Values F3 Optimized Defaults F4 Save Exit ESC Exit Version 2 20 1271 Copyright C 2020 American Megatrends Inc BIOS Menu 13 RTC Wake Settings Wake system with Fixed Time D...

Страница 107: ...ole Redirection Settings COM2 Console Redirection Disabled Console Redirection Settings COM3 Console Redirection Disabled Console Redirection Settings COM4 Console Redirection Disabled Console Redirec...

Страница 108: ...inal type is VT100 VT100 The target terminal type is VT100 VT UTF8 The target terminal type is VT UTF8 ANSI DEFAULT The target terminal type is ANSI Bits per second 115200 Use the Bits per second opti...

Страница 109: ...n Odd The parity bit is 0 if the number of ones in the data bits is odd Mark The parity bit is always 1 This option does not provide error detection Space The parity bit is always 0 This option does n...

Страница 110: ...m Enter Select Change Opt F1 General Help F2 Previous Values F3 Optimized Defaults F4 Save Exit ESC Exit Version 2 20 1271 Copyright C 2020 American Megatrends Inc BIOS Menu 15 Legacy Console Redirect...

Страница 111: ...General Help F2 Previous Values F3 Optimized Defaults F4 Save Exit ESC Exit Version 2 20 1271 Copyright C 2020 American Megatrends Inc BIOS Menu 16 USB Configuration Legacy USB Support Enabled Use the...

Страница 112: ...ty Support Module Configuration CSM Support Enabled Enable Disable CSM Support Select Screen Select Item EnterSelect F1 General Help F2 Previous Values F3 Optimized Defaults F4 Save ESC Exit Version 2...

Страница 113: ...ation Aptio Setup Utility Copyright C 2020 American Megatrends Inc Advanced NVMe controller and Drive information No NVMe Device Found Select Screen Select Item Enter Select Change Opt F1 General Help...

Страница 114: ...crashes Please install Auto Recovery API service before enabling this function Select Screen Select Item Enter Select Change Opt F1 General Help F2 Previous Values F3 Optimized Defaults F4 Save Exit E...

Страница 115: ...u may cause the system to malfunction Aptio Setup Utility Copyright C 2020 American Megatrends Inc Main Advanced Chipset Security Boot Save Exit System Agent SA Configuration PCH IO Configuration Syst...

Страница 116: ...d Supported VT d Disabled Memory Configuration Graphics Configuration PEG Port Configuration VT d capability Select Screen Select Item Enter Select Change Opt F1 General Help F2 Previous Values F3 Opt...

Страница 117: ...onfiguration CHA_DIMM0 Populated Enabled Size 8192 MB DDR4 Number of Ranks 2 Manufacturer Kingston CHA_DIMM1 Not Populated Disabled CHB_DIMM0 Not Populated Disabled CHB_DIMM1 Not Populated Disabled Se...

Страница 118: ...FX Boot Display VBIOS Default HDMI_DP Switch Status Display Port DP Select which of IGFX PEG PCI Graphics device should be Primary Display Or select SG for Switchable Gfx Select Screen Select Item Ent...

Страница 119: ...memory allocated to the integrated graphics processor when the system boots The system memory allocated can then only be used as graphics memory and is no longer available to applications or the oper...

Страница 120: ...Enter Select Change Opt F1 General Help F2 Previous Values F3 Optimized Defaults F4 Save Exit ESC Exit Version 2 20 1271 Copyright C 2020 American Megatrends Inc BIOS Menu 24 PEG Port Configuration En...

Страница 121: ...ce Device Disabled Select Screen Select Item EnterSelect Change Opt F1 General Help F2 Previous Values F3 Optimized Defaults F4 Save Exit ESC Exit Version 2 20 1271 Copyright C 2020 American Megatrend...

Страница 122: ...F2 Previous Values F3 Optimized Defaults F4 Save Exit ESC Exit Version 2 20 1271 Copyright C 2020 American Megatrends Inc BIOS Menu 26 PCH IO Configuration Restore AC Power Loss Last State Use the Re...

Страница 123: ...r SW2 BIOS option to configure whether to provide power to the corresponding USB connectors Table 5 2 when the system is in S3 S4 sleep state This option is valid only when the above Power Saving Func...

Страница 124: ...ght C 2020 American Megatrends Inc Chipset PCI Express Configuration PCIEX4_1 Slot PCIEX4_2 Slot PCIEX4_3 Slot M 2 A Slot M 2 M Slot PCI Express Root Port Settings Select Screen Select Item Enter Sele...

Страница 125: ...lues F3 Optimized Defaults F4 Save Exit ESC Exit Version 2 20 1271 Copyright C 2020 American Megatrends Inc BIOS Menu 28 PCIe Slot Configuration Submenu PCIEX4_1 Slot Enabled Use the PCIEX4_1 Slot opt...

Страница 126: ...lot Enabled DEFAULT Enables the M 2 2230 A key slot M 2 M Slot Enabled Use the M 2 M Slot option to enable or disable the M 2 2280 M key slot Disabled Disables the M 2 2280 M key slot Enabled DEFAULT...

Страница 127: ...ode Selection AHCI PCIe Storage Dev On Port 9 Not RST Controlled SATA Port 1 Empty Hot Plug Disabled SATA Port 2 Empty Hot Plug Disabled SATA Port 3 Empty Hot Plug Disabled SATA Port 4 Empty Hot Plug...

Страница 128: ...CIe Storage Dev On Port 9 Not RST Controlled Use the PCIe Storage Dev On Port 9 option to enable or disable RST PCIe storage remapping RST Controlled Enables RST PCIe storage remapping It is only supp...

Страница 129: ...onditionally disabled Enabled HDA will be unconditionally enabled Select Screen Select Item Enter Select Change Opt F1 General Help F2 Previous Values F3 Optimized Defaults F4 Save Exit ESC Exit Versi...

Страница 130: ...s a power on password and must be entered to boot or enter Setup In Setup the User will have Administrator rights The password length must be Minimum length 3 Maximum length 20 Administrator Password...

Страница 131: ...rsion 2 20 1271 Copyright C 2020 American Megatrends Inc BIOS Menu 32 Boot Bootup NumLock State On Use the Bootup NumLock State BIOS option to specify if the number lock setting must be modified durin...

Страница 132: ...boot from the UEFI devices Disabled DEFAULT Boot from UEFI devices is disabled Enabled Boot from UEFI devices is enabled Launch PXE OpROM Disabled Use the Launch PXE OpROM option to enable or disable...

Страница 133: ...t Version 2 20 1271 Copyright C 2020 American Megatrends Inc BIOS Menu 33 Save Exit Save Changes and Reset Use the Save Changes and Reset option to save the changes made to the BIOS options and reset...

Страница 134: ...IMBA C2460 ATX Motherboard Page 120 Appendix A A Regulatory Compliance...

Страница 135: ...terference that may cause undesired operation This equipment has been tested and found to comply with the limits for a Class A digital device pursuant to part 15 of the FCC Rules These limits are desi...

Страница 136: ...IMBA C2460 ATX Motherboard Page 122 B Product Disposal Appendix B...

Страница 137: ...lassified as electronic device in terms of the European Directive 2012 19 EU WEEE and must not be disposed of as domestic garbage EU wide legislation as implemented in each Member State requires that...

Страница 138: ...IMBA C2460 ATX Motherboard Page 124 Appendix C C BIOS Options...

Страница 139: ...port Disable 86 ACPI Sleep State S3 Suspend to RAM 87 PC Health Status 88 CPU_FAN1 Smart Fan Control SYS_FAN1 Smart Fan Control Auto Mode 89 Auto mode fan start off temperature 90 Auto mode fan start...

Страница 140: ..._2 Slot Enabled 111 PCIEX4_3 Slot Enabled 112 M 2 A Slot Enabled 112 M 2 M Slot Enabled 112 PCIe Speed Auto 112 Detect Non Compliance Device Disabled 112 SATA Controller s Enabled 113 SATA Mode Select...

Страница 141: ...IMBA C2460 ATX Motherboard Page 127 Appendix D D Digital I O Interface...

Страница 142: ...f external devices or TTL devices Data can be read or written to the selected address to enable the DIO functions NOTE For further information please refer to the datasheet for the Super I O chipset T...

Страница 143: ...low byte value AH 6FH Sub function AL 9 Set the digital port as OUTPUT BL Digital I O output value Assembly Language Sample 2 MOV AX 6F09H setting the digital port as output MOV BL 09H digital value...

Страница 144: ...IMBA C2460 ATX Motherboard Page 130 Appendix E E Watchdog Timer...

Страница 145: ...INT 15H is used to control the Watchdog Timer INT 15H AH 6FH Sub function AL 2 Sets the Watchdog Timer s period BL Time out value Its unit second is dependent on the item Watchdog Timer unit select in...

Страница 146: ...e system resets EXAMPLE PROGRAM INITIAL TIMER PERIOD COUNTER W_LOOP MOV AX 6F02H setting the time out value MOV BL 30 time out value is 48 seconds INT 15H ADD THE APPLICATION PROGRAM HERE CMP EXIT_AP...

Страница 147: ...IMBA C2460 ATX Motherboard Page 133 Appendix F F Intel Matrix Storage Manager...

Страница 148: ...e hard drives appears to an operating system as a contingent storage space The operating system will not be able to distinguish the physical disk drives contained in a RAID configuration F 1 1 Precaut...

Страница 149: ...rives have the same capacity are the same type and have the same speed NOTE Make sure the SATA drives are EXACTLY the same when they are configured in a RAID configuration If they are not the same siz...

Страница 150: ...o install the operating system to the RAID array some extra steps are necessary during the installation process Step 1 Prepare a RAID driver floppy disk on another computer If installing on the RAID a...

Страница 151: ...IMBA C2460 ATX Motherboard Page 137 Appendix G G Error Beep Code...

Страница 152: ...s not found 4 Recovery failed 4 S3 Resume failed 7 Reset PPI is not available G 2 DXE Beep Codes Number of Beeps Description 1 Invalid password 4 Some of the Architectural Protocols are not available...

Страница 153: ...IMBA C2460 ATX Motherboard Page 139 Appendix H H Hazardous Materials Disclosure...

Страница 154: ...PBB Polybrominated Diphenyl Ethers PBDE Bis 2 ethylhexyl phthalate DEHP Butyl benzyl phthalate BBP Dibutyl phthalate DBP Diisobutyl phthalate DIBP Housing O O O O O O O O O O Printed Circuit Board O...

Страница 155: ...otherboard Page 141 H 2 China RoHS RoHS RoHS Pb Hg Cd CR VI PBB PBDE O O O O O O O O O O O O O O O O O O O O O O O O O O O O O O O O O O O O O O O O O O O SJ T11364 2014 GB T26572 2011 X SJ T11364 201...

Отзывы: