background image


GRAND-C422-20D-H   


Page 37 

  WARNING: 

The precautions outlined in this chapter should be strictly followed. 
Failure to follow these precautions may result in permanent damage to 
the GRAND-C422-20D-H. 

B.1 Safety Precautions 

Please follow the safety precautions outlined in the sections that follow: 

B.1.1 General Safety Precautions 

Please ensure the following safety precautions are adhered to at all times. 


Follow the electrostatic precautions

 outlined below whenever the 

GRAND-C422-20D-H is opened. 


Make sure the power is turned off and the power cord is disconnected


whenever the GRAND-C422-20D-H is being installed, moved or modified.   


Do not apply voltage levels that exceed the specified voltage range

Doing so may cause fire and/or an electrical shock. 


Electric shocks can occur

 if the GRAND-C422-20D-H chassis is opened 

when the GRAND-C422-20D-H is running.   


If considerable amounts of dust, water, or fluids enter the 
GRAND-C422-20D-H

, turn off the power supply immediately, unplug the 

power cord, and contact the GRAND-C422-20D-H vendor.   


DO NOT

:   

o


Drop the GRAND-C422-20D-H against a hard surface. 

o


In a site where the ambient temperature exceeds the rated temperature 


Содержание GRAND-C422-20D-H

Страница 1: ...pports Hardware RAID with Intel Xeon W CPU Up to 256 GB DDR4 10GbE Port PCIe 3 0 x16 x8 x4 Slots Up to 20 SAS SATA Drives 4U Rack Mount 1200 W Redundant PSU RoHS GRAND C422 20D H Industrial serveri MO...

Страница 2: ...GRAND C422 20D H Page ii Revision Date Version Changes November 11 2019 1 00 Initial release...

Страница 3: ...rising out of the use or inability to use the product or documentation even if advised of the possibility of such damages This document contains proprietary information protected by copyright All righ...

Страница 4: ...ury Warnings should be taken seriously CAUTION Cautionary messages should be heeded to help reduce the chance of losing data or damaging the product NOTE These messages inform the reader of essential...

Страница 5: ...14 3 1 ANTI STATIC PRECAUTIONS 15 3 2 INSTALLATION PRECAUTIONS 15 3 3 EXPANSION CARD INSTALLATION 16 3 4 HARD DRIVE INSTALLATION 18 3 4 1 Hard Drive Bay Numbering 19 3 4 2 Hard Drive Installation 2 5...

Страница 6: ...eneral Safety Precautions 37 B 1 2 Anti static Precautions 38 B 1 3 Product Disposal 39 B 2 MAINTENANCE AND CLEANING PRECAUTIONS 39 B 2 1 Maintenance and Cleaning 39 B 2 2 Cleaning Tools 40 C HAZARDOU...

Страница 7: ...ray 2 5 3 5 20 Figure 3 2 HDD Tray Removal 2 5 3 5 20 Figure 3 3 HDD Tray Installation 2 5 3 5 21 Figure 3 4 HDD Installation 2 5 3 5 21 Figure 3 5 Release Drive Tray 2 5 22 Figure 3 6 HDD Tray Remova...

Страница 8: ...GRAND C422 20D H Page viii List of Tables Table 1 1 GRAND C422 20D H Model Variations 3 Table 1 2 Specifications 9 Table 2 1 Package List 13 Table 2 2 Optional Item 13...

Страница 9: ...GRAND C422 20D H Page 1 Chapter 1 1 Introduction...

Страница 10: ...p to 256 GB DDR4 ECC RDIMM LRDIMM RAM the GRAND C422 20D H storage server delivers outstanding performance for data transmission and applications The GRAND C422 20D H supports up to twenty 2 5 3 5 SAS...

Страница 11: ...AND C422 20D H Model Variations 1 3 Features The GRAND C422 20D H has the following features Intel Xeon W processor family supported Supports four DDR4 RAM modules for ECC RDIMM LRDIMM up to 256 GB pr...

Страница 12: ...Front Panel 1 LCM 2 LCM control buttons 3 Eight 2 5 SAS 12Gb s or SATA 6Gb s drive bays 4 Power button 5 LED Indicator 10GbE System status LAN Storage expansion port status 6 Twelve 2 5 3 5 SAS 12Gb...

Страница 13: ...s going to be full 4 The system fan is out of function 5 An error occurs when accessing read write the disk data 6 A bad sector is detected on the hard drive Green The system is ready Deep flashes of...

Страница 14: ...or of the two LAN ports on the rear panel LED Description LED Description 10GbE Port Speed Green 10G Yellow 5G 2 5G 1G 100M ACT LINK Blinking data is being sent received Green no activity 1GbE Port Sp...

Страница 15: ...ge 7 1 5 Rear Panel 1 10 Gigabit Ethernet port 5 Power supply unit 2 2 IPMI VGA port 6 Four USB 3 2 Gen 1 ports 3 Gigabit Ethernet port with NCSI support 7 Two USB 2 0 ports 4 Power supply unit 1 8 PC...

Страница 16: ...core 2 30 GHz 24 75M cache PCH Intel C422 Memory Four DDR4 ECC RDIMM LRDIMM slots support up to 265 GB Pre installed 32 GB Processor Cooling Water cooling system TPM 1 x TPM 2 0 pin header IPMI IPMI...

Страница 17: ...system status network drive LED Button Power button LCM LCM with two control buttons Dimensions HxWxD 176 15 mm x 480 94 mm x 644 00 mm 6 94 x 18 93 x 25 35 Power Consumption In operation 285 W Power...

Страница 18: ...GRAND C422 20D H Page 10 1 7 Dimensions The dimensions of the GRAND C422 20D H are listed below Figure 1 2 Dimensions Unit mm...

Страница 19: ...GRAND C422 20D H Page 11 Chapter 2 2 Unpacking...

Страница 20: ...ontact the IEI reseller or vendor the GRAND C422 20D H was purchased from or contact an IEI sales representative directly by sending an email to sales ieiworld com The GRAND C422 20D H is shipped with...

Страница 21: ...r 3 5 HDD installation Table 2 1 Package List 2 2 Optional Item The following are optional component s which may be separately purchased Microsemi Adaptec SmartRAID 3154 24i RAID adapter P N 7F200 SMA...

Страница 22: ...GRAND C422 20D H Page 14 Chapter 3 3 Installation...

Страница 23: ...fore handling the board touch any grounded conducting material During the time the board is handled frequently touch any conducting materials that are connected to the ground Use an anti static pad Wh...

Страница 24: ...ical values indicated on the label attached to the back of the GRAND C422 20D H 3 3 Expansion Card Installation WARNING The following instructions should only be performed by an authorized and trained...

Страница 25: ...oosen the two captive screws on the rear of the GRAND C422 20D H Slide the top cover towards rear panel Grab the handle to lift the top cover off the system Step 4 Remove the screw s from the expansio...

Страница 26: ...t Fasten screw s to lock in card i Step 6 Re install the top cover Step 7 Reconnect all cables back into the GRAND C422 20D H 3 4 Hard Drive Installation The GRAND C422 20D H is compatible with 2 5 in...

Страница 27: ...ck CAUTION IEI disclaims any responsibility for product damage malfunction or data loss recovery due to misuse or improper installation of hard disks in any occasions for any reasons 3 4 1 Hard Drive...

Страница 28: ...2 drive slots for installing 2 5 3 5 SAS SATA HDD SSD To install the hard drive into the system please follow the steps below Step 1 Press the button to release the HDD tray as shown in Figure 3 1 Fig...

Страница 29: ...e 3 3 Figure 3 3 HDD Tray Installation 2 5 3 5 Step 4 Insert the drive tray into the GRAND C422 20D H all the way to the end Close and lock the latch to secure the drive tray See Figure 3 4 Figure 3 4...

Страница 30: ...H also has 8 drive slots for installing 2 5 SAS SATA SSD To install the hard drive into the system please follow the steps below Step 1 Press the button to release the HDD tray as shown in Figure 3 5...

Страница 31: ...ure 3 7 Figure 3 7 Drive Tray Installation 2 5 Step 4 Insert the drive tray into the GRAND C422 20D H all the way to the end Close the latch to secure the drive tray See Figure 3 8 Figure 3 8 HDD Inst...

Страница 32: ...o the internal electronic components and may also cause injury to the user To power on the GRAND C422 20D H please make sure of the following The HDD SSD is installed The LAN cable is connected The po...

Страница 33: ...0D H Page 25 Step 2 Push the power button Figure 3 10 Figure 3 10 Power Button Step 3 To turn off the GRAND C422 20D H press the power button for 1 5 seconds To force turn off press the power button f...

Страница 34: ...GRAND C422 20D H Page 26 Chapter 4 4 Maintenance...

Страница 35: ...ils on anti static precautions please refer to Section 3 1 4 1 Component Replacement Procedure WARNING Users are not advised to attempt to repair or replace any internal or external components of the...

Страница 36: ...0D H Step 2 Put on an antistatic wrist strap to prevent electrostatic discharge The crocodile clip should be connected to the ground Step 3 Loosen the two captive screws on the rear of the GRAND C422...

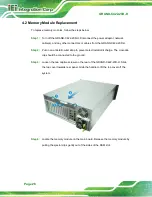
Страница 37: ...a memory module Step 7 Set the stick into the slot and apply equal pressure onto both ends of the stick until the clamps on the side click and fully lock the RAM in Step 8 Re install the top cover St...

Страница 38: ...e power adaptor network cable s and any other connectors or cables from the GRAND C422 20D H Step 2 Firmly press and hold the green button on back of PSU towards the black handle Pull out power supply...

Страница 39: ...GRAND C422 20D H Page 31 Appendix A A Regulatory Compliance...

Страница 40: ...requirements and other relevant provisions of Directive 1999 5 EC Bulgarian IEI Integration Corp 1999 5 esky Czech IEI Integration Corp t mto prohla uje e tento za zen je ve shod se z kladn mi po ada...

Страница 41: ...etuvi Lithuanian IEI Integration Corp deklaruoja kad is ranga atitinka esminius reikalavimus ir kitas 1999 5 EB Direktyvos nuostatas Nederlands Dutch IEI Integration Corp dat het toestel toestel in ov...

Страница 42: ...i direktive 1999 5 ES Slovensky Slovak IEI Integration Corp t mto vyhlasuje e zariadenia sp a z kladn po iadavky a v etky pr slu n ustanovenia Smernice 1999 5 ES Suomi Finnish IEI Integration Corp vak...

Страница 43: ...rence at his own expense Federal Communication Commission Interference Statement This equipment has been assembled with components that comply with the limits for a Class B digital device pursuant to...

Страница 44: ...GRAND C422 20D H Page 36 Appendix B B Safety Precautions...

Страница 45: ...H is opened Make sure the power is turned off and the power cord is disconnected whenever the GRAND C422 20D H is being installed moved or modified Do not apply voltage levels that exceed the specifi...

Страница 46: ...the following anti static precautions are strictly adhered to Wear an anti static wristband Wearing a simple anti static wristband can help to prevent ESD from damaging any electrical component Self g...

Страница 47: ...lectronic products carrying the mark left must be disposed of separately from normal household waste This includes monitors and electrical accessories such as signal cables or power cords When you nee...

Страница 48: ...be explicitly mentioned in the cleaning tips Below is a list of items to use when cleaning the GRAND C422 20D H Cloth Although paper towels or tissues can be used a soft clean piece of cloth is recom...

Страница 49: ...GRAND C422 20D H Page 41 Appendix C C Hazardous Substances Disclosure...

Страница 50: ...henyls PBB Bis 2 ethylhexyl phthalate DEHP Butyl benzyl phthalate BBP Dibutyl phthalate DBP Diisobutyl phthalate DIBP Housing O O O O O O O O O Display O O O O O O O O O Printed Circuit Board O O O O...

Страница 51: ...VI PBB PBDE 2 DEHP BBP DBP DIBP O O O O O O O O O O O O O O O O O O O O O O O O O O O O O O O O O O O O O O O O O O O O O O O O O O O O O O O O O O O O O O O O O O O O O O O O O O O O O O O O O SJ T...

Отзывы: