background image

32

4

Help

This section gives a number of suggestions allowing problems that may arise when using your printer to be pinpointed. If you do not manage to solve your 

problem, this section also explains how to contact IDville technical support.

4-1 Warnings and Diagnosis

Although the ID Maker printer was designed to work independently, keeping user involvement to a minimum, it may nonetheless prove useful to gain some 

familiarity with the main warnings.

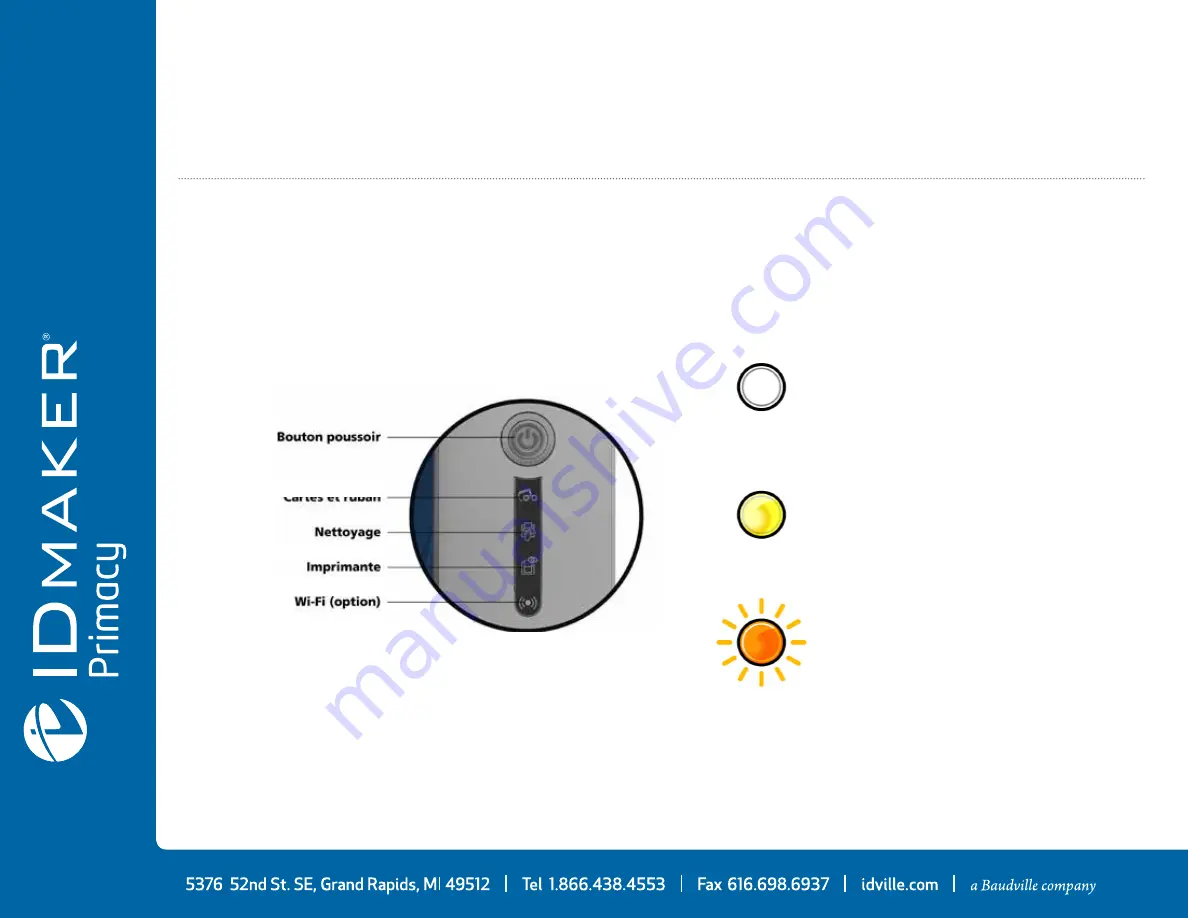
4-1a Control Panel Warnings

See 

section 1 - Description of the printer and its functions

 for further details about the control panel.

OFF

STEADY LIGHT

FLASHING

Pushbutton

Cards and ribbon

Cleaning

Printer

Содержание ID MAKER Elypso

Страница 1: ...USER GUIDE ID Maker Card Printer 2013 All rights reserved April 2013 Ref KU PRM1 037 ENG Rev A0 ...

Страница 2: ...ons Environmental information IDville is committed to helping the environment by reducing the energy consumption of its products ID Maker printers have been certified ENERGYSTAR due to their low power consumption Recycling of end of life products The manufacture of the equipment that you have purchased required the extraction and use of natural resources It may contain materials that are hazardous...

Страница 3: ...s visit our website at idville com Warranty Registration Please register on line at idville com to receive our special offers and general information Once on the website click on Drivers and Support then on Register your printer and fill in all the fields giving in particular the model and serial number found on your printer Getting Started The purpose of this user guide is to guide you step by st...

Страница 4: ... and draughts but well ventilated Take care to keep your printer on a flat sturdy surface able to bear its weight Getting Started 1 1 Unpacking Your printer is supplied with several accessories that we ask you to look at closely This list may vary depending on your location The printer is shipped in special packaging designed to prevent any damage in transit If you notice any visible damage do not...

Страница 5: ...Functions A Card input feeder B Output hopper C Control panel D USB connector type A E USB connector type B F Ethernet connector G Power cable socket H Place for Kensington lock I Place for reject box Pushbutton Cards and ribbon Cleaning Printer ...

Страница 6: ...ler or to experienced users The machine should always be disconnected from the power supply unplugged before carrying out any work on it J Thermal print head K Side panel opening mechanism L Cleaning roller M Card thickness adjustment gauge N Dust filter O Location for double sided printing activation key P Serial number label ...

Страница 7: ... switches to hibernation mode after 30 minutes in standby mode The standby times can be configured in the ID Maker Print Center In standard standby mode sending a print request restarts the printer and quickly pressing for 1 second on the button exits the printer from hibernation mode 1 3 Installation 1 3a Connecting the Printer Connection to the power supply 1 Connect the power cable to the power...

Страница 8: ...bons from other suppliers is liable to damage your printer and voids the manufacturer s warranty for the printer For optimum print quality IDville recommends that the printer is fully cleaned every time the ribbon is changed See the Servicing and Maintenance section of this manual 1 Open the cover 2 Insert the ribbon as shown 3 Close the cover and press until a click is heard Fitting the ribbon ...

Страница 9: ... of the cards in order to preserve print quality Do not use cards that have been damaged folded embossed or dropped on the floor Keep your cards protected from dust 1 3c Cards Loading the cards 1 Open the card feeder 2 Insert the cards a maximum of 100 cards of thickness 0 76 mm Ensure the cards are positioned as illustrated in the diagram 3 Close the feeder ...

Страница 10: ...nted and or encoded cards The printer is equipped with an output hopper with a maximum capacity of 100 x 0 76 mm cards Adjusting card thickness The printer is equipped with a manual card thickness adjustment mechanism which can be reached through the card feeder when open The printer accepts cards between 0 25 mm and 1 25 mm thick 10 to 50 mil The factory setting is 0 76 mm ...

Страница 11: ...1 1 3 2 To adjust card thickness 1 Open the card feeder on the printer 2 Adjust the thickness of the cards used by moving the gauge from right to left to the desired card thickness 3 Then close the feeder ...

Страница 12: ...e reject box The printer is fitted with a removable reject box which is positioned behind it The reject box can hold 30 cards To empty it just remove the cards in it IDville recommends that you empty this box regularly ...

Страница 13: ...require the user to have administrator rights to install the driver Printing 2 1 Installing the Print Driver New advanced functions automate printer configuration after the print driver has been installed Your printer is delivered with a CD containing the print drivers forWindows and Macintosh platforms To install a print driver insert the CD into your computer and select the print driver menu A p...

Страница 14: ...graphic application called ID Maker Print Center is available to help you if necessary to change certain predefined settings To access this application From the Start button on the bottom left of your screen in theWindows task bar select All programs ID Maker Card Printer ID Maker Software ID Maker Print Center The application displays all connected ID Maker printers ...

Страница 15: ...ttention to the settings defined under the print driver properties and do not hesitate to contact IDville for any advice and assistance needed before making any changes Select the desired printer Right click the name of the printer select Properties to access the settings or double left click the name of the printer ...

Страница 16: ... of your print requests Warnings about problems which have stopped the printer When the ID Maker Printer Manager is active a small icon is displayed in the bar on the bottom right of your screen The color of the icon varies according to the status of the printer Green Printer ready Orange Information message issued printing stopped Red Warning message issued printing stopped Grey Printer in hibern...

Страница 17: ...the MS Word application Click on the File in the menu bar then on Page Setup In the Margins tab set all margins to 0 then in the Orientation section select Landscape The Paper tab has a Paper Size option select CR80 Card ForWord 2010 click the Page layout tab then click on Size and select CR80 Card Close the window by clicking OK Your Word window should now look like this You are ready to customiz...

Страница 18: ...ble sided printing upgrade by contacting IDville This kit comprises an activation key which must be inserted into the printer This operation is quick and easy to do Follow the procedure below 1 Turn on your printer It must not be turned off or on standby 2 Open the printer cover 3 Remove the printer ribbon 4 Insert the key as shown in the diagram ...

Страница 19: ...trol panel start flashing one after the other for between 5 and 10 seconds Activation has completed successfully when the 3 LEDs remain lit for several seconds then turn off 6 Open the coverA and remove the activation keyB 7 Refit the ribbon 8 Close the cover ...

Страница 20: ...h aTCP IP network connection Out of the box the printer comes configured in DHCP mode Dynamic Host Configuration Protocol which means that its IP address is supplied by the network In addition to these basic settings the network administrator has the option of configuring the printer differently in order to comply with the constraints imposed by the corporate LAN Printer connected in a subnet in D...

Страница 21: ...diate environment on the print head or on the cards Users must take all necessary precautions to insert only clean cards free of dust deposits or foreign bodies into the machine The frequency and quality of cleaning are decisive factors enabling users to extend the print head s useful life and to ensure excellent print quality Particular care must therefore be taken with cleaning Users must comply...

Страница 22: ...e valid Recommended cleaning cycle whenever the ribbon is changed Mandatory cleaning cycle when the cleaning warning is triggered Servicing accessory adhesive cleaning card Your printer is fitted with a cleaning warning system which is triggered after a certain number of cards have been inserted You should proceed with the routine cleaning of your printer as soon as the warning is triggered If you...

Страница 23: ...e printer cleans the cleaning roller in order to maintain print quality and increases the service life of the print head 1 Open the printer cover 2 Remove the ribbon as shown on the diagram 3 Close the cover and check it has clicked shut 4 Open the feeder of the printer 5 Using the lever set the card thickness to the MAX position 1 3 2 5 4 ...

Страница 24: ...ge to the desired card thickness 6 Remove any cards present in the feeder 7 Double click the cleaning button on the control panel before inserting the cleaning card 8 Remove the film from the adhesive cardA and insert the cleaning card into the feeder as shown adhesive side upB Cleaning starts 9 The used cleaning card is ejected automatically into the output hopper ...

Страница 25: ... objects Avoid touching the print head directly with your fingers as this could affect print quality or permanently damage the print head 3 2b Servicing the Print Head However to maintain the original print quality and to absorb surplus ink on the print head we recommend that you regularly clean the print head whenever the ribbon is changed and during the routine cleaning using the cotton buds sup...

Страница 26: ... ID Maker cotton bud and press the middle of the tube until the end of the cotton bud is impregnated with alcohol 2 Unplug the power supply cable open the cover then find the print head 3 Gently rub the cotton bud from left to right along the print head for a few seconds 4 Close the cover Reconnect the printer ...

Страница 27: ...nance kit consisting of 2 adhesive cards 2 impregnated T shaped cards a cleaning pen and a box of 60 wipes The T shaped card is used to clean the card feed rollers and the magnetic encoder head To ensure advanced cleaning is carried out properly the procedure given below must be followed 3 3a Routine Printer Cleaning Follow the procedure below 1 Open the printer cover 2 Remove the ribbon as shown ...

Страница 28: ... thickness to the MAX position 6 Remove any cards present in the feeder 7 Double click the cleaning button on the control panel before inserting the cleaning card 8 Take the T shaped cleaning card and insert it in the feeder as shown Cleaning starts ...

Страница 29: ...it for 2 minutes after cleaning before using your printer Before using your printer remember to reset the gauge to the desired card thickness 9 Remove the T shaped card then remove the film from the adhesive cleaning card1 and insert the cleaning card into the feeder as shown adhesive side up2 Cleaning starts 10 The used adhesive card is ejected automatically into the output hopper ...

Страница 30: ... directly with your fingers as this could affect print quality or permanently damage the print head Wait for 2 minutes after cleaning before using your printer 3 3b Servicing the Print Head The cleaning pen can be used up to 8 times for cleaning the print head Follow the procedure below 1 Remove the cover from the cleaning pen 2 Unplug the power supply cable open the cover then find the print head...

Страница 31: ...g environment 1 Open the printer cover Locate the dust filter 2 Remove the filter by pulling it upwards and slide it out to release it completely 3 Once the filter is removed from its slot obtain a cleaning wipe supplied by IDville 4 Clean the filter by rubbing the wipe either side of it 5 To replace it insert it in its slot notch towards you and lower it until you hear it click indicating it is c...

Страница 32: ...nical support 4 1 Warnings and Diagnosis Although the ID Maker printer was designed to work independently keeping user involvement to a minimum it may nonetheless prove useful to gain some familiarity with the main warnings 4 1a Control Panel Warnings See section 1 Description of the printer and its functions for further details about the control panel OFF STEADY LIGHT FLASHING Pushbutton Cards an...

Страница 33: ...zed Check the condition of the ribbon in the printer If you have a print job in progress this restarts with a new card The printer is receiving data No cards in the card feeder Put cards back into the feeder the process starts again Card loading error Check cards have been loaded For any other problem contact your IDville Printer Ready Ribbon Processing Cards ...

Страница 34: ... refer to section 4 3b If the problem persists contact your Evolis dealer for assistance Mechanical Error The printer requires advanced cleaning See section 3 Maintenance Advanced Cleaning The printer must be cleaned See section 3 Maintenance Routine Cleacing after 1 000 cards have been inserted The printer must be cleaned to avoid the risk of the warranty being voided See section 3 Maintenance Cl...

Страница 35: ...pdating its Firmware The printer restarts following the update Cooling Mode Waiting for a Card to be Inserted or Removed Firmware Update The printer is waiting for a card to be inserted or removed Insert a card or remove the card from the manual feeder see section 1 Getting started The wireless Wi Fi connection has been enabled You can start printing WI FI ON option ...

Страница 36: ...ou may be asked to run by IDville to help you as effectively as possible 4 2a Printing a Technical Test Card The technical test card must be printed when you receive your machine to ensure your printer is operating correctly This card shows various items of technical information concerning the machine serial number firmware cleaning operations print head etc You may be asked for these by your deal...

Страница 37: ...Software Versions You can identify directly the system versions installed print driver set etc 1 In Evolis Print Center double click the name of the printer to display its Properties 2 Click System information then System information ...

Страница 38: ... is lit Make sure you are using the power supply unit supplied with the printer 3 Check the USB cable Check that the USB cable is connecting the printer to your computer 4 Check the ribbon Check that the ribbon is fitted correctly and that the cover is closed 5 Check the cards Check that there are cards in the card feeder Check that no cards are jammed in the printer 6 Print a test card See elsewh...

Страница 39: ...w cards Cleaning roller or print head clogged Run a cleaning cycle The ribbon is not correctly fitted Check that there are no wrinkles on the ribbon surface Print head dirty or damaged Clean or replace the print head The ribbon is not correctly fitted Check that the ribbon is correctly positioned in the printer Poor ribbon synchronization Open and close the printer cover to synchronize the ribbon ...

Страница 40: ...puter and the printer Try using another cable of the same type Check that the printer is clean Clean the printer especially the cleaning roller See the maintenance section Check that the cards are clean Store your cards protected from dust Check the ribbon Check that the ribbon is fitted correctly Check that the ribbon spools freely Check the print head Should horizontal straight lines appear on p...

Страница 41: ... card is still stuck inside the printer slide it manually towards the printer output If there is more than one card always push the top one first 3 Replace the ribbon then close the printer cover To prevent card jams Check that the card thickness gauge is correctly adjusted Check that the thickness of the cards used matches the specifications set out in Appendix A Technical specifications in this ...

Страница 42: ...e environment free from dust or other particles ensure a lengthy useful life Nonetheless the print head may sometimes need to be replaced IDville has designed a unique device enabling users to undertake such replacement with no tools needed simply by following the instructions very carefully Before doing anything else please contact IDville in order to check the advisability of replacing the print...

Страница 43: ...ad 3 Press on the plastic part behind the head pressure plate and pull on the head with the other hand as shown in the diagram in order to free the lugs from the holding fork then remove the lugs from their slots 4 Tilt the head carefully downwards and disconnect the connector linked to the cable without using force on the mechanism Step 1 Removing the Defective Print Head ...

Страница 44: ...raising it in the two guides so as to trap the lugs of the fork in their slotsA then lower it by pressing on the two forksB a click will be heard 3 Connect the cable into its socket making sure it is the right way round Do not use any force as this part is relatively fragile Press down on each side of the connector to ensure a good connection is made 4 The head is back in position 5 Close the cove...

Страница 45: ...rinter CLEANING Step 3 Configuring the New Print Head 1 Power up the printer and check that it is properly connected to a computer on which the printer s ID Maker Print Center is installed 2 In Maintenance of ID Maker Print Center click on the Change print head tab 3 Enter the PKN number of the print head kit in Enter PKN no the number you noted down in step 2 Then click Confirm Step 4 Cleaning th...

Страница 46: ...dates can be downloaded from the website at idville com 1 Go to the Support Drivers menu then select your printer model and click on the Print drivers and Firmware link 2 Then click on the file for the corresponding Firmware 3 Accept the download then save the file in a directory on your hard drive The firmware is stored compressed as a zip file which you will need to extract 4 Then double click o...

Страница 47: ...ns or gain the benefit of new options 1 Go to the Support Drivers menu then select your printer model and click on the Print drivers and Firmware link 2 Then click on the file for the corresponding print driver 3 Accept the download then save the file in a directory on your hard drive The firmware is stored compressed as a zip file which you will need to extract 4 Then double click on the setup ex...

Страница 48: ...ng A description of the incident that has occurred A description of the steps that you have taken to resolve the problem In addition to enable you to find answers to your questions 24 7 the idville com website includes a number of aspects related to day to day use of your printer 4 4b Finding Information on idville com If you need additional technical help you will find a great deal of information...

Страница 49: ...our Maximum speed under special conditions Color up to 210 cards hour single side Monochrome up to 850 cards per hour single side Card Management and Technical Data Automatic or manual feeder Feeder capacity 100 cards 0 76 mm 30 mil Output hopper capacity 100 cards 0 76 mm 30 mil Reject box 30 cards 0 76 mm 30 mil Card thickness 0 25 to 1 25 mm 10 to 50 mil adjustment using the gauge 0 25 mm 10 mi...

Страница 50: ...hed Integrated ribbon saving for monochrome printing Ribbon YMCKO 300 prints roll YMCKO K 200 prints roll 1 2 YMCKO 400 prints roll KO 600 prints roll Monochrome ribbons 1000 prints roll1 Hologram ribbon 400 prints roll 1 Under specific conditions Ports Connectivity USB 1 1 compatible 3 0 EthernetTCP IP 10BaseT 100BaseT Traffic Led Optional 802 11b g wireless connection Display LEDs Graphic printe...

Страница 51: ...indows2 XP SP3 Vista 32 64 W7 32 64 W8 32 64 Supplied with eMedia CS card designer Standard Edition unlimited version compatible withWindows 7 andVista Supplied with Mac OS X printer driver from 10 5 Linux platform on request SDK available on request 1 Requires net 4 0 client profile version 2 For older versions of Windows you can only use the printer via a printer driver there is no Print Center ...

Страница 52: ...pressure in assistant positions LpAm color mode YMCKO In operation 48 dB A Standby mode background noise level Security Place for Kensington lock Data encryption for magnetic encoding Eco Design and Certifications Standby mode and reduced power consumption Printer ENERGYSTAR certified Printer meets the Energy Related Products Directive ErP 2009 125 EC Contents of the Packaging Printer CD ROM with ...

Страница 53: ...of Conformity CE FCC IEC VCCI CCC KC ErP 2009 125 CE ENERGY STAR RoHS 13 56 MHz PLL ASK semi duplex operation Power Supply Power supply module 100 240Volts AC 50 60 Hz 1 7A Printer 24Volts DC 2 7 A Environment Min max operating temperature 15 30 C 59 86 F Humidity 20 to 65 without condensation Min max storage temperature 5 70 C 23 158 F Storage humidity 20 to 70 without condensation Ventilation in...

Страница 54: ...ion FCC Part 15 Subpart A Section 15 107 a and Section 15 109 a Class B Digital device Additional information This equipment has been tested and found to comply with the limits for a Class B digital device pursuant to part 15 of the FCC Rules These limits are designed to provide reasonable protection against harmful interference in a residential installation This equipment generates uses and can r...

Страница 55: ...gnetic encoder works in exactly the same way as a basic card printer The ID Maker encoder encodes the magnetic stripes in a single pass then runs a data check Although able to be configured as high coercivity HiCo or low coercivity LoCo by a simple click in ID maker Print Center ID Maker magnetic encoders come factory set for high coercivity HiCo Location of the Magnetic Encoder The magnetic encod...

Страница 56: ...aced in the card feeder so that the magnetic stripe is facing downwards as shown below 1 Open the printer card feeder as shown 2 Insert a maximum of 50 cards of thickness 0 76 mm Hold the cards as shown in the diagram magnetic stripe downwards 3 Close the feeder ...

Страница 57: ...magnetic encoding to high HiCo or low LoCo coercivity A magnetic stripe that is encoded with high coercivity is more resistant to external disturbance than a magnetic stripe encoded using low coercivity Encoding via an application is used to encode magnetic stripe cards from applications underWindows such asWord for example A text field enclosed within and characters or some other character which ...

Страница 58: ... Maintenance section of this manual for further information Repeatedly running the cleaning card through the printer cleans the card feed rollers the cleaning rollers the print head and the magnetic encoder read write head If in between two routine printer cleaning runs every 1000 cards inserted the read write process fails with more than one card it is recommended to run an advanced printer clean...

Страница 59: ...ker smartcard contact station is used to program chips to ISO 7816 2 standards Contact Station Location The contact station is a module installed either in the factory or on site by IDville It is located over the path taken by the cards and after the print head To contact the smartcard the contact station descends mechanically against the smartcard The programming sequence for a chip is always car...

Страница 60: ...feeder so that the chip contact is facing upwards as shown below 1 Open the printer card feeder as shown 2 Insert a maximum of 50 cards of thickness 0 76 mm smartcard contact upwards Ensure the cards are positioned as illustrated in the diagram 3 Close the card feeder ...

Страница 61: ...ly with a smartcard contact station without integrated encoder are fitted with a female DB 9 connector which is found on the back of a printer This connector directly connected to the contact station inside the printer is also connected to an external coupler to program the chip Asequenceofcommandsmustbesentviatheprinter sinterfacetoinsertacardintotheprinterthenpositionitunderthestationandestablis...

Страница 62: ... sequence A card is moved from the feeder to the contact station and stops underneath it The contact station is pushed downwards to make contact with the card The printer connects the contact station to the DB 9 connector The chip can be programmed via the external coupler The ID Maker product catalogue also includes printers equipped with a chip contact station and a built in encoder These encode...

Страница 63: ...cation of the Antenna or the encoder including an antenna By means of a specific command the card is positioned close to the antenna such that the card lies within its radio range Reading data from or writing data to the card can then start The programming sequence for a chip is always carried out before the card is printed Card Positioning There is in theory no restriction on card positioning whe...

Страница 64: ...and secondly the encoder from the computer If your encoder is supplied with an RS 232 interface it needs to be connected to the computer via a serial cable This cable plugs into the printer s female DB 9 socket and into a COM port on the computer The command sequence is as follows Sending the SIC sequence A card is moved from the feeder towards the antenna and is positioned nearby The chip is prog...

Страница 65: ...panel 1000 prints roll R2F010XXX KO black and clear overlay 600 prints roll Color Ribbons R5F002XXX YMCKO 200 prints roll R5F008XXX YMCKO 300 prints roll R5H004XXX 1 2 YMCKO 400 prints roll R6F003XXX YMCKO K 200 prints roll Special Ribbon RVA022XXX Genuine Globes hologram ribbon 400 prints roll XXX the product reference number may vary depending on your region Appendix D D1 Consumables and Accesso...

Страница 66: ... impregnated T shaped cards A5003 Cotton bud cleaning kit for cleaning the print head 25 cotton buds with foam ends and reservoir with isopropyl alcohol IPA ACL005 Pen cleaning kit for cleaning the print head 3 cleaning pens up to 8 uses per pen Cards C4001 Blank white PVC cards Standard 0 76 mm 5 boxes of 100 cards C4002 Blank white PVC cards Standard 0 50 mm 5 boxes of 100 cards C4003 Blank whit...

Отзывы: