background image

ID TECH ViVOpay VP5200 User Manual 

Page | 10  


2.9.1.


Connecting to Power 

The VP5200 can be powered through the RS-232 communications cable or the USB cable. 
 
Connect the +5VDC power supply (P/N AC0005R-3B) to the barrel receptacle on the RS-232 cable or 
use USB port power, as appropriate.  
 
Plug the unit in to an AC outlet and verify that the VP5200 lights up. 
 

2.10.


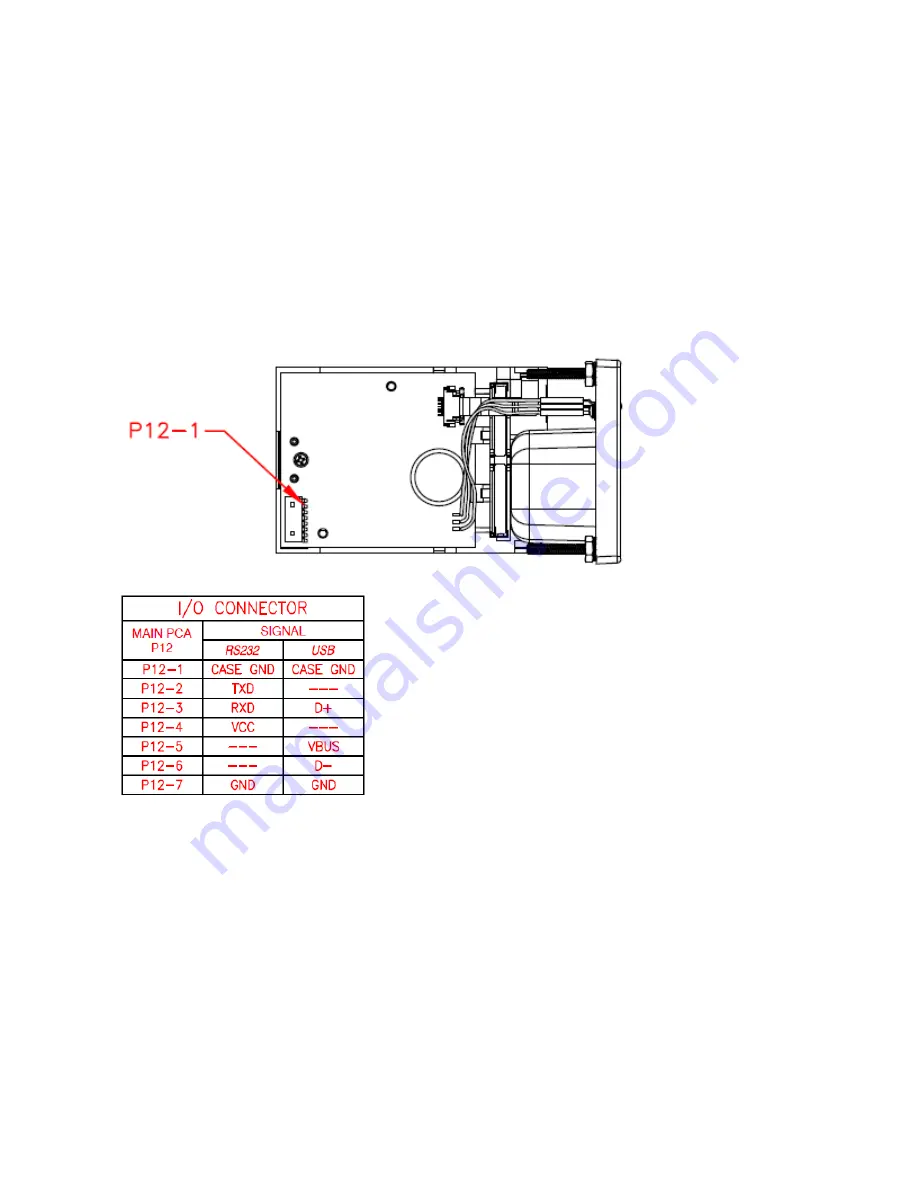
Connecting to the Data Port 


Содержание ViVOpay VP5200

Страница 1: ...ViVOpay VP5200 User Manual 80167501 001 Rev B December 20 2019 ...

Страница 2: ...registered trademark of International Technologies and Systems Corporation ViVOpay and Value through Innovation are trademarks of International Technologies and Systems Corporation Other trademarks are the property of the respective owner Warranty Disclaimer The services and hardware are provided as is and as available and the use of these services and hardware are at the user s own risk ID TECH d...

Страница 3: ...ical Mechanical Characteristics 7 2 5 VP5200 Durability and Reliability Specs 7 2 6 VP5200 3 View Drawing 8 2 7 VP5200 Installation 9 2 8 Parts List 9 2 9 Installation of Reader 9 2 10 Connecting to the Data Port 10 2 11 LED Management 11 2 12 Front LED Status 11 2 13 Installation 11 3 FIRMWARE UPGRADE 12 3 1 Uploading Firmware for RS 232 or USB 12 4 TROUBLESHOOTING 15 ...

Страница 4: ...ndards of EMV Level 1 and Level 2 It offers easy integration of payments into self serve kiosk and unattended environments of all kinds The ViVOpay VP5200 VP5200 PCI EMV Certified Insert Reader Model Number Description IDV52 783 33 1NG0C 00 Outdoor hybrid insert reader plastic flush mount bezel no SAM TDES Card Present switch Contact controller module IDV52 783 33 1NG0CD 00 Same as above but with ...

Страница 5: ...s section on the ID TECH Knowledge Base for the latest VP5200 demos utilities SDK updates white papers and other downloads all of which are freely available without registration 2 Features The VP5200 supports the following features ICC reader with landing contact Contact EMV Level 1 certified o Contact EMV Level 2 certified using ID TECH s proven Common Kernel Dual head MSR reads up to 3 tracks of...

Страница 6: ... 7810 ISO 7811 specification Supports AAMVA format Supports JIS I II card format Supports single dual and triple tracks Bi directional reading Contact EMVCo Contact Level 1 2 using ID TECH L2 Common Kernel Power Management Low power modes Sleep RS 232 and USB Suspend Key injection Compatible with FutureX HSMs for Data Key Injection Can communicate with HSM via USB with use of adapter or RS232 port...

Страница 7: ...using Color Black Weight 0 2 kg Environmental Characteristics Category Support Operating Temperature 25 C to 70 C 13 F to 158 F max change of 10 C per hour Storage Temperature 40 C to 80 C 40 F to 176 F Operating Humidity 10 to 95 non condensing Storage Humidity 10 to 95 non condensing duration 3 months Transit Humidity 5 to 95 non condensing duration 1 week Operating Environment Water resistant f...

Страница 8: ...ID TECH ViVOpay VP5200 User Manual Page 8 2 6 VP5200 3 View Drawing ...

Страница 9: ...e installation of the VP5200 VP5200 P N IDV52 783 33 1NG0C 00 or 1NG0D 00 demo USB cable P N 80035212 002 or RS 232 cable CAB1041 1 Power supply P N AC0005R 3B 2 9 Installation of Reader Refer to the VP5200 3 view drawing Verify that power cords can physically reach the unit Then proceed to Locate mark and drill holes for the four main mounting points of the unit spaced 61 5 mm apart lengthwise on...

Страница 10: ...ered through the RS 232 communications cable or the USB cable Connect the 5VDC power supply P N AC0005R 3B to the barrel receptacle on the RS 232 cable or use USB port power as appropriate Plug the unit in to an AC outlet and verify that the VP5200 lights up 2 10 Connecting to the Data Port ...

Страница 11: ...emove the smart card If the transaction mode was MSR magstripe card data is sent out 3 Solid Red The recent magstripe card read was bad Red lasts 1 second 2 13 Installation The VP5200 is designed to be mounted on a metal surface and in reasonably close proximity to any internal motors and electrical devices that may be operating inside the kiosk Tie all cables neatly with nylon cable ties and rout...

Страница 12: ...ction use Baud Rate of 115200 default with settings 8 N 1 1 Move firmware files FM and bootloader EXE files into the same folder 2 Check and confirm the device is correctly connected to the power source and RS 232 USB connection 3 If RS 232 is the interface choice close all software using RS 232 communication 4 Launch IDtechBootload EXE from the firmware package with the VP5200 connected 5 Follow ...

Страница 13: ...e screenshots above to load the bootloader_loader_Vx xx_1 fm file note that this time we are loading the 1 fm file 7 Repeat the same steps in the screenshot above to load the VP5200_v1 00 020 0151 S_Test fm file or the specific version firmware file included in your package ...

Страница 14: ... the screenshot below 8 Install all the kernel files by following the numbered steps shown in the screenshot below When all is done the LED on the reader should be back to solid green 9 Exit the Bootloader app and launch the USDK Demo app available for download on the ID TECH Knowledge Base Run the Firmware Version command under Device to verify the new firmware ...

Страница 15: ... firmware contact your local support representative Check to see if card is damaged Verify that correct firmware is loaded on reader local support representative only Card readers must contain the latest versions of card brand public certificates CAPKs If a CAPK is out of date one kind of card may no longer be usable Update the CAPK Communication to Kiosk No data is received or data is garbled Fau...

Отзывы: