background image

IDS Ingegneria Dei Sistemi S.p.A. 

N. doc.: MN/2009/056 - Rev. 1.1 

RIS  Hi-Mod  /  DUALF-400-900    -  Installation  Guide 
and User Manual


20 

44 

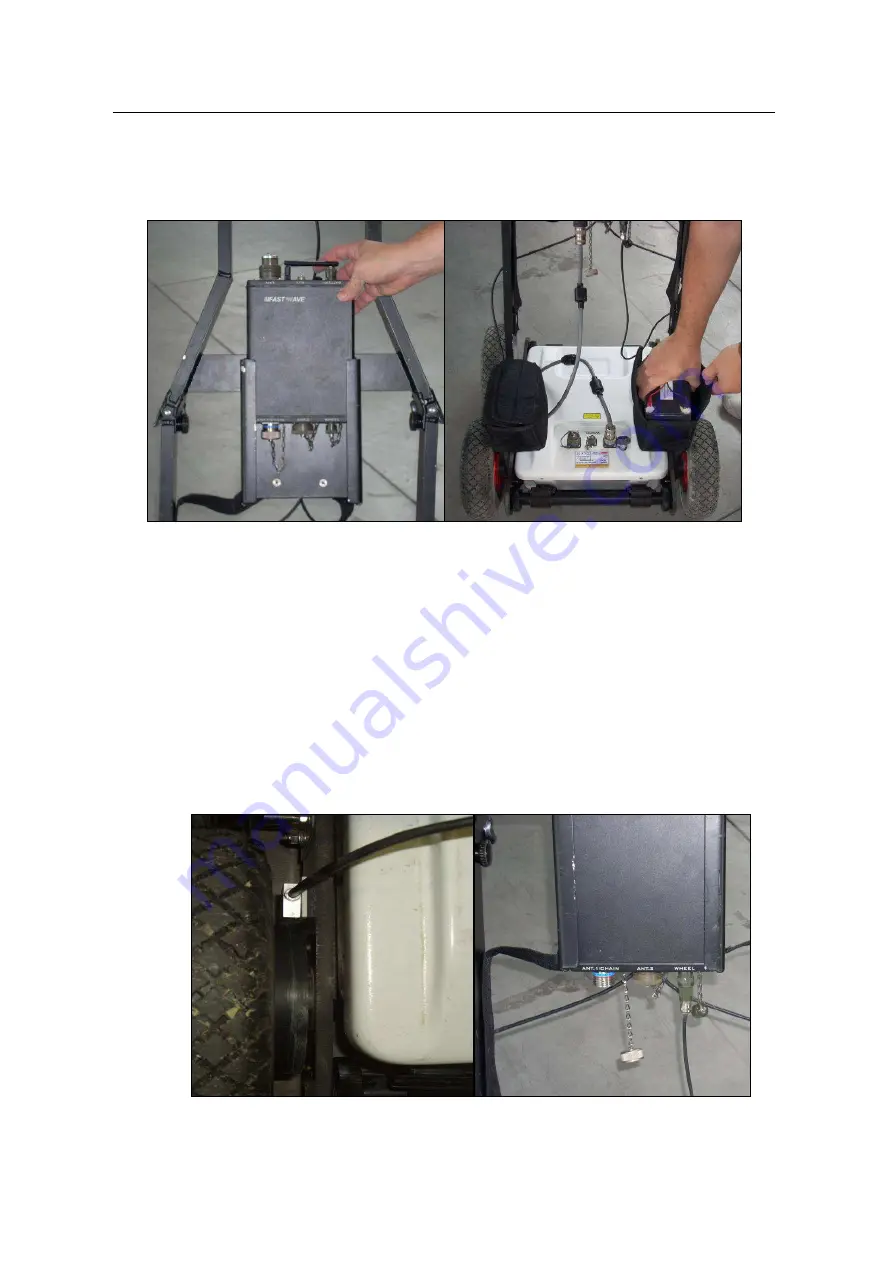
Finally put the DAD Control unit inside the box in the middle of the rudder (Fig. 
1.9) and the battery in one of the two small black bags


Fig. 1.9 – Insertion of the DAD Control Unit and battery 


1.1.2


Wiring 

Once the DAD unit is in place you have to connect it with the magnetic encoder, 
the antenna, the battery and your laptop. 

The  magnetic  encoder  cable  is  located  on  one  of  the  wheel  frames.  Let  it  pass 
through the black strip on the rudder until you reach the first ferrite then link the 
connector with the Wheel port of the DAD unit (Fig. 1.10). 


Fig. 1.10 – Magnetic encoder cable 

Содержание RIS Hi-Mod

Страница 1: ...010 M1 Rev 4 INGEGNERIA DEI SISTEMI S p A Rev 1 1 N doc MN 2009 056 RIS Hi Mod DUALF 400 900 Systems Installation Guide and User Manual Pisa December 2010 RIS Hi Mod DUALF 400 900 Installation Guide...

Страница 2: ...ion Rev 1 1 December 2010 Document revision Added DUALF 400 900 and IC information OUR CONTACTS IDS Ingegneria dei Sistemi S p A GeoRadar Division Via Enrica Calabresi 24 Loc Montacchiello 56121 PISA...

Страница 3: ...CESSING AND ANALYSIS TOOLS WHILE EVERY EFFORT IS MADE TO ENSURE THE ACCURACY OF THE INFORMATION PROVIDED BY THOSE TOOLS THEY MUST NOT BE INTENDED AS A SUBSTITUTE FOR PEOPLE ANALYSIS RATHER THEY HAVE T...

Страница 4: ...t by the member states that implement these regulations 1999 05 EEC Radio Directive Warning this equipment is destined for use in industrial environments Class A apparatus In residential commercial an...

Страница 5: ...he UWB operator shall include the name address and other pertinent contact information of the user the desired geographical area of operation and the FCC ID number and other nomenclature of the UWB de...

Страница 6: ...by the UWB operator shall include the name address and other pertinent contact information of the user the desired geographical area of operation and the FCC ID number and other nomenclature of the UW...

Страница 7: ...rated only when in contact with or within 1 m of the ground This Ground Penetrating Radar Device shall be operated only by law enforcement agencies scientific research institutes commercial mining com...

Страница 8: ...uctions 1 turn off the laptop 2 open the drawer with the symbol of the batteries 3 extract the battery pack pulling the tab Radar batteries Manufacturer FIAMM FG21202 SAFT MP176065 Type rechargeable l...

Страница 9: ...naged by IDS When you decide to dispose of the equipment contact IDS and follow the system that IDS has set up to permit the separate collection of the apparatus at its life end Adequate separate coll...

Страница 10: ...ranty terms Buyer shall have to contact IDS Customer Care Office to get the clearance to return the Faulty Parts 2 The Faulty Parts once received by IDS will be inspected to verify they are eligible f...

Страница 11: ...and User Manual 11 44 3 EXCEPT AS PROVIDED IN THIS DOCUMENT THE FOREGOING WARRANTIES ARE IN LIEU OF ALL OTHER WARRANTIES AND SELLER MAKES NO OTHER WARRANTIES WHETHER WRITTEN ORAL EXPRESS IMPLIED OR S...

Страница 12: ...2 1 The Notebook Computer 36 2 1 1 Panasonic Toughbook rugged tablet PC 36 2 2 Connecting the DAD Control Unit Notebook Computer 38 2 3 Wireless connection 40 3 On line assistance 42 3 1 Remote assis...

Страница 13: ...S LOCKING DEVICE 29 FIG 1 25 INSERTION OF ONE ANTENNA AND CLOSE UP OF THE HOOK 30 FIG 1 26 ANTENNA CABLES 30 FIG 1 27 THREE ANTENNAS CONFIGURATION 31 FIG 1 28 EQUIPMENT PROVIDED FOR THE FOUR ANTENNAS...

Страница 14: ...S Hi Mod DUALF 400 900 Installation Guide and User Manual 14 44 FIG 3 1 MAIL SENT BY IDS TO THE CLIENT 42 FIG 3 2 CLIENT DATA INSERTION FORM 43 FIG 3 3 WEBEX SET UP WINDOW 43 FIG 3 4 WELCOME TO WEBEX...

Страница 15: ...handbook shows you the equipment you will receive and guides you through the configuration of your hardware One antenna equipment and configuration Fig 1 1 shows you the equipment you will receive for...

Страница 16: ...two free bars and four knobs Fig 1 2 The bigger ones must be screwed in vertically to block the free bars in place while the little ones can be screwed in two different position if placed on the insi...

Страница 17: ...Fig 1 3 Rudder knobs bigger one on the left smaller one on the right Now you have to build the frame carrying the antenna you will need the equipment shown in Fig 1 4 Take one of the wheel frame and...

Страница 18: ...on and closed frame Place the rudder into the metallic connections of the wheel frame as shown in Fig 1 6 then insert the two locking devices shown in Fig 1 7 in the metallic connections The locking d...

Страница 19: ...f the metallic frames up and locking device down Take the antenna and make it slide in the frame from behind Remember to put and remove the antenna always from the rear part of the frame When the ante...

Страница 20: ...black bags Fig 1 9 Insertion of the DAD Control Unit and battery 1 1 2 Wiring Once the DAD unit is in place you have to connect it with the magnetic encoder the antenna the battery and your laptop Th...

Страница 21: ...he ANT1 CHAIN port of the DAD unit Fig 1 11 Fig 1 11 Antenna cable in place Battery cable has two connectors of different shapes in order to help you one of them must be linked with the battery the ot...

Страница 22: ...onnectors in Chapter 2 The DAD control unit 1 2 Two antennas equipment and configuration Fig 1 13 shows you the equipment you will receive for your two antennas configuration The equipment is composed...

Страница 23: ...bs Fig 1 2 The bigger ones must be screwed in vertically to block the free bars in place while the little ones can be screwed in two different position if placed on the inside part of the frame you wi...

Страница 24: ...it Connect these pipes with the non wheeled frame the white spots on it show you which side goes down Link the other two connection pipes and finally close the box with the other wheeled frame Fig 1...

Страница 25: ...ig 1 16 Making the two antennas frame Fig 1 17 Insertion and locking of the rudder Take the antennas and make them slide in the frame from behind Remember to put and remove the antennas always from th...

Страница 26: ...DAD unit positioning and Battery bags 1 2 2 Wiring Battery wheel and LAN cables are linked to the DAD control unit as in the mono antenna configuration see Par 1 1 2 Wiring for further instruction In...

Страница 27: ...ors in Chapter 2 The DAD control unit 1 3 Three antennas equipment and configuration Fig 1 21 shows you the equipment you will receive for your three antennas configuration The equipment is composed o...

Страница 28: ...ation 1 3 1 Assemblage instructions First you must set the system in its mono antenna configuration see Par 1 1 1 then you have to build the frames for the antennas on the side Equipment needed for th...

Страница 29: ...rame with the central one by linking the metallic locks with the wheels mushrooms Lock up the structure by turning the switches Fig 1 24 Do the same operations to build and place the box on the other...

Страница 30: ...mono antenna configuration see Par 1 1 2 Wiring for further instruction In the three antennas configuration you have three antenna cables To make a cascade connection between the antennas you have to...

Страница 31: ...2 The DAD control unit 1 4 Four antennas equipment and configuration Fig 1 28 shows you the equipment you will receive for your four antennas configuration The equipment is composed of A Rudder Four...

Страница 32: ...4 2 Wiring Battery wheel and LAN cables are linked to the DAD control unit as in the mono antenna configuration see Par 1 1 2 for further instruction In the four antennas configuration you have four...

Страница 33: ...009 056 Rev 1 1 RIS Hi Mod DUALF 400 900 Installation Guide and User Manual 33 44 Fig 1 29 Antenna cables Fig 1 30 Four antennas configuration You can find more info about the DAD unit and its cable c...

Страница 34: ...adar data The DAD Control Unit has the following ports Lan Port for a network connection to the Notebook Computer Battery Port to connect the battery Wheel Port to connect the position sensor wheel An...

Страница 35: ...ector with 19 poles This kind of connector may be connected to the following categories of radar antennae Entire range of TR IDS antennae that has a 19 pole connector and foresee a cascade connection...

Страница 36: ...antennae with internal or external multiplex and an 11 pole connector 2 1 The Notebook Computer The K2_FW acquisition SW is installed on a Notebook Computer This SW is dedicated to the specific phase...

Страница 37: ...ranty Support Three year limited warranty parts and labor lifetime toll free 24 7 Battery Life Wi Fi On Off 5h 6h about Environmental Water proof IP54 Fig 2 5 Panasonic Toughbook CF 19 NOTE No communi...

Страница 38: ...following describes how to cable the DAD Control Unit to the Notebook Computer Use the Lan Cable Fig 2 6 to connect the DAD Control Unit and the Notebook Computer as shown in Fig 2 7 Fig 2 6 Lan Cabl...

Страница 39: ...within 30 seconds the indicator light will start to flash As soon as the K2_FW software is activated the indicator light stops flashing and appears a constant blue light If however the Software is no...

Страница 40: ...plug on LAN port of the DAD Fig 2 1 e Fig 2 11 4 Activate wireless network on PC choosing ON with the button on relative port shown in in Fig 2 10 5 Set up wireless board on PC with the following IP a...

Страница 41: ...41 44 Fig 2 11 Wireless connection on the DAD Fig 2 12 Configuration file for wireless connection Once the Notebook Computer has been switched on and the start up button on the DAD unit has been press...

Страница 42: ...desktop It can be used to perform web conferences and presentations It is easy to use thanks to its simple and intuitive interface Since there are no firewalls or other types of network configurations...

Страница 43: ...u have clicked on the link sent by email the following window will appear Insert your data into the form see Fig 3 2 Fig 3 2 Client data insertion form Once you have clicked Submit the following page...

Страница 44: ...ort Center window At this point IDS Customer Care can perform a range of operations on your desktop Request control of the desktop using the Request Control command Give you control of the IDS desktop...

Отзывы: