background image

68 


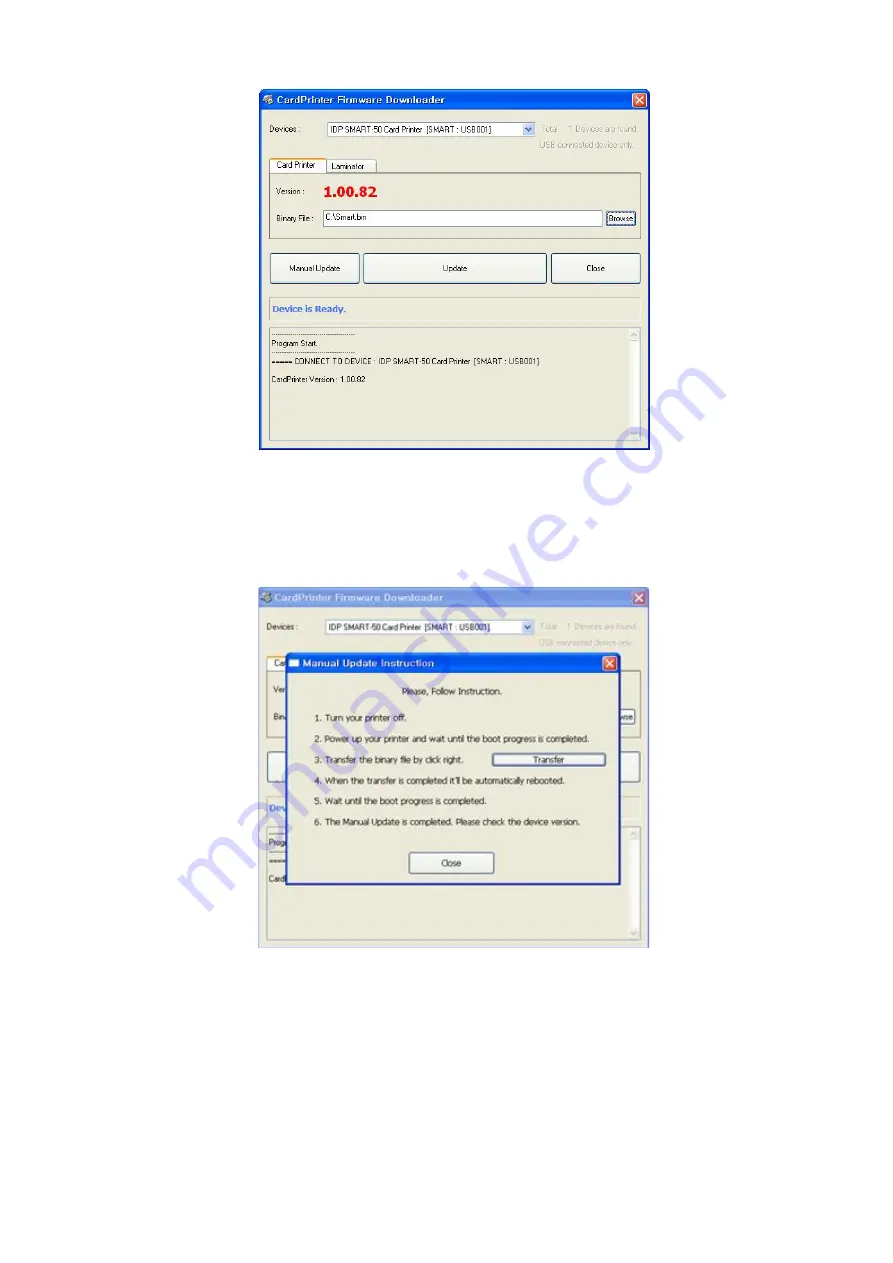
Pic.118    Ready for firm-ware upgrade 


In case there are some problems in the automatic upgrade, you click “Manual Update” and can see the 

pop-up  widow  as  below  picture.  It  shows  procedure  of  manual  upgrade.  You  can  upgrade  manually 
according to this procedure. 


Pic.119    Firm-ware manual upgrade   


4.3.2. Laminator Firm-ware Upgrade.


This function is only for card printer firm-ware version 1.00.60 and laminator should be installed to the 

printer. If you click “Browse” and select the new firmware, “Manual Update” and ”Update” are activated. 
At that time, click “Update” button to upgrade automatically, then the printer is upgraded after rebooting. 

  (Caution: Please do not close upgrade dialog box until it is completed successfully and do not turn off 

Содержание SMART-50

Страница 1: ...1 SMART 50 ID Card Printer User Manual Standard Dual Lite RW Laminator...

Страница 2: ...demarks or registered trademarks are marks of their respective holders SMART 50 Design is a trademark of IDP Return Materials Authorization In order to make a warranty claim you must contact an IDP Re...

Страница 3: ...configuration 34 3 Driver configuration 43 3 1 Checking printer properties 43 3 2 Changing printer properties 43 3 3 Other settings 48 4 Utilities 51 4 1 Card Printer Setup 51 4 2 Card Printer Test 61...

Страница 4: ...r 1 20 Pic 26 Install XP printer driver 2 20 Pic 27 Install XP printer driver 3 20 Pic 28 Install XP print driver 4 20 Pic 29 Install XP print driver 5 21 Pic 30 Install XP print driver 6 21 Pic 31 In...

Страница 5: ...r 2 34 Pic 75 Running the NetAdmin 35 Pic 76 Network printer is not found 35 Pic 77 Connecting to USB port 36 Pic 78 NetAdmin Log in 36 Pic 79 Dynamic IP configuration 37 Pic 80 Static IP configuratio...

Страница 6: ...Pic 125 Completing the smartcard reader driver installation 72 Pic 126 Found New Hardware Wizard 73 Pic 127 Installation method selection 73 Pic 128 Driver location 74 Pic 129 Completing the driver in...

Страница 7: ...ork port it is communicated with the user s PC The following shows the outside functional features found on your SMART 50 printer Pic 1 Printer front features Pic 2 Printer rear features Top cover ope...

Страница 8: ...play Watchman program will be installed in the tray on the Windows when the driver is installing for the printer status SMART 50 RW Pic 6 is a rewritable only card printer which is able to erase and w...

Страница 9: ...9 Pic 3 SMART 50 Standard Pic 4 SMART 50 Dual Pic 5 SMART 50 Lite Pic 6 SMART 50 RW Pic 7 SMART 50 Laminator...

Страница 10: ...kness control lever Adjust the cards thickness Ribbon cartridge Install the ribbon and the disposable cleaning roller Thermal Print Head This enables the cards to be printed Caution This is very hot a...

Страница 11: ...ase contact printer reseller Take up Supply parts Ribbon is wrapped to the supply parts as the Pic 8 It should be installed as the Pic 8 Disposable cleaning roller It removes dust on the surface of ca...

Страница 12: ...ze the ribbon setting and display the ribbon s color value 6 S M A R T System Ready On On Installed ribbon information Soft power ON OFF Standby Printer is ready for printing and you can check the ins...

Страница 13: ...there is a ribbon pull out it and install again Press the left or right button to redetect the ribbon 17 Check Please Ribbon Zero Blinking Blinking Ribbon redetecting Ribbon redetecting The installed...

Страница 14: ...0 IC Contactor up 11 IC Contactor down 12 Flipper top error 13 Flipper bottom error 14 Error in printing 15 Magnetic stripe read write error 16 Ribbon search error 17 Ribbon move error 18 No print hea...

Страница 15: ...o know the proper method of installing the ribbon and the cleaning roller into the printer In the case of SMRT RW model the ribbon is no needed so skip 2 1 4 and 2 1 5 process 2 1 1 Turn off the print...

Страница 16: ...ightened a rolling up error might be happened Pic 14 Installing the cleaning roller 2 1 6 Install the disposable cleaning roller to the ribbon cartridge Pic 15 Peeling the protective wrapper 2 1 7 Pee...

Страница 17: ...8 Install the ribbon cartridge into the printer after installing the ribbon with a cleaning roller to the cartridge Pic 17 Close Top Cover 2 1 9 Close the top cover If it is not closed properly check...

Страница 18: ...r Use the type of cards in the specification of this manual Always keep the card surface clean state Pic 19 Preparing the card 1 Pic 20 Preparing the card 2 2 2 4 To separate cards from each other pus...

Страница 19: ...rtically after separating Pic 22 Loading the cards 2 2 2 6 Load the cards on the input hopper properly and close the hopper cover Pic 23 Loading the cards 3 2 2 7 When insert each one card insert the...

Страница 20: ...all XP printer driver 2 Pic 27 Install XP printer driver 3 2 3 3 STEP 1 If the printer is connected to the PC and turned on turn off the power of the printer Click Next The existing installed printer...

Страница 21: ...click Continue Anyway Pic 31 Install XP printer driver 7 2 3 6 STEP 3 Click Next to use USB port Click TCP IP Network port to use the printer as network printer and choose the printer as shown on the...

Страница 22: ...ork printer refer to 2 5 Network Printer section Pic 34 Install XP printer driver 10 2 3 8 Please connect USB cable provided with the printer to PC and the printer For the network printer refer to 2 5...

Страница 23: ...xt Pic 37 Install XP printer driver 13 2 3 11 Click Continue Anyway in Software Installation window Pic 38 Install XP printer driver 14 2 3 12 Click Finish in Completing the Found New Hardware Wizard...

Страница 24: ...xes window Pic 41 Install XP printer driver 17 2 3 14 After selecting the icon of IDP SMART 50 Card Printer click the right mouse button and select the Properties Pic 42 Install XP printer driver 18 2...

Страница 25: ...printing success If the printing is normal click the OK If the printing is abnormal or the printer error is occurred remove the problem refer to Trouble Shooting section and execute test printing agai...

Страница 26: ...Wizard window Pic 46 Install XP printer driver 22 2 3 19 Select I accept the terms of the license agreement and click Next Pic 47 Install XP printer driver 23 2 3 20 Choose the destination location a...

Страница 27: ...27 Pic 49 Install XP printer driver 25 2 3 22 Smart Design DB program is installed successfully...

Страница 28: ...3 When User Account Control window is opened click Yes Pic 52 Install Win7 driver 3 Pic 53 Install Win7 driver 4 2 4 4 STEP 1 Please turn off printer if it is connected to PC Please click Next When y...

Страница 29: ...anyway in case Windows Security window comes out Pic 57 Install Win7 driver 8 2 4 7 STEP 3 Please click Next if printer is connected to USB only If you want to install the driver for a printer connect...

Страница 30: ...y to the printer If your printer is for network please refer 2 5 Network Configuration Pic 60 Install Win7 driver 11 2 4 9 Please connect USB cable to the printer If your printer is for network please...

Страница 31: ...c 63 Install Win7 driver 14 2 4 12 Please open Devices and Printers from Hardware and Sound Please check if IDP SMART 50 Card Printer is created Pic 64 Install Win7 driver 15 2 4 13 Please click the r...

Страница 32: ...se check test card if it is printed properly and click Close if a card is printed properly If card is not printed or error comes out please refer Trouble Shooting Pic 67 Install Win7 driver 18 2 4 16...

Страница 33: ...terms of the license agreement and click Next Pic 70 Install Win7 driver 21 2 4 19 Please select directory for program installation and click Next Pic 71 Install Win7 driver 22 2 4 20 Please click Ins...

Страница 34: ...h installed with network option has a port for network connection as shown in the Pic 72 Power Switch Power Supply Connector Network Port USB Port Pic 74 Rear view of SMART 50 printer 2 Please connect...

Страница 35: ...es connected encoder on network module Reboots Resets network module Firmware upgrade available Printer Configuration Sets detailed system configuration Network Information Shows firmware version of n...

Страница 36: ...76 You don t need to install device driver for network configuration by USB Please ignore messages related to device installation You can change values of System Management only when you connect a pr...

Страница 37: ...emporary so the IP address may be changed In this case the network error may occur in connecting to SMART 50 network printer Pic 80 Static IP configuration Please select Static for Static IP configura...

Страница 38: ...d the printer supports SSL Secure Sockets Layer and User Authentication for security Please use default and ask technician for details Pic 82 OCP configuration You can use Open Card Print function Thi...

Страница 39: ...hows available users Add User makes new user Del User deletes selected user Change Password changes password 2 5 3 Network module management Pic 84 USB port state USB port state shows USB device statu...

Страница 40: ...click Refresh after reboot When proper printer shown please connect printer by clicking Connect Pic 86 Reset to default Reset to default resets to default and reboot network module Please click Yes wh...

Страница 41: ...module You can choose a firmware file Pic 88 Upgrading the firmware 2 Warning box will be shown during firmware upgrade for network module It is recommended not to do other work during firmware upgra...

Страница 42: ...firmware 3 When firmware upgrade is completed pop up comes out for reboot Please click Yes It takes 1 minute to reboot Please click Refresh after reboot When proper printer shown please connect print...

Страница 43: ...properties 1 When you click Printer Properties as like Pic 88 a device driver of IDP SMART 50 Card Printer is shown 3 2 Changing printer properties In the general tab shown as Pic 89 you can check th...

Страница 44: ...44 Pic 92 Layout 3 2 1 1 Layout You can select either horizontal or vertical printing direction To apply your selection click OK...

Страница 45: ...SMART 50 RW Erase Sharpening to calibrate image sharpened Flip Front to set printed direction of image on front side Flip Back to set printed direction of image on back side Magnetic Strip Encoding Me...

Страница 46: ...ll of black Not Use not to extract resin black Split You can set the both sides Front YMCO Back K to save color ribbon YMCKO HYMCKO BYMCKO It is only activated while printing both sides option is set...

Страница 47: ...T 50 laminator printer is connected to PC In the case of normal SMART 50 Printer this tap will be not displayed To set Laminator printing options Laminator Side You can select not use top side bottom...

Страница 48: ...via Network Default is Not sharing Pic 98 Ports 3 3 2 Ports Port tab shows which port is connected with SMART 50 SMART 50 has connection with USB Virtual printer port as Pic 96 because SMART 50 uses U...

Страница 49: ...ART 50 uses color profile to express optimal color The driver selects color profile automatically to fit each ribbon It is recommended to maintain default Pic 101 Service 3 3 5 Service You can recogni...

Страница 50: ...Pic 102 Laminator 3 3 6 Laminator This tap will be shown only when SMART 50 Laminator printer is connected to PC You can recognize laminator film s type balance laminator s version serial number stat...

Страница 51: ...03 CardPrinterSetup Log in Password input window is displayed when you run this program If you input the correct password the recorded setup value will be shown and you can change values The password...

Страница 52: ...set administrator root password This password is used to verify user authority for CardPrinterSetup and User Authentication Also it is required for User password management Please set password for sec...

Страница 53: ...n black and overlay So please set each density for high quality Please optimize the quality by adjusting each value To optimize you repeatedly adjust the density and print a Calibration card and check...

Страница 54: ...lowing pictures Pic 108 Resin Black density Overlay Density To set overlay density Please set it when overlay is printed on surface regularly If it is too strong it is hazy and marks are appeared If i...

Страница 55: ...o set values to current printer Load from File to load values from file Save to File to save values to file Load Default to load default Please adjust values again after load default Close to close Ca...

Страница 56: ...u use SDK you can encrypt magnetic stripe encoding data transmitted by USB You can define and save the encryption key to SMART 50 using Set Mag Encrypt Key To show how many cards are issued with SMART...

Страница 57: ...pecific PC It is activated when you click Set PC Serial Physical Key You can set this option when physical key is installed User Root Authentication You can set passwords for User and Administrator Us...

Страница 58: ...u click Change Serial No button you can change serial number The fields show laminator film s type balance code and laminator code Film Type It shows installed film s type and vendor code Film Remain...

Страница 59: ...sition Torque Laminating Max Maximum torque of motor while laminating Torque Laminating Min Minimum torque of motor while laminating Laminating with Pulse The value is for change laminating width Film...

Страница 60: ...e Max Change Maximum motor torque Torque Move Min Change Minimum motor torque The values are for setting motor torque of laminating You can set the values of each section You can set Head temperature...

Страница 61: ...veloped by using SMART Printer SDK 4 2 1 CardPrinterTest When CardPrinterTest is run all function can be tested individually Pic 113 CardPrinterTest Select Printer select printer to test In the Pic 11...

Страница 62: ...ipper and From Rotator is to move a card from flipper to printer from In is to move a card from the card in sensor to where you define position and from Out is to move a card from the card out sensor...

Страница 63: ...magnetic stripe card and store the data in the buffer Read All Buffer is to transmit the date stored in the buffer to PC If the track number is ticked the data of the ticked track is only transmitted...

Страница 64: ...equentially Card IN Move IC IC ICH Contact IC Init IC Contact IC Reset IC ICH Dis contact Card OUT Pic 115 Contact smartcard encoding RF PC SC Contactless Smartcard Encoding SMART 50 printer has the i...

Страница 65: ...000000000004 Move to print define SMSC_M_MOVE_PRN2ROT 0x0000000000000008 Move from printer to flipper define SMSC_M_MOVE_ROT2PRN 0x0000000000000010 Move from flipper to printer define SMSC_M_MOVE_IC 0...

Страница 66: ...x0000002000000000 Card move Error Contactless define SMSC_F_MOVETOROTATOR 0x0000004000000000 Card move Error Printer to Flipper define SMSC_F_MOVEFROMROTATOR 0x0000008000000000 Card move Error Flipper...

Страница 67: ...ual Update It is used when you want to upgrade manually Update Upgrades automatically In generally we recommend upgrading automatically Close Exit Message It displays information of upgrading Pic 117...

Страница 68: ...Firm ware manual upgrade 4 3 2 Laminator Firm ware Upgrade This function is only for card printer firm ware version 1 00 60 and laminator should be installed to the printer If you click Browse and sel...

Страница 69: ...grade In case there are some problems in the automatic upgrade you click Manual Update and can see the pop up widow as below picture It shows procedure of manual upgrade You can upgrade manually accor...

Страница 70: ...artcard reader and mobile SIM smartcard reader If you have one or more smartcard reader devices on your printer you should install the smartcard device driver as in the following and connect SMART 50...

Страница 71: ...window as the Pic 121 is shown Check at the agreement and click Next Pic 123 License agreement 5 1 3 Installation The installation message is shown as the Pic 122 Click Install to install driver Pic 1...

Страница 72: ...4 Complete installation When the installation is completed the window as the Pic 123 is shown Click the Finish to complete the installation steps Pic 125 Completing the smartcard reader driver instal...

Страница 73: ...actless smartcard device driver as in the following and connect SMART 50 printer to your PC 5 2 1 Connect SMART 50 printer to PC When you connect the printer to PC and turn on the printer you can see...

Страница 74: ...ight directory which is installed OS version on your PC and select the directory as the Pic 126 and click Next Pic 128 Driver location 5 2 4 Complete installation When the installation is completed th...

Страница 75: ...ase the exclusive cleaning card ask to SMART 50 printer provider Pic 130 Exclusive cleaning card for SMART 50 printer If the exclusive cleaning card is ready click the Clean Printer in the service tab...

Страница 76: ...aning Step 1 Step 2 Open the hopper and top cover and remove the card and ribbon cartridge Pic 133 Printer cleaning Step 2 Step 3 Insert the exclusive cleaning card into the printer through input hopp...

Страница 77: ...nds and rollers are moving to clean Pic 134 Printer cleaning Step 3 Step 4 Close the top cover to clean the Thermal Print Head and the printing roller When the top cover is closed cleaning card will b...

Страница 78: ...card will be ejected automatically as the Pic 134 Pic 136 Printer cleaning Step 5 Step 6 Remove the exclusive cleaning card and install ribbon cartridge into the printer Pic 137 Printer cleaning Step...

Страница 79: ...extended setup Step3 Input the TPH s Serial No Resistance and Type choose KEE or KPE on the TPH s label and click OK Step4 Click Set Config to set the new TPH s configuration Pic 139 Print head setup...

Страница 80: ...mm Card thickness control lever is set improperly Regulate the card thickness control lever to fit the current card thickness Bad card array Array the cards again and put them on input hopper as secti...

Страница 81: ...hecking the card change it to another card The cleaning roller is contaminated with the dust and dirt Check the cleaning roller If there is much dust change the cleaning roller to the new one Much dus...

Страница 82: ...ft LED button to retry The magnetic head is contaminated with the dust and dirt Clean the magnetic head with the cleaning kit The magnetic encoding data is not transmitted or the wrong data is transmi...

Страница 83: ...and the printer Bad power adaptor Please contact the local supplier for replacement of the adaptor The printer driver is Offline Change the printer driver to Online The printer s USB cable is disconn...

Страница 84: ...70mm x 420mm x 195mm 170mm x 510mm x 195mm Weight 4 5Kg 10lbs 5 5Kg 10lbs Magnetic Stripe Contact Smart Card Contactless Smart Card Certifications Encoding MiFare DesFire ISO 14443 type A B ISO 15693...

Страница 85: ...tons 2 LED Buttons Supported Platform Communications Power Supply Power Consumption Temperature Humidity Size W x L x H 170mm x 420mm x 195mm 170mm x 420mm x 195mm Weight 4 5Kg 10lbs 4 5Kg 10lbs Magne...

Страница 86: ...Vista 32 64bit 7 32 64bit Dimensions 64MB Speed Max 100 cards Printing Cards ISO CR 80 54mm x 86mm 2 12 x 3 38 0 76mm 29 9mil 1 0mm 40mil Laminating 44 sec 54 sec ISO7816 ID 1 USB Ethernet Option Fre...

Отзывы: