background image

9

Video Display Area

Left-click on the video display area to toggle between split 
screen and single screen modes. Drag the camera screens 
around to rearrange them. 

Apply/Cancel Buttons

While in Camera Registration mode, select 

Apply

 to register 

all changes. When selecting 

Apply

, the message will be 

displayed. You can activate or deactivate Self-diagnosis.
Select 

Cancel

 to exit Camera Registration mode without 

applying the changes.

It is not possible to register a camera that has already 
been registered to a different NVR.

Diagnosis Process

When the camera is registered to the NVR, 

Self-diagnosis

runs automatically for the new registered and changed 
cameras. If Self-diagnosis is processing, 

Diagnosis 

Processing

 message will be displayed.

If 

Self-diagnosis

 is failed, 

Diagnosis Requirement

message will be displayed. In this case, you can run 
Selfdiagnosis manually.

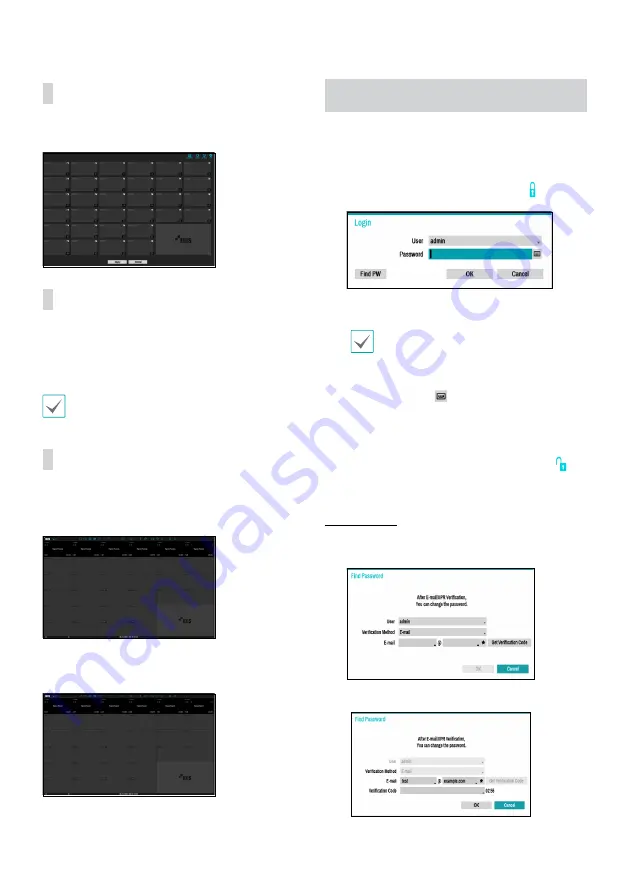
Login

Configuring the NVR's settings and accessing its searching 
and other functions require an authorized user login.

Bring up the Live menu and either press the 

Setup


button on the remote control or click on   icon using 
the mouse to log in.

Select a user, enter the password, and then select 

OK

.

•  Leaving the admin account unassigned with 

a password poses a security risk. Please assign 
a password at your earliest convenience. A 
warning message will continue to be displayed 
until a password is assigned.

•  Click on the 

 button next to the password 

field using the mouse. This will bring up a 
virtual keyboard you can use to assign a 
password.

To log out, bring up the Live menu and click on   

icon using the mouse.

Find Password

Enter a user, registered email and then select 

Get 

Verification Code

.

Enter 

Verification Code

 and select 

OK

.

Содержание DR-6516P-A

Страница 1: ...IDIS Co Ltd For more information please visit at www idisglobal com ...

Страница 2: ...DR 6508P DR 6516P A DR 6532P A Network Video Recorder Quick Guide Powered by ...

Страница 3: ...bjects have fallen into the equipment C If the equipment has been exposed to rain or water D If the equipment does not operate normally by following the operating instructions adjust only those controls that are covered by the operating instructions as an improper adjustment of other controls may result in damage and will often require extensive work by a qualified technician to restore the equipm...

Страница 4: ...wnontheproductoritsliterature indicatesthatitshouldnotbedisposedwithotherhouseholdwastesattheendofits workinglife Topreventpossibleharmtotheenvironmentorhumanhealthfromuncontrolledwastedisposal pleaseseparatethisfromother typesofwastesandrecycleitresponsiblytopromotethesustainablereuseofmaterialresources Householdusersshouldcontacteithertheretailerwheretheypurchasedthisproduct ortheirlocalgovernme...

Страница 5: ...order Power Cable Quick Guide SATA Cables Optical USB Mouse IR Remote Control Optional Assembly Screws for Adding Hard Disk Drives Rack mount Kit Please download IDIS Center software and product manual from this link IDIS Website www idisglobal com Overview Dimensions Unit mm 88mm 3 46ʺ 94 5mm 3 72ʺ 6 5mm 420 04mm 16 53ʺ 412 8mm 16 25ʺ 430mm 16 92ʺ ...

Страница 6: ...ouldonapersonalcomputer Foreasiersystemconfiguration aUSBmouseisrecommended Rear Panel 1 2 4 5 7 8 9 6 3 0 1 AudioPorts 2 VideoIn PoEPort 3 VideoIn Ext Port 4 NetworkPort 5 eSATAPorts 6 USB3 0Port 7 HDMI2 0Port 8 HDMI1 4bPort 9 AlarmConnectionPorts 0 RS 485Port RS 232Port PowerInPort Vent ...

Страница 7: ...ontrol Optional b a c d e f 3 1 2 4 5 6 7 8 9 0 1 ID Button 2 Panic Button 3 Camera Buttons 4 Status Button 5 Layout Button 6 PTZ Control Buttons 7 Register Mode Button 8 Thumbnail Button 9 Calendar Button 0 Keylock Button Setup Button Freeze Button Log Button Enter Button Arrow Buttons Alarm Button Sequence Button Zoom Button PTZ Button View Button a Save Button b Menu Button c Playback Buttons d...

Страница 8: ...d After exiting from Quick Wizard the network with Network Wizard will start automatically Start the Network Setup Wizard Internet Connection LAN Setup This test must be performed before proceeding to the next step FEN Setup Enter the NVR name registered on the FEN server in the Device Name field and click the Check to check its availability Finish the Network Setup Wizard Getting Started Setup Wi...

Страница 9: ...splay area Camera list Using the camera information file csv the user can register the cameras easily Scan Refresh Interval Configures the refesh interval to scan the camera If the interval is short camera scan results are refreshed more frequently However if the interval is long it is advantageous to scan cameras on a wide network 1 Select Scan to commence scanning 2 Select a camera from the scan...

Страница 10: ...iagnosis is failed Diagnosis Requirement message will be displayed In this case you can run Selfdiagnosis manually Login Configuring the NVR s settings and accessing its searching and other functions require an authorized user login 1 Bring up the Live menu and either press the Setup button on the remote control or click on icon using the mouse to log in 2 Select a user enter the password and then...

Страница 11: ...ntrol while in Live mode to bring up the Live menu on the top of the screen Press MENU once more to hide the menu Use the Arrow buttons on the front panel of the NVR or the remote control to select the menu options Video Recording Records the live video Refer to the manual for more information Panic Recording Select Live or Search menu s Panic Recording icon or press the Panic Recording button on ...

Страница 12: ...nternet Explorer Version 10 or later 32 bit Chrome Google Chrome 22 0 1229 0 or above 59 xxx or above recommended Edge 98 0 1108 43 or above Setup IDIS Web 1 Launch the web browser and then enter the following information in the address bar http IP Address Port Number NVR system s IP address and IDIS Web port number configured under Network General Default Value 12088 Or http fen idisglobal com FE...

Страница 13: ... www idis co kr 2 Browse to the Setup folder in the downloaded file and run setup exe On Microsoft Windows Vista or User Account Control window may pop up Click Allow and follow the instructions in the installation window to proceed with the installation 3 When the installation window appears click Next 4 Select an installation path for the program and click Next 5 When the install confirmation wi...

Страница 14: ...ID is admin without a password You can change User ID and Password in the User menu Device Registration To use the functions provided by IDIS Center you must first register a device and add the device to a device group 1 Select System IDIS Center Setup Device in the menu at the top of the screen 2 On the Site panel click on All Devices then click on the E button at the bottom of the Site List pane...

Страница 15: ...group will be displayed on the right To modify a device group that has been registered select a device group and click E on the bottom of the Sites panel Modify Device Group window will appear You can modify the selected device group from this window Live Video Mode 1 In the Site List make sure that the device has been added to the device group 2 In the panel tabs click the Live tab In the Site li...

Страница 16: ...ntact your FEN server administrator iOS device 1 Open the App Store on your device 2 Enter IDIS Mobile Plus in the search filed of the App Store 3 Install IDIS Mobile Plus program and open it 4 In the start up screen click the button on the bottom and select a device registration option QR Code For devices which support a QR code scan the QR code to automatically register device information IP Add...

Страница 17: ...cables attached to the hard disk 4 Detach the bracket from the mainboard Installing or Replacing the HDD YoucaninstallanadditionalHDDorreplaceanHDDwithanexistingdriveifnecessary Imagebelowisfor illustrativepurposesonlyandmaydifferfromtheactualproduct PleasefollowthesestepstoaddorreplaceanHDDinanactualplacewhereusersusetheproduct 요 ...

Страница 18: ...o detach it from the mainboard 6 Unscrew the screws on the left and right sides of the HDD bracket to detach the HDD from the bracket Install the new HDD and tighten the screws to fix it 7 Install the bracket with the HDD installed to the mainboard and tighten one screw to fix it ...

Страница 19: ...18 8 Attach the bracket 9 Connect the power and data cables to the hard disk 10 Close the cover 11 After closing the cover tighten the screws to fix it ...

Страница 20: ...gabitEthernet IPCamera x8 Gigabit Ethernet Ext x1 DR 6508P Transmission Speed 50Mbps 100Mbps BRPMode Camera Power PoE IEEE802 3atclass4 supported16ports 120W DR 6532P DR 6516P PoE IEEE802 3atclass4 supported16ports 200W DR 6532P A DR 6516P A PoE IEEE802 3atclass4 supported8ports 120W DR 6508P Event Notification Email attachclip cbf MP4 Callbackto RemoteS W Pushnotification IDISMobile FTP HTTP INTE...

Отзывы: