background image

14

Device Registration

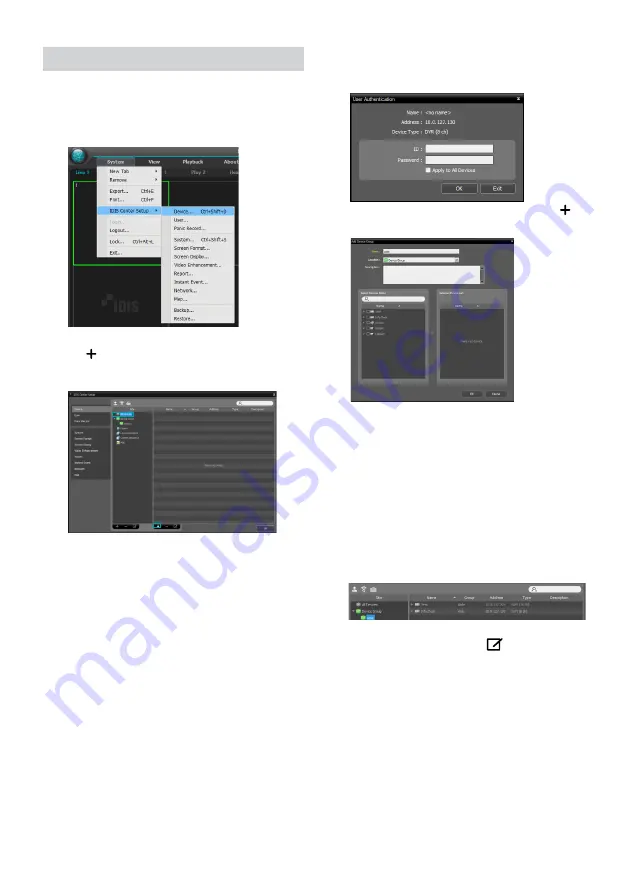
To use the functions provided by IDIS Center, you must first 
register a device and add the device to a device group.

Select 

System > IDIS Center Setup > Device 

in the 

menu at the top of the screen.

On the 

Site

 panel, click on 

All Devices

, then click on 

the 

E

 button at the bottom of the Site List panel on 

the right. A 

Device Scan

 window will appear on the 

screen.

After selecting a scan mode, click on 

Start Scan

button and the scan results will be displayed on the 

list. 

Click 

Add Devices

 at the bottom of the 

Device Scan

window.

When user authentication window appears, enter the 

User ID and Password set up on each device, and then 

select OK for remote access.

Click 

Device Group

 on the 

Sites

 panel and click 

E

 at 

the bottom. 

Add Device Group

 window will appear.


Name

: Enter a name for the device group.


Location

: Select an location for the subject device 

group.

When you select a device from the device List on the 
left, it will be added to the 

Selected Device List

 on 

the right. Click 

OK

 to register the device group.

Make sure that the device has been added to the 

device group correctly. Click 

Device Group

 on the 

Sites

 panel and click on next to 

Device Group

. When 

you click on a registered device group, a list of devices 

added the selected device group will be displayed on 

the right.

To modify a device group that has been registered, 
select a device group and click 

E

 on the bottom of 

the 

Sites

 panel. 

Modify Device Group

 window will 

appear. You can modify the selected device group 
from this window.

Содержание DR-2304P

Страница 1: ...DR 2304P DR 2404P DR 2308P DR 2316P Network Video Recorder Quick Guide Powered by...

Страница 2: ...d B If liquid is spilled or objects have fallen into the equipment C If the equipment has been exposed to rain or water D If the equipment does not operate normally by following the operating instruct...

Страница 3: ...systems Thismarkingshownontheproductoritsliterature indicatesthatitshouldnotbedisposedwithotherhouseholdwastesattheendofits workinglife Topreventpossibleharmtotheenvironmentorhumanhealthfromuncontroll...

Страница 4: ...wer Cable DC Adapter 12V 48V Quick Guide SATA2 Cables Optical USB Mouse IR Remote Control Assembly Screws for Adding Hard Disk Drives Please download IDIS Center software and product manual from this...

Страница 5: ...eras and alarms that can be connected and the number of cameras that can be displayed For simplicity the illustrations and descriptions in this document refer to the 16 channel model Rear Panel DR 230...

Страница 6: ...7 NetworkPort 8 VideoIn Ext Port 9 AlarmConnectionPorts 0 RS 232Port PowerInPort 12V PowerInPort 48V Connections on the Rear Panel D i r e c t I P S w i t c h Camera Network Keyboard POS Sensor VGAMon...

Страница 7: ...Mode Button 8 Thumbnail Button 9 Calendar Button 0 Keylock Button Setup Button Freeze Button Log Button Enter Button Arrow Buttons Alarm Button Sequence Button Zoom Button PTZ Button View Button a Sa...

Страница 8: ...zard Date Time Setup The new date and time settings will only be applied after clicking Next Record Method Setup Record Video Quality Setup Higher recording quality uses up more disk space Finish the...

Страница 9: ...itself may not be visible for scanning and registration by the NVR For more information about supported network devices and models contact your retailer Mode Select the scan mode Advanced Setup If the...

Страница 10: ...he mouse This will bring up a virtual keyboard you can use to assign a password 3 To log out bring up the Live menu and click on icon using the mouse Find Password 1 Enter a user registered email and...

Страница 11: ...rding mode is not set to Recycle and the HDD has reached 100 of its capacity Audio Recording If the Record Audio option under Record Setup General has been enabled the camera will record audio along w...

Страница 12: ...enter the NVR name registered to the FEN server instead of its IP address You will be prompted to enter the FEN server s address and port number under Setup IDIS Center Program System Requirements Rec...

Страница 13: ...he system this step will be skipped automatically 6 When the Installation Completed window appears click Close and finish the installation Start Program When IDIS Center software is installed IDIS Cen...

Страница 14: ...t OK for remote access 6 Click Device Group on the Sites panel and click E at the bottom Add Device Group window will appear Name Enter a name for the device group Location Select an location for the...

Страница 15: ...E may result in excessive data charges Android OS device 1 Open the Play Store Google Play on your Android device 2 In Play Store Google Play enter IDIS Mobile in the search field 3 Install IDIS Mobil...

Страница 16: ...puts 4 8 16 IP channels Video Outputs 1 HDMI 1 VGA Display Resolution 3840x2160 1920 x 1200 1920 x 1080 1680 x 1050 1600 x 1200 Display Speed Up to 480ips DR 2316P Up to 240ips DR 2308P Up to 120ips D...

Страница 17: ...nux Unit Dimensions W x H x D 300mm x 62mm x 231mm 11 8 x2 4 x9 1 Unit Weight 2 3Kg with 1HDD DR 2308P DR 2316P 2 2Kg with 1HDD DR 2304P DR 2404P Working Temperature 0 C to 40 C 32 F 104 F Operating H...

Страница 18: ...IDIS Co Ltd For more information please visit at www idisglobal com...

Отзывы: