background image


DMI-F-10_Annexe 2_Notice.3 

Page 

10

 sur 

17


Mai 2023 

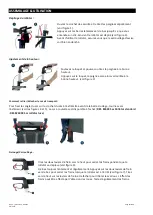
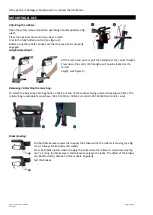
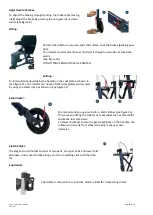
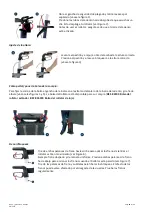
Adjustment of brakes:  

To adjust the braking strength,pull up the brake cable (see fig-
ure8) adjust the brake by pressing the nut upwards or down-
wards (see figure 9) 
 

Sitting: 


Position the rollator on an even and solid surface. Lock the brakes (parking posi-
tion). 
The rollator must stand and must not slip. Sit straight up and do not lean back-
wards. 
(See figure 10). 
DO NOT MOVE ROLLATOR WHILE SEATED.


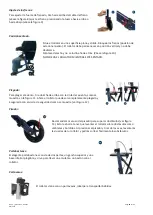
Folding: 

To fold, pull seat upwards by the handle on the seat plate as shown in 

(see figure 11). The rollator can now be folded completely and secured 
by using the safety clasp as shown in (see figure 12). 


Kerb climber: 


We recommend you use our built-in, kerb climber (see figure 13). 
This saves you lifting the rollator over obstacles such as thresholds 
and kerbs. Just step down 
on the kerb climber and with a gentle pull back on the handles, the 
rollator will raise its front wheels to easily maneuver over 
obstacles. 


Crutch holder: 

The elegant crutch holder consists of two parts, an upper hook and lower fold-
able base, and is used to take along a crutch or a walking stick with the rolla-
tor. 


Cup Holder: 


The rollator comes with a cup holder, which is ideal for transporting drinks. 


Содержание NEO LIGHT M

Страница 1: ...et L Notice d utilisation DISPOSITIF MEDICAL NEO LIGHT FOLDED ROLLATOR M and L Instructions Manual MEDICAL DEVICE ANDADOR NEO LIGHT Manual de instrucciones DISPOSITIVO MEDICO REFERENCES 826027 M 82602...

Страница 2: ...maximum de l utilisateur Max user Weight Peso m ximo del usuario Dispositif m dical Medical Device Dispositivo m dico NOTICE D INSTRUCTIONS FR IMPORTANT Lire attentivement la notice avant toute utili...

Страница 3: ...utilisez pas le si ge lorsque le rollator se trouve sur un terrain inclin ou in gal Utilisez donc le rollator que sur des surfaces planes et solides Remplacez les roues lorsqu elles sont tr s us es ou...

Страница 4: ...re 3 Comment retirer attacher le sac de transport Pour fixer la sangle du sac sur le crochet du sac l extr mit avant de la barre du si ge tournez vers l ext rieur voir les figures 4 et 5 Le sac roulet...

Страница 5: ...plaque d assise comme indiqu voir figure 11 Le d ambulateur peut maintenant tre compl tement pli et fix l aide du fermoir de s curit comme indiqu voir figure 12 Passe trottoir Nous vous recommandons...

Страница 6: ...utilisateur Au pr alable le produit devra tre inspect par un sp cialiste autoris RECYCLAGE Lorsque le produit sera devenu inutilisable et que vous devrez le jeter veuillez contacter votre revendeur sp...

Страница 7: ...ur toute pi ce qui a cass en raison d un d faut de fabrication de conception ou de mat riau Contactez le distributeur chez qui vous avez achet le produit au cas o vous auriez besoin de faire une r cla...

Страница 8: ...t both handgrips are fully tightened and are a equal heights Test the the rollator for stability before applying the full weight to the handgrips Do not use the seat when the rollator is on sloping or...

Страница 9: ...atch the handgrip will now be locked at the correct height see figure 3 Removing Attaching the carry bag To attach the bag strap onto bag hook on the front end of the seat bar facing outward see Figur...

Страница 10: ...e as shown in see figure 11 The rollator can now be folded completely and secured by using the safety clasp as shown in see figure 12 Kerb climber We recommend you use our built in kerb climber see fi...

Страница 11: ...accordance with hygiene instructions When transferring the rollator remember to hand over all the necessary technical documents to the new user Beforehand the product must be inspected by an authorise...

Страница 12: ...IES will provide replacement parts for any part that has broken due to a manufacturing design or material defect Contact the distributor from whom you purchased the product in case you need to make a...

Страница 13: ...tilice el asiento cuando el rollator est en un terreno inclinado o desigual Use el rollator s lo en superficies planas y s lidas Reemplace las ruedas si est n muy desgastadas o da adas NO MUEVA EL ROL...

Страница 14: ...a fijar la correa de la bolsa al gancho de la bolsa en el extremo delantero de la barra del asiento gire hacia afuera v anse las figuras 4 y 5 La bolsa del rollator est disponible para su compra REF 8...

Страница 15: ...egar el asiento tire de l hacia arriba con la cinta del asiento como se muestra en la figura 11 Ahora el rollator puede ser completamente plegado y asegurado con el cierre de seguridad como se muestra...

Страница 16: ...Al transferir el rollator recuerde dar todos los documentos t cnicos necesarios al nuevo usuario El producto debe ser inspeccionado primero por un especialista autorizado RECICLAJE Cuando el producto...

Страница 17: ...chura 43 cm x Profundidad 20 5 cm x Altura 60 cm Distancia entre las asas REF 826027 M 43 cm REF 826027 L 43 cm Peso REF 826027 M 7 6 kg REF 826027 L 7 7 kg Peso m ximo de usuario 136 kg VIDA TIL La v...

Отзывы: