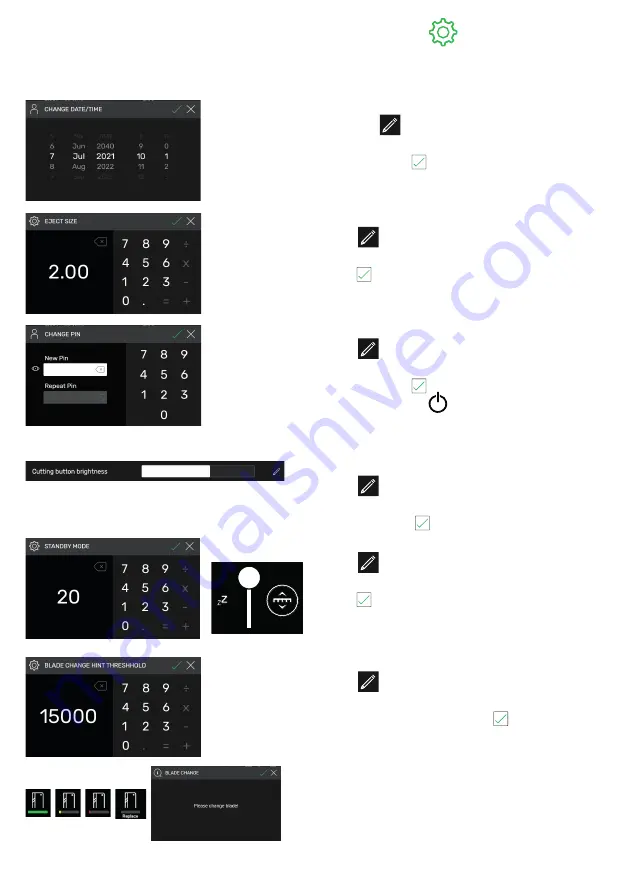
IDEAL THE 56 Скачать руководство пользователя страница 20

20

SETTINGS

In general
Date / time

• With the 

 symbol open the appropriate 

heading. Set by swiping upwards/ downwards 
and save with  .

Eject dimension (cm)

• With 

 open the appropriate column. Tap in 

the eject dimension (max. 15.00 cm) and save 
with  .

Set / change user PIN

• With 

 open the appropriate column. 

  Tap in PIN (min. 4-digit / max.10-digit) twice 

and save with  . Unlocks the standby mode 
and screen lock (

 On / Off button). If no PIN 

is set, then 1234 unlocks the PIN (as-delivered 
state).

Cutting button brightness

• With 

, activate appropriate column for 

changing. Set by swiping to the left /right and 
with save with  .

Standby mode after (min.)

• With 

 open the appropriate column. 

  Tap in SLEEP TIMER (max. 120 min.) and save 

with  .  Standby mode is displayed by a “zZ 
Symbol” next to the operating control.

  Unlock with the user PIN.

Blade change information

• With 

 open the appropriate column. 

  Tap in BLADE CHANGE WARNING LIMIT (max. 

500,000 cuts) and save with  . 

• Under an activated application (>1), a 
  coloured bar indicates how many cuts could 

still be carried out before replacing the blade 
(an extra pointer pops up).

• Input value 0 deactivates this application.

Operating / Multi-Touch Display

Содержание THE 56

Страница 1: ...THE 56 EN Operating Instructions...

Страница 2: ...perating 11 Operating Multi Touch Display 13 Blade Change 22 Changing the Cutting Stick 28 Maintenance and Upkeep 29 Yearly Maintenance Safety Inspection 30 Multi Touch Display Settings 31 Possible Ma...

Страница 3: ...not reach beneath the blade Never leave the blade unattended Do not extract or transport the blade without protection See page 24 Danger Risk of injury Do not cut hard materials or materials which may...

Страница 4: ...play You could subject yourself to dangerous voltages and other hazards by opening or removing the covers Leave any maintenance or repair work to qualified specialists Particular features of LCD monit...

Страница 5: ...60Hz Dangerous machine parts are protected by guards and covered by panels 1 The machine may only be operated with all safety and panelling sections fitted and in particular with Safety light beam cu...

Страница 6: ...f not in use for a long period Main switch to 0 Intended use This machine is for cutting stacks of paper to a certain size Safety Precautions This machine is only for a One man operation Caution Any s...

Страница 7: ...curtain in the tool kit as delivered 6 Front table 7 Two hand cutting activation operating buttons 8 Operating control for electrical back gauge adjustment 9 Main switch lockable 10 Tool panel tool ki...

Страница 8: ...Base frame panelling 2 Order No 9000 553 The add on instructions are enclosed with the base frame panel 1 Cutting machine 2 Multi touch display incl 4GB USB stick Note Do not withdraw USB stick during...

Страница 9: ...lug before assembling the display Insert display into the slots as far down as possible Bring the pivoted display to the position required The display angle is adjustable from 0 to 55 Tighten with cam...

Страница 10: ...check the safety equipment for completeness and functionality All panels 1 must be attached Light beam curtain 2 must be fitted The cut may only be activated simultaneously with the two hand activatio...

Страница 11: ...lade cut at the front edge of the light beam Cutting line indicator mechanical For marking based cutting the clamp bar 2 can be used as the cutting line indicator the cut occurs approx 1 mm before thi...

Страница 12: ...tting area when the blade is in motion Only when the specified dimension is moved to can a cut be activated Release the light beam curtain protective area 1 Simultaneously press both operating buttons...

Страница 13: ...e green symbols indicate the mode Setting the clamping pressure general Tap on symbol set clamping pressure from 1 to 8 and save with shown with an exponent next to the symbol 8 Table lighting Tap on...

Страница 14: ...keypad Dimension appears in red an incorrectly entered dimension can be cleared by tapping C START tap on Dimension is moved to and again appears in white after reaching the required position Insert t...

Страница 15: ...or paper removal the entered target dimension is then automatically moved to function only with travel to the rear Pocket calculator function Calculate the required dimension e g 40 2 38 then START or...

Страница 16: ...erating Multi Touch Display You switch to the PROGRAM MODE The program name appears By tapping on you can edit the program name at any time Dimensions can also be moved to for acceptance in one step M...

Страница 17: ...the paper stack to be ejected Note Cannot be selected simultaneously with the consecutive cut function Consecutive cut Put tick at Consecutive cut tap the dimension and enter accordingly determine nu...

Страница 18: ...e you can freely enter a text and save it Program start Program is called up Tap on the symbol to start the program The first program step is moved to TheActivate cut The second step is moved to etc O...

Страница 19: ...folder can be re named in the PROGRAM MODE it cannot be cleared Tapping on the symbol shows up or conceals a folder s content Create replicate and move programs The symbol permits a program P to be cr...

Страница 20: ...ng button brightness With activate appropriate column for changing Set by swiping to the left right and with save with Standby mode after min With open the appropriate column Tap in SLEEP TIMER max 12...

Страница 21: ...1 00 cm With activate correction The The back gauge automatically moves to the reference point 56 00 cm Change to the home mode carry out test steps possibly repeat operation as described Information...

Страница 22: ...or transport the blade without protection Changing the blade may only be performed by trained staff Starting blade change You are in the home mode Tap on the symbol to activate the blade change start...

Страница 23: ...ging device 4 Firmly screw down grips 5 into the tapped holes of the 2 unscrewed blade screws Unscrew the remaining 3 blade screws 6 Slightly slacken both grips 5 simultaneously and remove downwards b...

Страница 24: ...or 0 276 spacing Blade edge must be covered 10 Warning Injury risk Rotating and replacing cutting stick Lift out the cutting stick by pressing in its ejector 7 e g with a hexagonal socket spanner and...

Страница 25: ...ging device at the grips 5 and remove Loosely screw in the remaining 2 screws 3 Remove all tools from the working area Blade change Through the open slots position blade with blade changing device at...

Страница 26: ...he blade slowly slips downwards onto the cutting stick The Blade must rest on the cutting stick Using the hexagonal socket spanner pressure tighten the centre blade screw 3 downwards 40 Nm Also tighte...

Страница 27: ...s the test cuts are carried out For testing cut through a stack of paper Lower the blade in steps as follows should the last sheet or several sheets not be cut through With the hexagonal socket spanne...

Страница 28: ...eet or several sheets not be cut through With the hexagonal socket spanner 4 8 mm insert the blade depth adjuster 2 keep pressed and fine tune anticlockwise disengage into the individual locking optio...

Страница 29: ...ease Order No 9800 933 Firmly screw down the rear table cover Note More than 5 hours of operation day means carrying out maintenance work that much more often Without a properly closed cover for the r...

Страница 30: ...ature wear we would recommend having the machine inspected and serviced once a year by a qualified service technician Safety inspection Every 5 years a safety inspection as per Section 3 5 Cap 2 2 of...

Страница 31: ...the key i R or save with the MENU key 3 Input settings Press the i R key to call up the selection options for sources The selection options may vary depending on the model e g VGA HDMI etc Correspond...

Страница 32: ...NU key 7 Languages Press the key MENU 5 X the key and again the key MENU In the Other menu 4 X the key and again the key MENU until you are in the Language menu With the keys or select the required la...

Страница 33: ...n established Turn the main switch to Position I Press the On off button directly at the monitor Is the display flat cable correctly inserted see Page 9 Setting Up The screen is too dark or too bright...

Страница 34: ...shown in the display Use the reference dimension to correct the multi touch display see Reference dimension correction Page 21 Operating buttons are permanently red the safety light beam curtain is on...

Страница 35: ...ng unit of cutting sticks 6 pcs No 9000 035 Blade changing device 1 No 2722 053 Stack elbow 1 No 9000 521 1 Included in the delivery Set of side tables 2 pcs No 9000 552 Cuttings container mobile No 4...

Страница 36: ...approx 1000 daN Advance speed back gauge up to approx 10 cm sec Adjustable table height the adjustable feet adjust complete machine as to height 950 1000 mm Minimum space requirement without side tab...

Страница 37: ...s LAN USB Clamping force Programmable Subject to technical changes This machine is approved by independent safety laboratories and is in compliance with the EC regulations 2006 42 EG and 2014 30 EU So...

Страница 38: ...KG has the following certifications Quality management system according to DIN EN ISO 9001 2015 Environmental management system according to DIN EN ISO 14001 2015 Energy management system according to...

Страница 39: ...ve 2011 65 EU 2015 863 EU RoHS directive Applied harmonised standards in particular EN 60204 1 EN 1010 1 EN 1010 3 EN 55014 1 EN 55014 2 EN 61000 3 2 EN 61000 3 3 EN ISO 12100 EN 61496 1 EN 61496 2 EN...

Страница 40: ...Krug Priester GmbH Co KG Simon Schweitzer Str 34 D 72336 Balingen Germany www krug priester com 9700330 9700319 07 2021 14 10 2021 zm...

Отзывы: