background image


LanTEK III 


161809 Iss 2 

User Manual 


Page43  


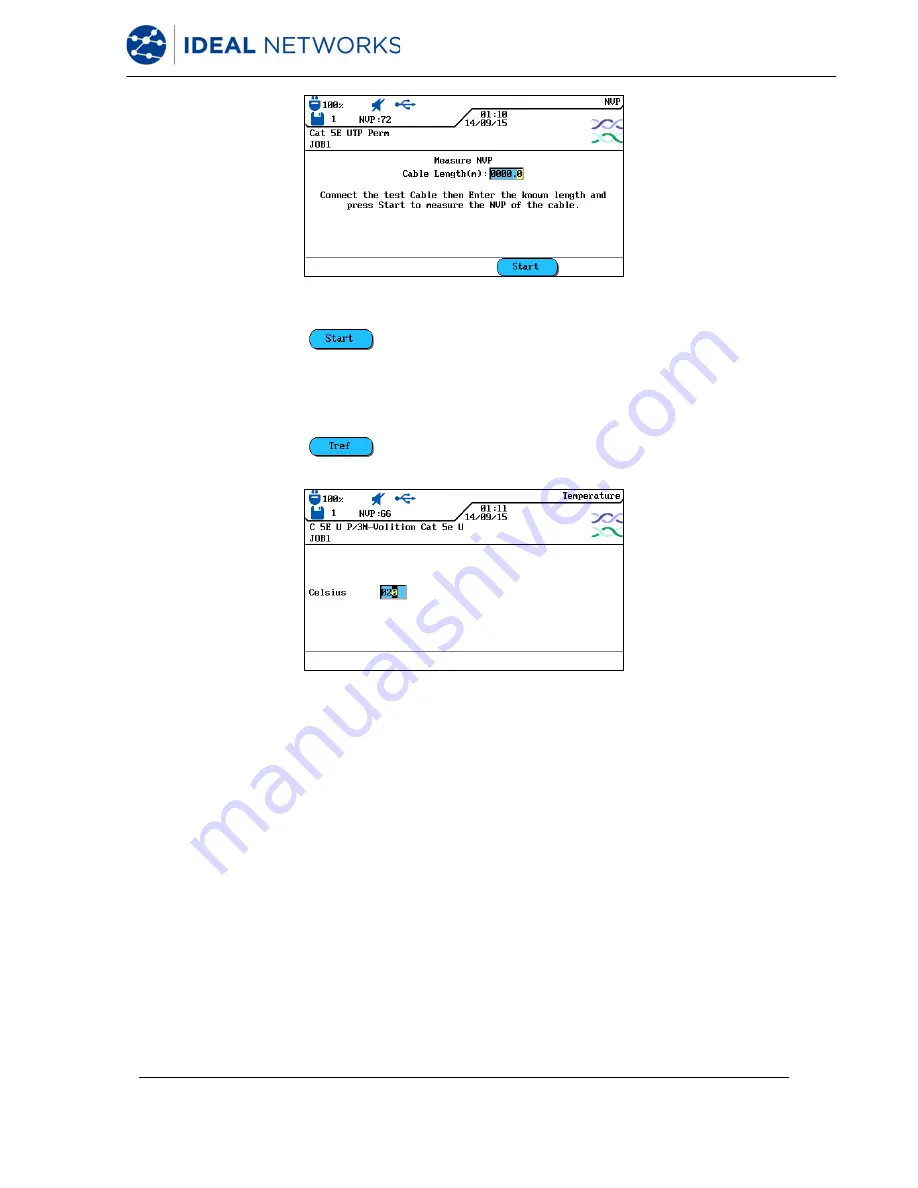
Fig. 49 Cable Length 


6.


Use soft key 

 to start calculation of NVP. 

7.


Press 

Enter

 to save NVP. Use 

Escape 

to exit menu without making changes. 


5.5.4


Enter Reference Temperature  

1.


Use soft key 

 to open Select Menu for changing ambient temperature.  

2.


Use 

Alphanumeric Keys

 to assign reference temperature. 


Fig. 50 Reference Temperature 


3.


Press 

Enter

 to save the reference temperature. Use 

Escape

 to exit menu without 

making changes. 


Содержание LanTEK III

Страница 1: ...LanTEK III ...

Страница 2: ...n reproduction and use apply to all media in which this information may be placed IDEAL INDUSTRIES Ltd pursues a policy of continual product improvement and reserves the right to alter without notice the specification design price or conditions of supply of any product or service IDEAL INDUSTRIES LTD 2016 All rights reserved Publication ref 161809 Issue 2 01 16 Applies to software revision 3 061 o...

Страница 3: ...the battery pack s electrical contacts are shorted The following battery pack handling precautions must be closely followed to avoid risk of injury When a battery pack is not installed in the Display DH or Remote RH handset it should be kept in a clean dry non conductive package Keep conductive materials away from the battery pack at all times Keep contact sides of the battery pack away from each ...

Страница 4: ...ation available from International LAN cabling standards committees the LAN industry and IDEAL INDUSTRIES own experience and testing Before performing any measurements IDEAL INDUSTRIES LTD recommends to request detailed information from contractor or project manager on the standards to be used for measuring to ensure that relevant parameters are complied with Information on the use of this Instruc...

Страница 5: ... 18 Chapter 4 Preferences 19 4 1 Open Preferences 19 4 2 User Information 19 4 3 Autotest Options 20 4 4 Contrast 21 4 5 Timeout Options 21 4 6 Measurement Units 22 4 7 Talkset 22 4 8 Date and Time 23 4 9 Restore Default 24 4 10 Clear Memory 24 4 11 Temperature 25 Chapter 5 Autotest 26 5 1 Set Autotest Pref 27 5 2 Select Job Folder 28 5 2 1 Enable Existing Job Folder 28 5 2 2 Create New Job Folder...

Страница 6: ...EXT Test Error 64 6 11 Insertion Loss Test Attenuation 64 6 11 1 Insertion Loss test Error 64 6 12 Return Loss Test 64 6 12 1 Return Loss Test Error 65 6 13 Impedance Test 65 6 13 1 Impedance Error 65 6 14 Delay and Skew Test 66 6 14 1 Delay and Skew Test Error 66 6 15 Capacitance Test 66 6 15 1 Capacitance Test Error 67 6 16 ACR N ACR Test and Power Sum ACR N Power Sum ACR Test 67 6 16 1 ACR N AC...

Страница 7: ...SO EA Cable specification ISO F ISO FA Upgradeable Accuracy level III IIIe IV IIIe ETL IIIe IV ETL DualMODE tests Permanent Link test with patch cord for non RJ45 connectors Permanent Link test with permanent link Adapter for RJ45 connectors CAT 6 test storage capacity with graphs 1700 1700 USB port Serial port concerns only Service Fiber LWL loss and length measurement FiberTEK FDX Optional Optio...

Страница 8: ... W 127 mm x D 53 mm Weights Display handset DH 1180 g incl battery Remote handset RH 1120 g incl battery pack Battery pack 548 g Battery Packs Display Handset DH and Remote Handset RH Lithium ion battery packs Li ion Operating life with Battery Pack 18 hours under normal conditions Charging Time In handset 6 8 hours External 4 hours Operating Temperature min max 0 o C to 50 o C Operate only if han...

Страница 9: ... impedance 35 180 0 1 3 1 Capacitance bulk 0 100 nF 1 pF or 3 digits 2 20 pF Capacitance 0 333 pF m 0 1 pF 2 1 pF DC loop resistance 35 200 0 1 1 2 Attenuation 1 MHz 1 GHz 0 1 dB Level III IIIe IV NEXT crosstalk 1 MHz 1 GHz 0 1 dB Level III IIIe IV Return loss 1 MHz 1 GHz 0 1 dB Level III IIIe IV ELFEXT ACR F 1 MHz 1 GHz 0 1 dB Level III IIIe IV ACR ACR N 1 MHz 1 GHz 0 1 dB Level III IIIe IV ...

Страница 10: ...tion 1 On Off Power the Display handset DH on off 2 Dim Backlight Dim Backlight in two stages 3 Shift Toggle key activities having dual functions 4 Help Language Open Help Menu Open Language Selection 5 Talk Call RH Activate Talkset function call Remote Handset RH 6 Length Analyze Open Length Measurement Open Diagnostics Menu 7 Wiremap File Open analyze function Wiremap Open Job List 8 7 6 5 4 9 1...

Страница 11: ...e selected menu 12 Escape Abort and exit the current menu without making changes 13 Alphanumeric Keys Enter numbers letters and special characters Ports Connectors Description 14 Low NEXT Connector Connect a test adapter 15 Service and Maintenance Jack Connection for service and maintenance work 16 USB Port Connect USB removable devices to transmit data and to load Firmware Updates 17 USB Device C...

Страница 12: ...ays the time and date 5 Field calibration Select the field calibration 6 Preferences Select the instrument preferences 7 Toner Select the tone generator 8 General Help Select the Help menu 9 Cable Type Select or edit the cable type 10 Fiber Select the fiber measurement 11 Analyze Perform individual cable tests in real time 12 Instrument Display the information on LanTEK II Cable Certifier 13 Funct...

Страница 13: ...the function key example Shift F4 equals function F8 2 1 4 Soft Key Soft keys indicate possible menu options at the bottom of the screen To select the according option press the corresponding Function Key F1 F5 below the soft key The example below shows the setting of Timeout options by using the soft keys at the bottom of the screen The Value is set by Function Keys F1 Increase and F2 Decrease So...

Страница 14: ...atically activated by the Display handset DH 2 2 1 Controls and Ports Connectors 9 8 7 5 4 10 11 12 6 3 2 1 Fig 5 The Remote Handset RH Front view Controls Description 1 On Off Power the Remote handset RH on off 2 Dim Backlight Dim Backlight in two stages 3 Shift Toggle key activities having dual functions 4 Talk Call DH Activate Talkset function call Remote handset RH 5 Tone Tone Mode Power the t...

Страница 15: ...andset is on 12 Fail LED Test result Fail 13 14 15 16 17 Fig 6 The Remote Handset RH Rear and side view Ports Connectors Description 13 Low NEXT Connector Connect a test adapter 14 Service and Maintenance Jack Connection for service and maintenance work 15 USB Device Connect to a computer for firmware updates 16 Talkset Jack Connect a Talkset 17 DC Input Jack Connect an external power supply and c...

Страница 16: ...od of inactivity If the instrument will not be used for a prolonged time it is recommended that the battery protection strips be inserted to conserve battery charge 2 3 1 Operating the Display and Remote handset from AC Power The Display DH and Remote RH handset can also be operated from an external DC source AC DC adapter The adapters are universally applicable Fig 7 Adapter for LanTEK III DH and...

Страница 17: ...ng battery This ensures an accurate indication of the charge state at all times NOTE Charge time depends on charge state of battery When the battery is removed the Display handset DH data and preferences are preserved in the flash ROM by a coin cell lithium battery 2 4 Talkset The LanTEK III Cable Certifier is designed for use with a talkset This function allows communication between the Display D...

Страница 18: ...tions for testing of communication networks A permanent link consists of up to 90 meters of horizontal cabling Maximum length limit applies to TIA standards only The permanent link shown above serves to certify the installation of the horizontal cabling before network connection and user hook up Adapters patch cords and jumpers are excluded from testing Depending on the link under test Permanent L...

Страница 19: ... GG45 Adapter R161054 LanTEK TERA Adapter R161055 LanTEK EC7 Adapter R161053 LanTEK Cat 6A Adapter for RJ 45 R161052 LanTEK Cat 6 Adapter for RJ 45 NOTE Please visit www idealnetworks net for an up to date full list of test Adapters 3 1 3 Setup for other Test Methods Depending on the testing requirements other than permanent link and channel LanTEKIII offers various testing configurations Coaxial ...

Страница 20: ...se Arrow Keys to navigate to Preferences and press Enter Fig 9 Open Preferences 2 Next the instrument preferences can be set by using the listed menus Fig 10 Preference Selection 4 2 User Information This menu can be used to provide information on assigned Technician Company and Contractor 1 Use Arrow Keys to navigate to User Information menu and press Enter ...

Страница 21: ... cursor position overwrite highlighted entry 5 Press Enter to save the information entered Press Escape to exit the menu without making changes 4 3 Autotest Options Use this menu to set Autotest options 1 Use Arrow Keys to navigate to Autotest Options menu and press Enter Fig 12 Autotest Options 2 Use Arrow keys to select the desired option 3 Use soft key to activate or deactivate the selected opt...

Страница 22: ...red Press Escape to exit the menu without making changes 4 5 Timeout Options Use this menu to set the time after which backlight automatically dims and the LanTEK III Cable Certifier automatically shuts down when tester is not in use Default settings Backlight 1 minute Tester 30 minutes 1 Use Arrow Keys to navigate to Timeout Options menu and press Enter Fig 14 Timeout Options 2 Use Arrow keys to ...

Страница 23: ...w Keys to navigate to Measurement Units menu and press Enter Fig 15 Measurement Units 2 Use soft key foot meter to select the desired unit 3 Press Enter to save the information entered Press Escape to exit the menu without making changes 4 7 Talkset Use this menu to set signal strength of tone generator volume of internal speaker and volume of talkset Also use this menu to change the talkset mode ...

Страница 24: ... menu and press Enter Fig 17 Date and Time 2 Use soft key to set the desired Time format 3 Use Arrow Keys to navigate to option Time 4 Use Alphanumeric Keys to enter the time 5 Use Arrow Keys to navigate to option Date Format 6 Use soft keys to select the desired format MDY month day year DMY day month year or YMD year month day 7 Use Arrow Keys to navigate to option Date 8 Use Alphanumeric Keys t...

Страница 25: ...ccept default settings 3 Use the soft key to exit the screen without making changes 4 10 Clear Memory Use this menu to clear all records from the tester memory at one time CAUTION When using the Clear Memory menu the records cannot be restored This will permanently delete all stored tests 1 Use Arrow Keys to navigate to Clear Memory menu and press Enter Fig 19 Clear Memory 2 Use the soft key to cl...

Страница 26: ...e required temperature in Celsius or Fahrenheit 1 Use Arrow Keys to navigate to Temperature menu and press Enter Fig 20Temperature 2 Use the soft keys to select the desired temperature 3 Press Enter to save the information entered Escape allows you to exit the menu without making changes ...

Страница 27: ...ttempts to establish a connection to the Remote handset RH via a correctly connected wire pair If connection cannot be established the Display handset DH will show the message Searching for Remote RH The search is continued until the Autotest is manually cancelled or the Remote handset RH is located After connection to the Remote handset RH has been successfully established its serial number is re...

Страница 28: ...information entered Escape allows you to exit the menu without making changes Autotest Pref Description Simple cable ID Assign name to cable line and set reset meter reading of tests The name can be assigned as simple cable ID or double cable ID Cable From Cable To NOTE If Simple Cable ID is not enabled the cable name assigned will be the default cable ID In addition to cable name and test meter a...

Страница 29: ...case of failed Autotest it determines whether another fault analysis will automatically be performed 5 2 Select Job Folder The name of the current job folder is shown in the TFT display on the ready screen To save the Autotest it is possible to keep this job folder enable another existing job folder or create a new job folder 5 2 1 Enable Existing Job Folder 1 Use Arrow keys to navigate to File an...

Страница 30: ...lay is highlighted blue Fig 24 Job Options example Current Job Info 5 Press Enter to save the information entered Escape allows you to exit the menu without making changes 6 When confirming with Enter the name of the selected job folder will appear on the ready screen 5 2 2 Create New Job Folder 1 Use soft key to open job options in job list Fig 25 Job List ...

Страница 31: ...n overwrite highlighted entry 5 Press Enter to save the information entered Escape allows you to exit the menu without making changes 6 When confirming with Enter the name of the new job folder will appear on the ready screen 5 3 Set Cable Name cable ID The cable name of the cable lines in an Autotest consists of a fixed Cable Name and a variable Current Value 4 digit test meter that automatically...

Страница 32: ... Set opens menu for cable name Select switches between Single Cable ID and Double Cable ID 5 3 1 Simple Cable ID 1 Use Arrow keys to navigate in Cable ID view to option Set and press Enter Single Cable ID 1 cable name 2 Use Alphanumeric Keys to enter a Cable Name for the test portion 3 Use Alphanumeric Keys to reset the Current Value of the test meter or enter an arbitrary value 4 Make corrections...

Страница 33: ...urrent Value of the test meter or enter an arbitrary value 8 Make corrections to entries by using the soft keys delete at cursor position delete characters to the left of cursor insert alphanumeric characters at cursor position overwrite highlighted entry Fig 31 Double Cable ID 9 Use soft keys and to switch between the views Cable From and Cable To 10 Use Alphanumeric Keys to enter a Cable Name fo...

Страница 34: ... cable name 2 Use Alphanumeric Keys to enter a Cable Name for the test portion 3 Use Alphanumeric Keys to reset the Current Value of the test meter or enter an arbitrary value 4 Use Alphanumeric Keys to enter an arbitrary value for Start and End Meter is reset after reaching final value 5 Make corrections to entries by using the soft keys delete at cursor position delete characters to the left of ...

Страница 35: ...l to enable Auto Increment of a character Fig 33 Double Cable ID 6 Use soft keys and to switch between the views Cable From and Cable To 7 Use Alphanumeric Keys to enter a Cable Name for the Cable From Cable To of test portion 8 Use Alphanumeric Keys to reset the Current Value of the test meter or enter an arbitrary value 9 Use Alphanumeric Keys to enter an arbitrary value for Start and End Meter ...

Страница 36: ...0 0 1 C 0 0 0 7 0 0 2 1 0 1 9 D 0 0 0 7 0 0 1 D 0 0 0 8 0 0 2 2 0 2 0 A 0 0 0 8 0 0 2 A 0 0 0 9 0 0 0 0 0 2 0 B 0 0 0 9 0 0 2 B 0 0 1 0 0 0 0 1 0 2 0 C 0 0 1 0 0 0 2 C 0 0 1 1 0 0 0 2 0 2 0 D 0 0 1 1 0 0 2 D 0 0 1 2 0 0 1 0 0 2 1 A 0 0 1 2 0 0 3 A 5 4 Labeling Standard TIA EIA 606 A The standards TIA EIA 606 A for telecommunication infrastructure include the following elements Horizontal cable arr...

Страница 37: ... line e g 1 building 1 floor 1 distribution sockets 1 Use soft key Drop to select cable parameter 606A Drop Fig 35 Cable Parameter 606A Drop AAA A AA 0000 Floor Telecom room Panel Port 2 Use Left Right Arrow Keys to navigate to desired position in port area Use Up Down Arrow Keys to assign characters and numbers 3 Proceed in the same manner with positions Panel Telecom Room and Floor 4 Use soft ke...

Страница 38: ...se Up Down Arrow Keys to assign characters and numbers 3 Proceed in the same manner with positions Telecom Room and Floor 4 Use soft key to hide individual positions Assembling the cable line automatically generates the 606A Name 5 Press Enter to save the cable name Use Escape to exit menu without making changes 5 4 4 Cable Parameter 606A Backbone Pair Fiber Name of a horizontal and vertical cable...

Страница 39: ...positions Assembling the cable line automatically generates the 606A Name 6 Press Enter to save the information entered Escape allows you to exit the menu without making changes 5 5 Select Twisted Pair Cabling 1 Open Cable Type on start screen 2 Use Arrow Keys to navigate to installation type of cable line to be tested Twisted Pair Perm Twisted Pair Basic or Twisted Pair Channel and confirm with E...

Страница 40: ...onfirm with Enter Fig 40 Specification of Cable Type 3 Press Enter to save the information entered Escape allows you to exit the menu without making changes 5 5 2 Create Cable Type 1 Use soft key to open select menu for individual creation of a cable type 2 Use Arrow keys in Select Menu to navigate to option Frequency Range and confirm with Enter Fig 41 Select Menu 3 Use Arrow Keys to navigate to ...

Страница 41: ...keys to navigate to desired pairings and enable or disable your selection with soft key An enabled pairing is indicated by the green box Fig 43 Connector Pinout 7 Press Enter to save the information entered Escape allows you to exit the menu without making changes 8 Use Arrow keys in Select Menu to navigate to option Test Limits and confirm with Enter 9 Use Arrow keys to navigate to the individual...

Страница 42: ... 15 Use Arrow keys in Select Menu to navigate to option Select Autotest and confirm with Enter 16 Prepare the desired measuring modes for the Autotest by using Arrow Keys to navigate to the desired measuring modes Enable or disable your selection with soft key An enabled measuring mode is indicated by the green box Fig 46 Select Autotests 17 Press Enter to save the information entered Escape allow...

Страница 43: ...lows you to exit the menu without making changes 5 5 3 Edit and Calculate NVP 1 Use soft key to open Select Menu for editing and calculating NVP 2 Use Arrow keys to navigate to the individual boxes and assign desired NVP with the Alphanumeric Keys Fig 48 NVP 3 Use soft key to open menu for entering cable length 4 Use Arrow Keys to navigate to box and use Alphanumeric Keys to assign Cable Length m ...

Страница 44: ...VP Use Escape to exit menu without making changes 5 5 4 Enter Reference Temperature 1 Use soft key to open Select Menu for changing ambient temperature 2 Use Alphanumeric Keys to assign reference temperature Fig 50 Reference Temperature 3 Press Enter to save the reference temperature Use Escape to exit menu without making changes ...

Страница 45: ...alMODE is the calculation of margins in relation to higher bandwidth for future applications Up to now you had to check the certification documents for Category 6 Permanent Link and assess whether adequate margins for transmission of applications at higher bandwidth are available However assessment of the complete final data would also require a certification according to Category 6A Due to higher...

Страница 46: ...EST The passed failed results are displayed For each DualMODE test the worst case margins and values for NEXT RL ACR und Loss are indicated Fig 52 Overall DualMODE Result 6 Use Enter to load the corresponding graphical result displays of the highlighted test ...

Страница 47: ...f this information is not available a cable of known length ca 30 60 meter should be connected and the NVP calculated by LanTEK II Cable Tester 1 Open Cable Type on start screen 2 Use Arrow Keys to navigate to desired cable type Fig 53 NVP Default Value 3 Use soft key to open menu for entering NVP Fig 54 Enter NVP 4 Use Alphanumeric keys to enter one or several NVP 5 For automatic calculation of a...

Страница 48: ...ength of both patch cords must be considered 5 8 Coaxial Cable Standards The LanTEK III Cable Tester supports the following coaxial cable standards CATV standards Ethernet standards Other cable types RG59 31 or 92 m 3 fold or 4 fold shield 10Base 2 IBM Coax RG6 31 or 92 m 3 fold or 4 fold shield 10Base 5 TWINAXIAL ARCNET 1 Open Cable Type on start screen 2 Use Arrow Keys to navigate to option Ethe...

Страница 49: ...een performed The user receives a message informing him that a field calibration is required The test adapter has been changed A patch cord has been changed Field calibration is not necessary for Permanent Link Adapters 5 9 1 Twisted Pair Cabling 1 Use Arrow Keys to navigate to Calibration and press Enter to open job list Fig 58 Ready screen Calibration requires one patch cord each for the Display...

Страница 50: ...e Remote handset RH indicates calibration and a progress bar shows the status 4 Connect Display handset DH and Remote handset RH with patch cord for Display handset DH as shown on the display Remember which connection of the patch cord is connected to the Display handset DH Fig 60 Patch Cord DH 5 Use soft key to continue calibration The Remote handset RH indicates calibration and a progress bar sh...

Страница 51: ... COAX adapters the LanTEK III process consisting of 4 steps is changed Since the coaxial cables are tested at low frequencies the additional data received during calibration are largely ignored thus calibration with LanTEK II Cable Tester is already completed after one step NOTE The LanTEK III Cable Tester COAX adapters are equipped with BNC connections COAX cables applied by the user must convert...

Страница 52: ...ss 2 User Manual Page51 Fig 63 Ready Screen 7 Use soft key to initiate calibration Fig 64 Coaxial Cable Calibration 8 After completion of calibration and display of according message press Escape to return to main screen ...

Страница 53: ...e cable line link 3 Start by pressing Autotest 5 11 Open Job Folder of Autotest The internal memory of LanTEK III Cable Tester can hold a maximum of 1700 individual TIA CAT 6 Autotest results with graphs which can later be loaded again via File The Autotest results can be saved immediately after the test The complete set of test results is saved in a file The test results are automatically saved i...

Страница 54: ...the total number of passed failed tests cable length and memory used for the highlighted job folder All Job Info The display shows the total number of passed failed tests cable length and memory used for all highlighted job folders Permanently Delete Selected Jobs The selected job folder is deleted Rename Job Renaming highlighted job folder New Job Adding a new job folder to job list Make Job Curr...

Страница 55: ...ts Info Displays information on test results such as number of tests number of passed failed tests Tested lengths and memory used Selected Results Info Displays results of selected tests Rename Test Renames selected test results 5 11 3 Copy Job Folder to USB Removable Storage 1 Insert the USB removable storage into the USB port of Display handset DH 2 Navigate in job list with Arrow Keys to job fo...

Страница 56: ...sired job folder The display is highlighted yellow 3 Use Arrow Keys to navigate to desired single test The display is highlighted yellow 4 Press Enter to display overview of single tests Fig 65 Single test overview 5 Press Enter again to open test series of single test Fig 66 Test series 6 Use Arrow Keys to navigate to desired test series and press Enter to display result table Fig 67 Result Table...

Страница 57: ...raphs make it easier to recognize the relation between two network parameters the actually measured values and the pre programmed limits The horizontal axis indicates the frequency values and the vertical axis the measured values in dB The limits are drawn as solid line Table view 10 9 8 Graph view 1 2 3 4 5 7 6 Fig 69 Table View and Graph View The margins indicated at lower right in table view pr...

Страница 58: ...lly When cursor position is changed the measuring values displayed on screen are changed as well Use soft keys and to move cursor in larger steps Use Arrow Keys to move cursor in smaller steps While SHIFT key is pressed cursor can be moved in large steps with Arrow Keys 7 Enlargement or reduction of view of horizontal axis At maximum size these keys have no function 8 Horizontal axis with frequenc...

Страница 59: ... until the analysis test is manually cancelled or the Remote handset RH is located After connection to the Remote handset RH has been successfully established its serial number is read out to check if current configuration data are available If during the last 7 days no calibration has been performed on the identified Remote handset RH the user receives a message that calibration is recommended Di...

Страница 60: ...t Overall result Individual Results Fig 71 Evaluation of Analysis Test Results The above example shows the screen for DC resistance The overall result of the test appears in the upper right beside the date The results of the individual wire pairs appear in the last column on the right result column The results for the overall test and the single tests are indicated similar to Autotest 6 4 1 Graphs...

Страница 61: ...ests it is possible to pinpoint short circuits interrupts and incorrect wiring To facilitate evaluation the test results are displayed in graph format Fig 72 Wiremap Test An error indicated by the Wiremap test should always be corrected first since it will cause errors in other tests An unwired contact can cause the tests for DC loop resistance and loss to receive a failing grade as well An interr...

Страница 62: ...gth Test 6 7 1 Length Test Error Minor length differences can occur between the wire pairs of a cable due to small NVP differences as well as length differences caused by transposition A failure exists if the electronically measured cable length deviates too much from the actual length 6 8 Resistance Test This test determines the loop resistance of the individual wire pairs This ensures that the t...

Страница 63: ... NEXT ACR F ELFEXT and Power Sum The NEXT test determines interfering effects crosstalk of a transmitting wire pair on the adjacent wire pair in the same cable NEXT is measured on Display handset DH and Remote handset RH 1 2 3 6 4 5 7 8 2 1 6 3 5 4 8 7 Fig 76 Effect of Adjacent Pair FEXT test and NEXT measurement are similar the only difference is that in FEXT test the transmissions emanate from R...

Страница 64: ...1 Pair When using Power Sum NEXT four 4 calculations on each cable end and on each wire pair combination pairs 1 2 3 6 and 4 5 to 7 8 etc are performed A total of eight 8 values is obtained Fig 78 Power Sum NEXT NOTE The Power Sum NEXT values are usually 2 3 dB below the value stronger crosstalk than with conventional NEXT measurement When using Power Sum ACR F Power Sum ELFEXT four 4 calculations...

Страница 65: ... a signal with known amplitude into the Remote handset RH and then reading the amplitude on the Display handset DH Fig 80 Loss Test 6 11 1 Insertion Loss test Error The insertion loss reduces the signal in the cable Loss increases with cable length signal frequency and temperature With the aid of loss tests it is possible to detect faults in cable connections and connection technology A high loss ...

Страница 66: ...e impedance can help in indentifying damages to cable connections or cable sections with impedance mismatch Since this test uses a capacity measurement the correct cable type must be indicated to obtain a precise measuring result NOTE The measurements are incorrectly calculated if the setting is for a type CAT 3 cable the cable insulation containing PVC but the test is actually performed on a CAT ...

Страница 67: ...1 Delay and Skew Test Error The delay and skew measurements usually result in slightly different values for the individual wire pairs of a cable However a large difference indicates a cable fault or a damaged wire pair 6 15 Capacitance Test This test determines the mutual capacitance between the two conductors of each wire pair to ensure that the capacitance of the corresponding cable type has not...

Страница 68: ...CR N Power Sum ACR measurement is calculated by summation of NEXT values between a selected wire pair and three other wire pairs of the same cable Fig 85 ACR N ACR Power Sum ACR N Power Sum ACR 6 16 1 ACR N ACR Test and Power Sum ACR N Power Sum ACR Test Error A large difference between the measuring values is preferable since this indicates a strong signal and minor perturbations 6 16 2 Troublesh...

Страница 69: ...CR 6 18 Custom Cable Preferences and Cable Parameters All cable types pre programmed in LanTEK II Cable Tester are based on a predefined test standard These pre programmed preferences cannot be changed If you wish to perform other tests on a selected cable line you first must create a custom cable Example In addition to TIA 568B Category 5 tests the return loss is to be measured which is not requi...

Страница 70: ... 6 Use Alphanumeric Keys to enter one or several NVP values if required 7 Use soft key to accept changes and return to screen to create a custom cable 6 18 2 Select Custom Cable Type The custom cable type can be edited at any time or selected as current cable type 1 Open Cable Type on start screen 2 Use Arrow Keys to navigate to Custom Cable and confirm with Enter 3 Use Arrow Keys to navigate to d...

Страница 71: ...not be performed on wire pairs that have not been selected Test Limits Use this screen to adjust the pass fail limits for the Autotest to your requirements Link models The custom limits for NEXT and loss are specified as constant limit or according to the link models The frequency limits depend on LanTEK II model and link type Select Autotests Not all cable lines require the complete Autotest test...

Страница 72: ...ination of both This shield makes the coaxial cable extremely impervious to electromagnetic disturbances Sheath A robust sheath made of plastic or Teflon protects the coaxial cable from mechanical damage Coaxial cables differ by their impedance in ohm which indicates the cable s resistance of the current Thus a coaxial cable of type RG 59 and RG 6 typically has an impedance of 75 ohm whereas a RG ...

Страница 73: ...air D Low High and Warble are soft keys that are displayed on the Display handset DH 8 1 1 Enable Tone Generator with Display handset DH 1 Connect Display handset DH to cable to be tested 2 Use Arrow Keys to navigate on ready screen to Toner display and confirm with Enter NOTE The Tone Mode remains enabled until you press Escape 3 Use soft keys to select the wire pair Pair 78 Pair 36 Pair 54 or Pa...

Страница 74: ...cond line the type of tone signal as well as the feed location is shown in XY format X symbol Tone Y symbol feed location L Low 78 Pair 78 H High 36 Pair 36 W Warble 54 Pair 54 12 Pair 12 Example L78 low tone Low pair 78 NOTE The Tone Mode remains enabled until you press Escape 3 Select the wire pair into which the tone signal is to be fed by switching between the options with the TONE key 4 Selec...

Страница 75: ...e storage NOTE Before updating the firmware make a backup of the test records on the LanTEK III Cable Tester When updating the firmware the Display DH or the Remote RH handset must be supplied with power through the adapter 9 1 1 Using the Computer 1 Supply the Display handset DH with power by using the adapter 2 Connect the Display handset DH to a free USB port of the computer by using the USB ca...

Страница 76: ...SB removable storage into the USB port of the powered off Display handset DH 4 Power the display handset DH on wait approx 1 2 seconds then press and hold the Escape button until an hourglass appears on the TFT display Release the escape button when the hour glass appears 5 Wait until the upgrade is finished and the main menu appears on the Display handset NOTE During the upgrade the connection to...

Страница 77: ...ce To comply with precision requirements you should have your LanTEK III Cable Tester calibrated on an annual basis Before sending the tester for calibration or maintenance please contact the local Technical Customer Service of IDEAL INDUSTRIES at www idealnetworks net ...

Страница 78: ......

Отзывы: