43
Viscount GTS -
Installation & Servicing
INSTALLATION
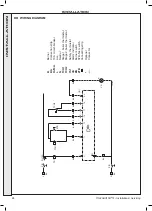
67 BURNER WIRING HARNESS
Control Panel Connections
Connect the terminal block with the male connecting terminals
to terminals 4-12 in the control panel.
12
11
10
9
8
7
6
5
4
VA
S3 T8
T7
T6
T 2 T
1 L1
N
230V
50Hz
L
N
A
L
I
har7058
Burner Connections without Plug-in Connectors
In this case, the connectors supplied with the burner cable must be
rewired.
The diagram shows the wire numbers and terminals of the burner
connectors.
The table below specifies the way in which the cables are to be
connected to the burner control box.
B4 S3 T2 T1 N
g/y
L1
B5 T6 T7 T8
8
4
5
6
7
1
3
2
har705
9
Burner Cable
The control panel is supplied with a burner power supply
cable, with one 7 and one 4-pin European plugs on one
end and a terminal block with male connecting terminals
on the other end.
Burner
Wire
Connector
No. From
Connection to the Burner Control Box
Terminal No.
L1
7
Permanent Live supply from the safety thermostat
Burner main supply
g/y Earth connection
Earth connection
N
6
Neutral taken after On/Off Switch
Neutral terminal
T1/T2
5/4 Volt free contact of the stage 1 boiler thermostat
Insert the control circuit of boiler stage 1
S3
8
Burner alarm indicator
Alarm output (live)
T6
1
Stage 2 boiler thermostat input
Insert in the control circuit of burner stage 2
T7
3
Stage 2 "boiler off" thermostat output
Connect only if the burner is of the modulating type
T8
2
Stage 2 "boiler on" thermostat output
Insert in the control circuit of burner stage 2
Note.
If the electrical characteristics of the burner exceed the
following values:
-
start up current > 16 A or
-
P > 450 W (or 1/2 cont. hp. motor), or
-
I > 2A cos
ϕ
= 0,7
The burner controls circuit must use a relay.
INST
ALLA
TION
Содержание VISCOUNT GTS 14
Страница 50: ...50 Viscount GTS Installation Servicing NOTES...
Страница 51: ...51 Viscount GTS Installation Servicing NOTES...

