background image

58


F

AUL

T FINDING F

AUL

T FINDING F

AUL

T FINDING F

AUL

T FINDING F

AUL

T FINDING

Installation and Servicing

SECTION 4 - FAULT FINDING

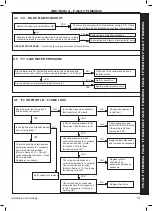
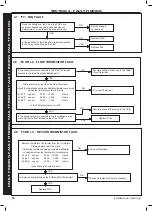
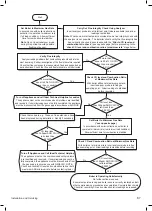
4.7  ‘F3’ - FAN FAULT

Does the wiring from the Fan to the PCB have 
secure connections at both ends and has not 
deteriorated?  Does the wiring have continuity?

YES

Rectify Wiring & 
connections

Is there 230Vac at the Blue and Brown connections 
to the 3 way connection on the Fan?

NO

Replace PCB

Replace Fan

NO

YES

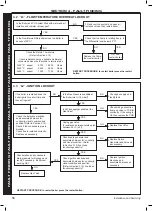
4.8  ‘F4 OR L4’ - FLOW THERMISTOR FAULT

Disconnect the wiring from the Flow Thermistor

Check the resistance using a suitable multimeter connected 

across the Thermistor’s terminal pins.

  At 25 

o

C  expect 

9,700  - 10,300 

Ohms

  At 60 

o

C  expect 

2,400 -  2,600 

Ohms

  At 85 

o

C  expect 

1,000 -  1,100 

Ohms

Is the Thermistor value correct?

YES

Is the wiring securely connected to the low voltage 6 way 
connector at the front left hand side of the PCB?

YES

Replace PCB

Fit a new Thermistor

NO

Securely connect the wiring to the PCB

Is the wiring securely connected to the Flow Thermistor 
(located in the top of the Heat Exchanger?)

YES

NO

Securely connect the wiring to the Water 
Flow Thermistor

NO

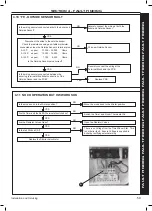
4.9  ‘F5 OR L5’ - RETURN THERMISTOR FAULT

Remove the Return Thermistor from the CH Return 

Pipe and disconnect the wires.

Check the resistance using a suitable multimeter 

connected across the thermistor’s terminal pins.

  At 25 

o

C  expect 

9,700  - 10,300 

Ohms

  At 60 

o

C  expect 

2,400 -  2,600 

Ohms

  At 85 

o

C  expect 

1,000 -  1,100 

Ohms

Is the Thermistor value correct?

YES

Is there continuity between the PCB and the Thermistor?

YES

Replace PCB

Fit a new Thermistor

NO

Check and replace wiring as necessary

NO

Содержание LOGIC COMBI ESP1 24

Страница 1: ...Do not use reconditioned or copy parts that have not been clearly authorised by Ideal Boilers For the very latest copy of literature for specification and maintenance practices visit our website www...

Страница 2: ...P1 kW 8 0 8 0 8 0 Auxiliary Electricity Consumption Full Load elmax kW 0 042 0 032 0 029 Part Load elmin kW 0 012 0 013 0 013 Standby PSB kW 0 005 0 005 0 005 Seasonal Space Heating Energy Efficiency...

Страница 3: ...I Class VII Class VIII 1 2 1 5 2 3 4 3 5 5 PRODUCT FICHE The energy efficiency of the package of products provided for in this document may not correspond to its actual energy efficiency once installe...

Страница 4: ...4 Installation and Servicing...

Страница 5: ...19 Ideal Boilers reserve the right to vary specification without notice FOR ANY TECHNICAL QUERIES PLEASE RING THE IDEAL INSTALLER HELPLINE 01482 498704 NOTE BOILER RESTART PROCEDURE To restart the bo...

Страница 6: ...6 Installation and Servicing...

Страница 7: ...Panel Removal Replacement 40 3 3 Fan And Venturi Assembly Removal And Cleaning 40 3 4 Burner Removal Cleaning 41 3 5 Cleaning the Condensate Trap Siphon 41 3 6 Cleaning the Heat Exchanger 42 3 7 Reass...

Страница 8: ...ut Non Condensing kW 24 2 4 8 6 1 7 1 70o C Mean Water temp Condensing kW 25 6 5 1 6 4 7 5 40o C Mean Water temp Seasonal efficiency SEDBUK 2005 91 1 91 1 91 1 Seasonal efficiency SEDBUK 2009 89 6 89...

Страница 9: ...re record Cold water inlet temp measure record Hot water outlet temp measure record Water flow rate at max setting measure record For condensing boilers only Condensate drain 28 29 For all boilers com...

Страница 10: ...ere is a demand for CH the heating system is supplied at the selected temperature of between 30o C and 80o C until DHW is drawn off The full output from the boiler is then directed via the diverter va...

Страница 11: ...nection of a control device not approved by Ideal Boilers could invalidate the certification and the normal appliance warranty It could also infringe the Gas Safety Regulations and the above regulatio...

Страница 12: ...full output at inlet pressures as low as 14mb other gas appliances in the property may not be as tolerant When operating pressures are found to be below the minimum meter outlet of 19mb these should b...

Страница 13: ...hermostatic radiator valves are used the space heating temperature control over a living dining area or hallway having a heating requirement of at least 10 of the minimum boiler heat output should be...

Страница 14: ...hat the flue hole is cut accurately e g with a core drill the flue can be installed from inside the building where wall thicknesses do not exceed 600mm Where the space into which the boiler is going t...

Страница 15: ...ny other reason an additional vessel MUST be installed on the return to the boiler Guidance on vessel sizing is given in table above Notes a The method of filling refilling topping up or flushing seal...

Страница 16: ...t Fernox Cookson Electronics Forsyth Road Sheerwater Woking Surrey GU21 5RZ 44 0 8706 015000 Sentinel Performance Solutions The Heath Business Technical Park Runcorn Cheshire WA7 4QX Tel 0800 389 4670...

Страница 17: ...06 Pipe Gas Injector 211 Injector Assy 214 Venturi 215 Fan 217 Burner 218 Gasket Burner 219 Sump Clean Out Cover 223 Flue Manifold 224 Flue Manifold Top 227 Clamp Retaining Flue Turret 228 Hose Conden...

Страница 18: ...S Gas Valve Pack 1 Pipe Gas Inlet 2 Washer Gas blue 3 Gas Cock Filling Loop Pack 1 3 8 Top Hat Washer 2 Valve Filling Loop 3 Pipe Filling Loop 4 Washer Fibre 3 8 Return Valve Pack 1 Pipe CH Return 2 W...

Страница 19: ...B 1 2 Pack B Contents Non Telescopic A Flue Terminal B Flue Turret C Rubber Terminal Wall Seal D Cutting Aid E Wall Seal White 2 3 UNPACKING CONT D A D B C E Note This flue system incorporates a remo...

Страница 20: ...o the wall Both wall faces immediately around the cut hole should be flat 2 Drill 2 mounting holes marked from template with a 7 5mm 8mm masonry drill and insert the plastic plugs provided for the wal...

Страница 21: ...t with an air stopper seal Ensure all caps seals are in place Additional Termination Kits available for use with these B packs Flue Deflector Kit The resistance is the equivalent of 1 metre of flue pi...

Страница 22: ...al 1000mm long B Pack Telescopic Cut 75mm Minimum Maximum Minimum Maximum Minimum Maximum Minimum Maximum B Pack Standard 181 556 286 484 601 816 526 741 Plus 1 1m D pack 1131 1506 1236 1434 1551 1766...

Страница 23: ...terminal is uppermost 4 Drill a 3 5mm hole through one of the 2 outer side holes in the outer flue section into the inserted outer flue as shown Take care not to pierce the inner plastic flue Fit scre...

Страница 24: ...l need to be refitted 9 When 1st mark is in line with the wall whilst holding the flue firmly push the white wall sealing flange to the wall until the 2nd of the two marks is just visible If the last...

Страница 25: ...ade using the supplied vertical connector WEATHER PROOFING Where the flue passes through the roof line an adequate seal must be made This is achieved by using either Flat roof weather collar or Univer...

Страница 26: ...enetrate the shaded area of the roof Note The equivalent flue length resistance of the elbow kits are 90o elbow kit 1m 45o elbow kit 0 6m If chimney penetrates dotted area such that A is less than 300...

Страница 27: ...he instructions provided with the vertical connector kit 3 Secure the vertical connector by applying downward pressure on the connector 4 Position the clamp on the top face of the flue manifold and pu...

Страница 28: ...ischarge point such as an internal soil and vent stack or internal kitchen or bathroom waste pipe etc fig 3 External Drain Connections The use of an externally run condensate drainage pipe should only...

Страница 29: ...ternal pipe Water Weather proof insulation Max 3m external pipework Limestone chippings 500 300 25 2 rows of three 12mm holes 25mm centres 50mm from the bottom of the tube facing away from the house M...

Страница 30: ...ed 2 Fit the DHW outlet pipe tail to DHW outlet connection ensuring the seal provided is correctly located 3 Fit the filling loop provided between the DHW inlet valve and the CH return valve GAS CONNE...

Страница 31: ...valve and fit the grey cap to the open end 8 Fit the Plug to the free end of the filling loop Note Open all DHW taps to ensure water is flowing freely Once satisfied close all taps Top Up 1 Ensure fi...

Страница 32: ...iler reverse the order above Note 1 The link wire on the 230V installer room stat timer connection gives a demand in conjunction with the OpenTherm link wire located on the right hand side of the cont...

Страница 33: ...tat L N Optional Timer Optional Timer DIAGRAM C Use of General Live for Room Stat Optional Room Stat Frost Stat Mains In Frost Room Stat Stat L N Optional Timer DIAGRAM A DIAGRAM B Room Stat with Exte...

Страница 34: ...D X9 X8 OWC OWC OPENTHERM OPENTHERM OPENTHERM 5V CHIP COM BUS TX CHIP COM BUS 24V CHIP COM BUS GND CHIP COM BUS 5V CHIP COM BUS RX MAINS LIVE MAINS NEUTRAL AUXILIARY LIVE IONISATION 2 2 FLOW DHW DHW X...

Страница 35: ...s only 2 22 COMMISSIONING AND TESTING GENERAL Please Note The combustion for this appliance has been checked adjusted and preset at the factory for operation on the gas type defined on the appliance d...

Страница 36: ...mp control B to max and turn the mode knob C to The boiler control should now go through its ignition sequence until the burner is established 10 If the boiler does not light then after 5 attempts the...

Страница 37: ...show then when the burner lights 2 Close all taps except the furthest one from the boiler and check that the boiler is firing at maximum rate This is factory set to give a DHW temperature rise of appr...

Страница 38: ...mestic hot water controls Explain that due to system variations and seasonal temperature fluctuations DHW flow rates temperature rise will vary requiring adjustment at the draw off tap It is therefore...

Страница 39: ...monstrated by satisfactory completion of the CPA1 ACS assessment which covers the use of electronic portable combustion gas analysers in accordance with BS7967 Parts 1 to 4 Note In order to carry out...

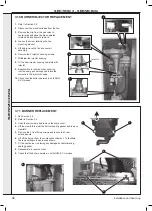
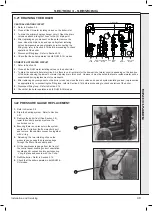
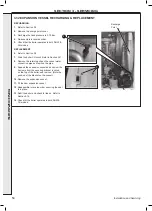
Страница 40: ...the front panel 5 Re tighten the two retaining screws 3 3 FAN AND VENTURI ASSEMBLY REMOVAL AND CLEANING 1 Disconnect the electrical leads from the fan 2 Remove the clip from the gas control valve out...

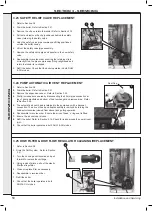
Страница 41: ...ion Care must be taken to ensure that the burner is not placed down upon its face as this may cause damage to the ceramic 6 Brush off any deposits that may be on the ceramic with a SOFT brush 7 Inspec...

Страница 42: ...nition and detection gaps are correct Refer to Sections 3 13 3 14 1 Ignition Electrode Flame Detection Reassemble the boiler in the following order 1 Ensure that the condensate trap siphon is full of...

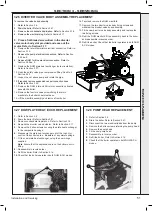
Страница 43: ...boiler Refer to Section 3 21 THE BOILER MUST NOT BE OPERATED WITHOUT THE FRONT PANEL FITTED 3 9 FAN REPLACEMENT 1 Refer to Section 3 8 2 Disconnect the electrical leads from the fan 3 Remove the clip...

Страница 44: ...rse order ensuring that the new gas seal supplied is located correctly in the injector housing 10 Check that the boiler operates in both DHW CH modes 4 3 3 3 11 BURNER REPLACEMENT 5 5 6 1 See Section...

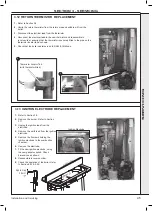
Страница 45: ...8 Reassemble in reverse order 9 Check the operation of the boiler Refer to Section 2 23 2 24 3 12 RETURN THERMISTOR REPLACEMENT 1 Refer to Section 3 8 2 Unclip the return thermistor from the return p...

Страница 46: ...rode 4 Remove the 2 screws retaining the detection electrode 5 Remove the electrode 6 Fit the new flame detection electrode using the new gasket supplied 7 Reassemble in reverse order 8 Check that the...

Страница 47: ...r slot provided and ease out the actuator 3 Before replacing the diverter valve actuator proceed as follows a Ensure that the switched live to the boiler is off and that all DHW taps are shut b Press...

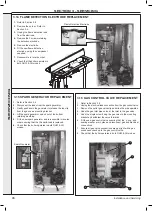
Страница 48: ...Spring out the four side retaining clips and pull the PCB upwards to clear the corner retaining posts 7 Take the new PCB 8 Re connect all plug connections 9 Reassemble in reverse order 10 a Turn power...

Страница 49: ...3 To drain the primary heat exchanger circuit Open the drain valve and attach a length of hose to the CH drain point 4 After replacing any component on the boiler remove the hose close the drain valv...

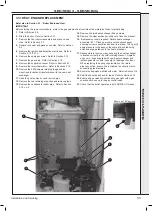
Страница 50: ...ction 3 32 4 Firstly increase access area by disconnecting the 22mm pipe connection at top of pump manifold and bottom of heat exchanger and remove pipe Refer to Section 3 26 5 The automatic air vent...

Страница 51: ...y 1 Refer to Section 3 8 2 Drain the boiler Refer to Section 3 21 3 Remove the condensate trap siphon Refer to Section 3 18 4 Remove the electrical plug Refer to Section 3 17 5 Place a flat bladed scr...

Страница 52: ...oiler Refer to Section 2 16 8 Check that the boiler operates in both DHW CH modes 3 30 FLOW THERMISTOR REPLACEMENT 4 3 3 29 CH WATER PRESSURE SWITCH REPLACEMENT 1 Refer to Section 3 8 2 Drain the boil...

Страница 53: ...to correctly match connecting pipe diameters 18 Ensure the trap siphon is filled with water Refer to Section 3 18 19 Refill the boiler and check for leaks Refer to Section 2 16 20 Ensure all gas valv...

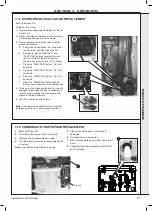
Страница 54: ...rcuit Refer to Section 3 21 8 Remove the retaining clip on the vessel water connection pipe and remove the pipe 9 Support the expansion vessel and unscrew the 2 screws from the securing bracket locate...

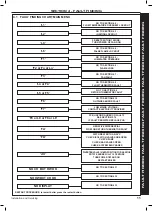
Страница 55: ...GO TO SECTION 4 9 RETURN THERMISTOR FAULT GO TO SECTION 4 10 OUTSIDE SENSOR FAULT LOW MAINS VOLTAGE CONTACT ELECTRICITY PROVIDER PCB UNCONFIGURED OR FAULTY SEE SECTION 3 19 IF FAULT PERSISTS REPLACE...

Страница 56: ...rectify fault NO YES Is 24Vdc supply available at the Gas Valve YES Check spark generator and associated harness for continuity and visual condition Refer to Section 3 15 Are these functioning correct...

Страница 57: ...these functioning correctly YES Check siphon and condensate drain pipe work for blockage and rectify if necessary Boiler now working OK Check wiring from gas valve to PCB for continuity If the wiring...

Страница 58: ...1 000 1 100 Ohms Is the Thermistor value correct YES Is the wiring securely connected to the low voltage 6 way connector at the front left hand side of the PCB YES Replace PCB Fit a new Thermistor NO...

Страница 59: ...and the PCB Replace PCB Fit a new Outside Sensor NO Securely connect the wiring at the Terminal Block and the PCB Is the wiring securely connected at both the boiler and Outside Sensor YES NO Securel...

Страница 60: ...d the diverter valve motor connected YES YES Check diverter head fully engaged and clip secured onto waterset YES Is diverter stuck in the CH position YES Check and re fit diverter valve actuator head...

Страница 61: ...ils of approved Ideal Parts Distributors are available on www idealparts com Our Parts team are also available to help with your Ideal Spare Parts enquiries on 01482 498665 When calling and to ensure...

Страница 62: ...62 Installation and Servicing SECTION 6 BENCHMARK COMMISSIONING...

Страница 63: ...ons and the data fields on the commissioning checklist completed in full To instigate the boiler guarantee the boiler needs to be registered with the manufacturer within one month of the installation...

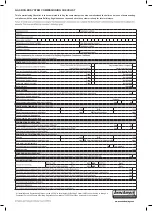
Страница 64: ...priate Building Regulations and then handed to the customer to keep for future reference GAS BOILER SYSTEM COMMISSIONING CHECKLIST CONTROLS Programmable room thermostat Optimum start control Combinati...

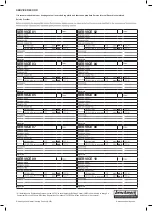
Страница 65: ...larly and that the appropriate Service Interval Record is completed Service Provider SERVICE RECORD SERVICE 01 AND Where Possible AND Signature SERVICE 02 AND Where Possible AND Signature SERVICE 03 A...

Страница 66: ...letin TB 008 where chimney flues are in voids The ECGA should be of the correct type as specified by BS 7967 Prior to its use the ECGA should have been maintained and calibrated as specified by the ma...

Страница 67: ...bled fixed and supported as per instructions Check that flue and flue terminal are not obstructed Check that no seals e g Those on flue extensions have been displaced during installation Rectify if ne...

Страница 68: ...68 NOTES Installation and Servicing...

Страница 69: ...69 NOTES Installation and Servicing...

Страница 70: ...70 NOTES Installation and Servicing...

Страница 71: ...71 NOTES Installation and Servicing...

Страница 72: ...he code of practice for the installation commissioning servicing of central heating systems Ideal Boilers Ltd PO Box 103 National Avenue Kingston Upon Hull HU5 4JN Tel 01482 492251 Fax 01482 448858 Re...

Отзывы: