background image

ADS-RR(SR)-TOY02-DS-IG-EN

maestro.idatalink.com

ToyoTa pRiuS WiTh JBL 2012-2014

Automotive Data Solutions Inc. © 2021
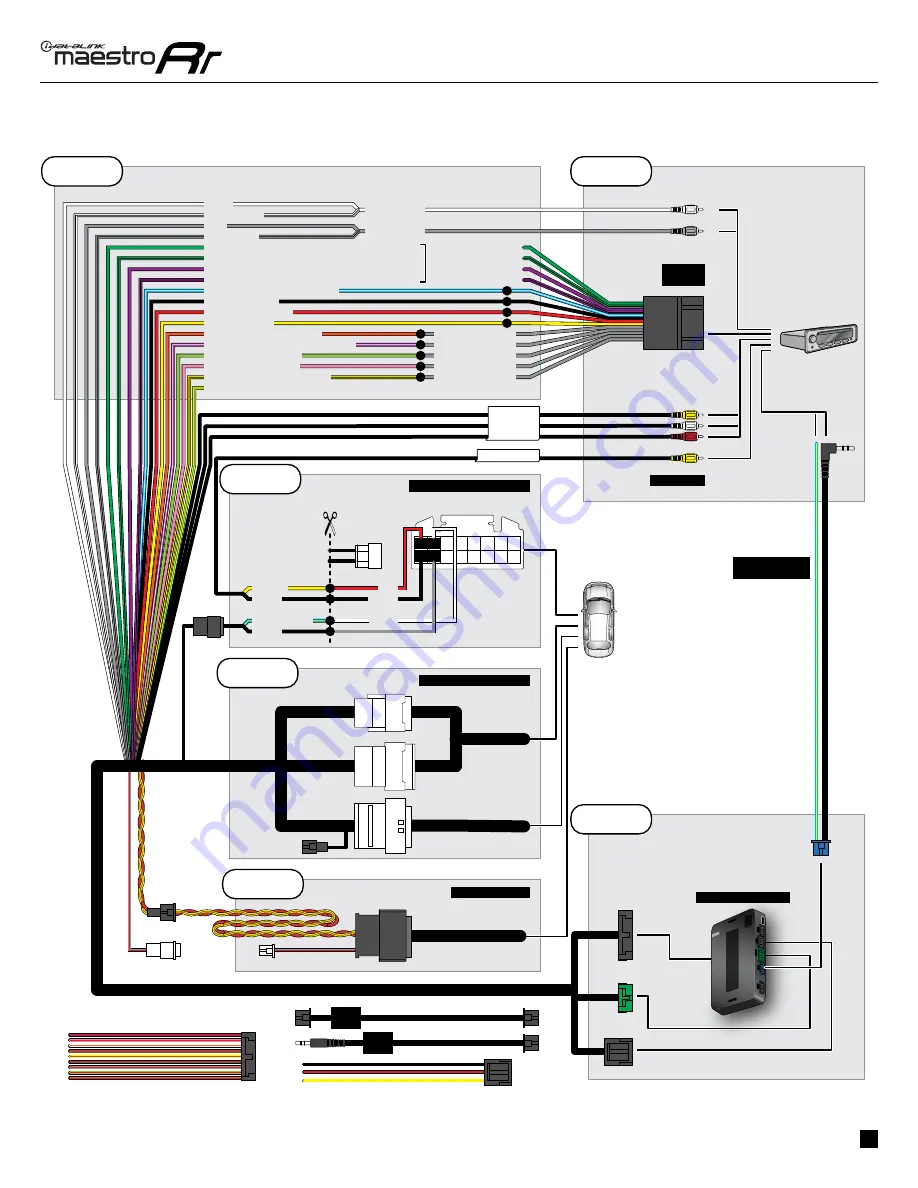
4

2

3

1

4

5

6

7

8

9

10

12

13

11

14

15

16

NC

AUX IN

AUX IN

10

BACKUP CAM

BACKUP CAM

RED

BLACK

WHITE

YELLOW - 12V (+)

BLACK - GROUND
RED - ACCESSORY (+)

YELLOW/BLACK - FOOT BRAKE

ORANGE - ILLUMINATION (+)

PURPLE/WHITE - REVERSE LIGHT (+)

PINK - VEHICLE SPEED

LTGREEN - E-BRAKE (-)

BLUE/WHITE - AMP. TURN ON (+)

STEP 1

WHITE

WHITE/BLACK

GRAY

GRAY/BLACK

LF RCA INPUT

RF RCA INPUT

SEE AFTERMARKET

RADIO GUIDE

FOR RADIO WIRE

COLORS

GREEN - LR SPEAKER (+)

GREEN/BLACK - LR SPEAKER (-)

PURPLE/BLACK - RR SPEAKER (-)

PURPLE - RR SPEAKER (+)

CONNECTIONS

NOT

REQUIRED

WITH AMP

YELLOW

YELLOW

BLACK

BLACK

BLUE/YELLOW

BLUE/YELLOW

BLACK

BLACK

MAIN

HARNESS

RCA CABLES

FACTORY RADIO HARNESS

REVERSE CAMERA HARNESS

TO2 T-HARNESS

STEP 2

STEP 3

STEP 5

WIRES FROM

VEHICLE

CONNECT YELLOW RCA AUX IN 

IF VEHICLE IS EQUIPPED WITH

AUXILIARY VIDEO

CONNECT YELLOW RCA AUX IN 

IF VEHICLE IS EQUIPPED WITH

AUXILIARY VIDEO

STEP 6

MAESTRO RR MODULE

CONNECT IF EQUIPPED

CONNECT IF EQUIPPED

CUT REVERSE

CAMERA

CONNECTOR FROM

TO2 T-HARNESS

AND CONNECT

WIRES AS SHOWN.

CUT REVERSE

CAMERA

CONNECTOR FROM

TO2 T-HARNESS

AND CONNECT

WIRES AS SHOWN.

CONNECT TO

AFTERMARKET RADIO

STEERING WHEEL

CONTROL CABLE

WIRING DIAGRAM 

with an Amplifier

YELLOW/GREEN (NOT CONNECTED)

OBDII CONNECTOR

STEP 4

N.C.

N.C.

NOT REQUIRED

AUDIO

CABLE

DATA

CABLE

Содержание maestro Rr

Страница 1: ...ter icon or quick printing this document will print all of the guides in this compilation Open the Bookmarks menu and find your vehicle OR scroll down until you find the install guide for your vehicle...

Страница 2: ...stallation performed by a certified technician Logos and trademarks used here in are the properties of their respective owners PRODUCTS REQUIRED iDatalink Maestro RR or RR2 Radio Replacement Interface...

Страница 3: ...ment solution You are now a few simple steps away from enjoying your new car radio with enhanced features Before starting your installation please ensure that your iDatalink Maestro module is programm...

Страница 4: ...STEP 3 Connect the factory harness to the TO2 T harness STEP 4 Unplug the Black 2 pin connector near the 28 Pin connector of the TO2 T harness Plug the Black 2 pin connector of the TO2 T harness into...

Страница 5: ...DIAGRAM with an Amplifier YELLOW 12V BLACK GROUND RED ACCESSORY YELLOW BLACK FOOT BRAKE YELLOW GREEN NOT CONNECTED ORANGE ILLUMINATION PURPLE WHITE REVERSE LIGHT PINK VEHICLE SPEED LTGREEN E BRAKE BL...

Страница 6: ...the Maestro is ashing RED ONCE There is no rmware on the module ash the RR module MAESTRO RR RESET PROCEDURE Turn the key to the OFF position then disconnect all connectors from the module Press and...

Страница 7: ...installation performed by a certified technician Logos and trademarks used here in are the properties of their respective owners PRODUCTS REQUIRED iDatalink Maestro RR or RR2 Radio Replacement Interfa...

Страница 8: ...ement solution You are now a few simple steps away from enjoying your new car radio with enhanced features Before starting your installation please ensure that your iDatalink Maestro module is program...

Страница 9: ...ss to the backup camera harness STEP 3 Connect the factory harness to the TO2 T harness STEP 4 Unplug the Black 2 pin connector near the 28 Pin connector of the TO2 T harness Plug the Black 2 pin conn...

Страница 10: ...AUX IN IF VEHICLE IS EQUIPPED WITH AUXILIARY VIDEO SEE AFTERMARKET RADIO GUIDE FOR RADIO WIRE COLORS GREEN LR SPEAKER GREEN BLACK LR SPEAKER PURPLE BLACK RR SPEAKER PURPLE RR SPEAKER CUT AND REMOVE TH...

Страница 11: ...n the Maestro is ashing RED ONCE There is no rmware on the module ash the RR module MAESTRO RR RESET PROCEDURE Turn the key to the OFF position then disconnect all connectors from the module Press and...

Страница 12: ...tallation performed by a certified technician Logos and trademarks used here in are the properties of their respective owners PRODUCTS REQUIRED iDatalink Maestro RR or RR2 Radio Replacement Interface...

Страница 13: ...ent solution You are now a few simple steps away from enjoying your new car radio with enhanced features Before starting your installation please ensure that your iDatalink Maestro module is programme...

Страница 14: ...STEP 3 Connect the factory harness to the TO2 T harness STEP 4 Unplug the Black 2 pin connector near the 28 Pin connector of the TO2 T harness Plug the Black 2 pin connector of the TO2 T harness into...

Страница 15: ...DIAGRAM with an Amplifier YELLOW 12V BLACK GROUND RED ACCESSORY YELLOW BLACK FOOT BRAKE YELLOW GREEN NOT CONNECTED ORANGE ILLUMINATION PURPLE WHITE REVERSE LIGHT PINK VEHICLE SPEED LTGREEN E BRAKE BLU...

Страница 16: ...the Maestro is ashing RED ONCE There is no rmware on the module ash the RR module MAESTRO RR RESET PROCEDURE Turn the key to the OFF position then disconnect all connectors from the module Press and h...

Страница 17: ...s installation performed by a certified technician Logos and trademarks used here in are the properties of their respective owners PRODUCTS REQUIRED iDatalink Maestro RR or RR2 Radio Replacement Inter...

Страница 18: ...acement solution You are now a few simple steps away from enjoying your new car radio with enhanced features Before starting your installation please ensure that your iDatalink Maestro module is progr...

Страница 19: ...m next page BROWN RED and BROWN YELLOW wires are not used STEP 3 Connect the factory harness to the TO2 T harness STEP 4 Unplug the Black 2 pin connector near the 28 Pin connector of the TO2 T harness...

Страница 20: ...NS NOT REQUIRED WITH AMP YELLOW YELLOW WHITE WHITE RED RED BLACK BLACK BLACK BLACK BLUE YELLOW BLUE YELLOW BLACK BLACK MAIN HARNESS RCA CABLES FACTORY RADIO HARNESS REVERSE CAMERA HARNESS TO2 T HARNES...

Страница 21: ...on the Maestro is ashing RED ONCE There is no rmware on the module ash the RR module MAESTRO RR RESET PROCEDURE Turn the key to the OFF position then disconnect all connectors from the module Press a...

Страница 22: ...is installation performed by a certified technician Logos and trademarks used here in are the properties of their respective owners PRODUCTS REQUIRED iDatalink Maestro RR or RR2 Radio Replacement Inte...

Страница 23: ...placement solution You are now a few simple steps away from enjoying your new car radio with enhanced features Before starting your installation please ensure that your iDatalink Maestro module is pro...

Страница 24: ...indicated in the wiring diagram next page BROWN RED and BROWN YELLOW wires are not used STEP 3 Connect the factory harness to the TO2 T harness STEP 4 Unplug the Black 2 pin connector near the 28 Pin...

Страница 25: ...T HARNESS STEP 1 STEP 2 STEP 3 STEP 5 WIRES FROM VEHICLE CONNECT YELLOW RCA AUX IN IF VEHICLE IS EQUIPPED WITH AUXILIARY VIDEO SEE AFTERMARKET RADIO GUIDE FOR RADIO WIRE COLORS GREEN LR SPEAKER GREEN...

Страница 26: ...ht on the Maestro is ashing RED ONCE There is no rmware on the module ash the RR module MAESTRO RR RESET PROCEDURE Turn the key to the OFF position then disconnect all connectors from the module Press...

Страница 27: ...nstallation performed by a certified technician Logos and trademarks used here in are the properties of their respective owners PRODUCTS REQUIRED iDatalink Maestro RR or RR2 Radio Replacement Interfac...

Страница 28: ...ment solution You are now a few simple steps away from enjoying your new car radio with enhanced features Before starting your installation please ensure that your iDatalink Maestro module is programm...

Страница 29: ...s to the backup camera harness STEP 3 Connect the factory harness to the TO2 T harness STEP 4 Unplug the Black 2 pin connector near the 28 Pin connector of the TO2 T harness Plug the Black 2 pin conne...

Страница 30: ...UX IN IF VEHICLE IS EQUIPPED WITH AUXILIARY VIDEO SEE AFTERMARKET RADIO GUIDE FOR RADIO WIRE COLORS GREEN LR SPEAKER GREEN BLACK LR SPEAKER PURPLE BLACK RR SPEAKER PURPLE RR SPEAKER CUT AND REMOVE THE...

Страница 31: ...the Maestro is ashing RED ONCE There is no rmware on the module ash the RR module MAESTRO RR RESET PROCEDURE Turn the key to the OFF position then disconnect all connectors from the module Press and...

Страница 32: ...ng this installation performed by a certified technician Logos and trademarks used here in are the properties of their respective owners PRODUCTS REQUIRED iDatalink Maestro RR or RR2 Radio Replacement...

Страница 33: ...io replacement solution You are now a few simple steps away from enjoying your new car radio with enhanced features Before starting your installation please ensure that your iDatalink Maestro module i...

Страница 34: ...e the factory radio STEP 2 Connect the factory harness to the TO2 T harness STEP 3 Unplug the Black 2 pin connector near the 28 Pin connector of the TO2 T harness Plug the Black 2 pin connector of the...

Страница 35: ...CA AUX IN IF VEHICLE IS EQUIPPED WITH AUXILIARY VIDEO SEE AFTERMARKET RADIO GUIDE FOR RADIO WIRE COLORS GREEN LR SPEAKER GREEN BLACK LR SPEAKER PURPLE BLACK RR SPEAKER PURPLE RR SPEAKER CUT AND REMOVE...

Страница 36: ...e light on the Maestro is ashing RED ONCE There is no rmware on the module ash the RR module MAESTRO RR RESET PROCEDURE Turn the key to the OFF position then disconnect all connectors from the module...

Страница 37: ...g this installation performed by a certified technician Logos and trademarks used here in are the properties of their respective owners PRODUCTS REQUIRED iDatalink Maestro RR or RR2 Radio Replacement...

Страница 38: ...replacement solution You are now a few simple steps away from enjoying your new car radio with enhanced features Before starting your installation please ensure that your iDatalink Maestro module is...

Страница 39: ...as indicated in the wiring diagram next page BROWN RED and BROWN YELLOW wires are not used STEP 3 Connect the factory harness to the TO2 T harness STEP 4 Unplug the Black 2 pin connector near the 28...

Страница 40: ...O2 T HARNESS STEP 1 STEP 2 STEP 3 STEP 5 WIRES FROM VEHICLE CONNECT YELLOW RCA AUX IN IF VEHICLE IS EQUIPPED WITH AUXILIARY VIDEO SEE AFTERMARKET RADIO GUIDE FOR RADIO WIRE COLORS GREEN LR SPEAKER GRE...

Страница 41: ...light on the Maestro is ashing RED ONCE There is no rmware on the module ash the RR module MAESTRO RR RESET PROCEDURE Turn the key to the OFF position then disconnect all connectors from the module Pr...

Страница 42: ...aving this installation performed by a certified technician Logos and trademarks used here in are the properties of their respective owners PRODUCTS REQUIRED iDatalink Maestro RR or RR2 Radio Replacem...

Страница 43: ...adio replacement solution You are now a few simple steps away from enjoying your new car radio with enhanced features Before starting your installation please ensure that your iDatalink Maestro module...

Страница 44: ...ng diagram next page BROWN RED and BROWN YELLOW wires are not used STEP 3 Connect the factory harness to the TO2 T harness STEP 4 Unplug the Black 2 pin connector near the 28 Pin connector of the TO2...

Страница 45: ...CONNECTIONS NOT REQUIRED WITH AMP YELLOW YELLOW WHITE WHITE RED RED BLACK BLACK BLACK BLACK BLUE YELLOW BLUE YELLOW BLACK BLACK MAIN HARNESS RCA CABLES FACTORY RADIO HARNESS REVERSE CAMERA HARNESS TO2...

Страница 46: ...The light on the Maestro is ashing RED ONCE There is no rmware on the module ash the RR module MAESTRO RR RESET PROCEDURE Turn the key to the OFF position then disconnect all connectors from the modul...

Страница 47: ...ving this installation performed by a certified technician Logos and trademarks used here in are the properties of their respective owners PRODUCTS REQUIRED iDatalink Maestro RR or RR2 Radio Replaceme...

Страница 48: ...adio replacement solution You are now a few simple steps away from enjoying your new car radio with enhanced features Before starting your installation please ensure that your iDatalink Maestro module...

Страница 49: ...ng diagram next page BROWN RED and BROWN YELLOW wires are not used STEP 3 Connect the factory harness to the TO2 T harness STEP 4 Unplug the Black 2 pin connector near the 28 Pin connector of the TO2...

Страница 50: ...ONNECTIONS NOT REQUIRED WITH AMP YELLOW YELLOW WHITE WHITE RED RED BLACK BLACK BLACK BLACK BLUE YELLOW BLUE YELLOW BLACK BLACK MAIN HARNESS RCA CABLES FACTORY RADIO HARNESS REVERSE CAMERA HARNESS TO2...

Страница 51: ...The light on the Maestro is ashing RED ONCE There is no rmware on the module ash the RR module MAESTRO RR RESET PROCEDURE Turn the key to the OFF position then disconnect all connectors from the modul...

Страница 52: ...tallation performed by a certified technician Logos and trademarks used here in are the properties of their respective owners PRODUCTS REQUIRED iDatalink Maestro RR or RR2 Radio Replacement Interface...

Страница 53: ...nt solution You are now a few simple steps away from enjoying your new car radio with enhanced features Before starting your installation please ensure that your iDatalink Maestro module is programmed...

Страница 54: ...STEP 3 Connect the factory harness to the TO2 T harness STEP 4 Unplug the Black 2 pin connector near the 28 Pin connector of the TO2 T harness Plug the Black 2 pin connector of the TO2 T harness into...

Страница 55: ...DIAGRAM with an Amplifier YELLOW 12V BLACK GROUND RED ACCESSORY YELLOW BLACK FOOT BRAKE YELLOW GREEN NOT CONNECTED ORANGE ILLUMINATION PURPLE WHITE REVERSE LIGHT PINK VEHICLE SPEED LTGREEN E BRAKE BLU...

Страница 56: ...he Maestro is ashing RED ONCE There is no rmware on the module ash the RR module MAESTRO RR RESET PROCEDURE Turn the key to the OFF position then disconnect all connectors from the module Press and ho...

Страница 57: ...stallation performed by a certified technician Logos and trademarks used here in are the properties of their respective owners PRODUCTS REQUIRED iDatalink Maestro RR or RR2 Radio Replacement Interface...

Страница 58: ...ment solution You are now a few simple steps away from enjoying your new car radio with enhanced features Before starting your installation please ensure that your iDatalink Maestro module is programm...

Страница 59: ...s to the backup camera harness STEP 3 Connect the factory harness to the TO2 T harness STEP 4 Unplug the Black 2 pin connector near the 28 Pin connector of the TO2 T harness Plug the Black 2 pin conne...

Страница 60: ...X IN IF VEHICLE IS EQUIPPED WITH AUXILIARY VIDEO SEE AFTERMARKET RADIO GUIDE FOR RADIO WIRE COLORS GREEN LR SPEAKER GREEN BLACK LR SPEAKER PURPLE BLACK RR SPEAKER PURPLE RR SPEAKER CUT AND REMOVE THE...

Страница 61: ...the Maestro is ashing RED ONCE There is no rmware on the module ash the RR module MAESTRO RR RESET PROCEDURE Turn the key to the OFF position then disconnect all connectors from the module Press and...

Страница 62: ...ng this installation performed by a certified technician Logos and trademarks used here in are the properties of their respective owners PRODUCTS REQUIRED iDatalink Maestro RR or RR2 Radio Replacement...

Страница 63: ...o replacement solution You are now a few simple steps away from enjoying your new car radio with enhanced features Before starting your installation please ensure that your iDatalink Maestro module is...

Страница 64: ...T harness to the backup camera harness STEP 3 Connect the factory harness to the TO2 T harness STEP 4 Unplug the Black 2 pin connector near the 28 Pin connector of the TO2 T harness Plug the Black 2...

Страница 65: ...LOW RCA AUX IN IF VEHICLE IS EQUIPPED WITH AUXILIARY VIDEO SEE AFTERMARKET RADIO GUIDE FOR RADIO WIRE COLORS GREEN LR SPEAKER GREEN BLACK LR SPEAKER PURPLE BLACK RR SPEAKER PURPLE RR SPEAKER CUT AND R...

Страница 66: ...light on the Maestro is ashing RED ONCE There is no rmware on the module ash the RR module MAESTRO RR RESET PROCEDURE Turn the key to the OFF position then disconnect all connectors from the module P...

Страница 67: ...nstallation performed by a certified technician Logos and trademarks used here in are the properties of their respective owners PRODUCTS REQUIRED iDatalink Maestro RR or RR2 Radio Replacement Interfac...

Страница 68: ...ement solution You are now a few simple steps away from enjoying your new car radio with enhanced features Before starting your installation please ensure that your iDatalink Maestro module is program...

Страница 69: ...s STEP 3 Connect the factory harness to the TO2 T harness STEP 4 Unplug the Black 2 pin connector near the 28 Pin connector of the TO2 T harness Plug the Black 2 pin connector of the TO2 T harness int...

Страница 70: ...G DIAGRAM with an Amplifier YELLOW 12V BLACK GROUND RED ACCESSORY YELLOW BLACK FOOT BRAKE YELLOW GREEN NOT CONNECTED ORANGE ILLUMINATION PURPLE WHITE REVERSE LIGHT PINK VEHICLE SPEED LTGREEN E BRAKE B...

Страница 71: ...n the Maestro is ashing RED ONCE There is no rmware on the module ash the RR module MAESTRO RR RESET PROCEDURE Turn the key to the OFF position then disconnect all connectors from the module Press and...

Страница 72: ...installation performed by a certified technician Logos and trademarks used here in are the properties of their respective owners PRODUCTS REQUIRED iDatalink Maestro RR or RR2 Radio Replacement Interf...

Страница 73: ...cement solution You are now a few simple steps away from enjoying your new car radio with enhanced features Before starting your installation please ensure that your iDatalink Maestro module is progra...

Страница 74: ...ess to the backup camera harness STEP 3 Connect the factory harness to the TO2 T harness STEP 4 Unplug the Black 2 pin connector near the 28 Pin connector of the TO2 T harness Plug the Black 2 pin con...

Страница 75: ...AUX IN IF VEHICLE IS EQUIPPED WITH AUXILIARY VIDEO SEE AFTERMARKET RADIO GUIDE FOR RADIO WIRE COLORS GREEN LR SPEAKER GREEN BLACK LR SPEAKER PURPLE BLACK RR SPEAKER PURPLE RR SPEAKER CUT AND REMOVE T...

Страница 76: ...on the Maestro is ashing RED ONCE There is no rmware on the module ash the RR module MAESTRO RR RESET PROCEDURE Turn the key to the OFF position then disconnect all connectors from the module Press an...

Страница 77: ...llation performed by a certified technician Logos and trademarks used here in are the properties of their respective owners PRODUCTS REQUIRED iDatalink Maestro RR or RR2 Radio Replacement Interface iD...

Страница 78: ...solution You are now a few simple steps away from enjoying your new car radio with enhanced features Before starting your installation please ensure that your iDatalink Maestro module is programmed w...

Страница 79: ...the backup camera harness STEP 3 Connect the factory harness to the TO2 T harness STEP 4 Unplug the Black 2 pin connector near the 28 Pin connector of the TO2 T harness Plug the Black 2 pin connector...

Страница 80: ...N IF VEHICLE IS EQUIPPED WITH AUXILIARY VIDEO SEE AFTERMARKET RADIO GUIDE FOR RADIO WIRE COLORS GREEN LR SPEAKER GREEN BLACK LR SPEAKER PURPLE BLACK RR SPEAKER PURPLE RR SPEAKER CUT AND REMOVE THE SPE...

Страница 81: ...Maestro is ashing RED ONCE There is no rmware on the module ash the RR module MAESTRO RR RESET PROCEDURE Turn the key to the OFF position then disconnect all connectors from the module Press and hold...

Страница 82: ...stallation performed by a certified technician Logos and trademarks used here in are the properties of their respective owners PRODUCTS REQUIRED iDatalink Maestro RR or RR2 Radio Replacement Interface...

Страница 83: ...ent solution You are now a few simple steps away from enjoying your new car radio with enhanced features Before starting your installation please ensure that your iDatalink Maestro module is programme...

Страница 84: ...STEP 3 Connect the factory harness to the TO2 T harness STEP 4 Unplug the Black 2 pin connector near the 28 Pin connector of the TO2 T harness Plug the Black 2 pin connector of the TO2 T harness into...

Страница 85: ...DIAGRAM with an Amplifier YELLOW 12V BLACK GROUND RED ACCESSORY YELLOW BLACK FOOT BRAKE YELLOW GREEN NOT CONNECTED ORANGE ILLUMINATION PURPLE WHITE REVERSE LIGHT PINK VEHICLE SPEED LTGREEN E BRAKE BL...

Страница 86: ...the Maestro is ashing RED ONCE There is no rmware on the module ash the RR module MAESTRO RR RESET PROCEDURE Turn the key to the OFF position then disconnect all connectors from the module Press and h...

Страница 87: ...nstallation performed by a certified technician Logos and trademarks used here in are the properties of their respective owners PRODUCTS REQUIRED iDatalink Maestro RR or RR2 Radio Replacement Interfac...

Страница 88: ...ement solution You are now a few simple steps away from enjoying your new car radio with enhanced features Before starting your installation please ensure that your iDatalink Maestro module is program...

Страница 89: ...ss to the backup camera harness STEP 3 Connect the factory harness to the TO2 T harness STEP 4 Unplug the Black 2 pin connector near the 28 Pin connector of the TO2 T harness Plug the Black 2 pin conn...

Страница 90: ...UX IN IF VEHICLE IS EQUIPPED WITH AUXILIARY VIDEO SEE AFTERMARKET RADIO GUIDE FOR RADIO WIRE COLORS GREEN LR SPEAKER GREEN BLACK LR SPEAKER PURPLE BLACK RR SPEAKER PURPLE RR SPEAKER CUT AND REMOVE THE...

Страница 91: ...n the Maestro is ashing RED ONCE There is no rmware on the module ash the RR module MAESTRO RR RESET PROCEDURE Turn the key to the OFF position then disconnect all connectors from the module Press and...

Страница 92: ...nstallation performed by a certified technician Logos and trademarks used here in are the properties of their respective owners PRODUCTS REQUIRED iDatalink Maestro RR or RR2 Radio Replacement Interfac...

Страница 93: ...ement solution You are now a few simple steps away from enjoying your new car radio with enhanced features Before starting your installation please ensure that your iDatalink Maestro module is program...

Страница 94: ...ss to the backup camera harness STEP 3 Connect the factory harness to the TO2 T harness STEP 4 Unplug the Black 2 pin connector near the 28 Pin connector of the TO2 T harness Plug the Black 2 pin conn...

Страница 95: ...UX IN IF VEHICLE IS EQUIPPED WITH AUXILIARY VIDEO SEE AFTERMARKET RADIO GUIDE FOR RADIO WIRE COLORS GREEN LR SPEAKER GREEN BLACK LR SPEAKER PURPLE BLACK RR SPEAKER PURPLE RR SPEAKER CUT AND REMOVE THE...

Страница 96: ...n the Maestro is ashing RED ONCE There is no rmware on the module ash the RR module MAESTRO RR RESET PROCEDURE Turn the key to the OFF position then disconnect all connectors from the module Press and...

Страница 97: ...stallation performed by a certified technician Logos and trademarks used here in are the properties of their respective owners PRODUCTS REQUIRED iDatalink Maestro RR or RR2 Radio Replacement Interface...

Страница 98: ...ent solution You are now a few simple steps away from enjoying your new car radio with enhanced features Before starting your installation please ensure that your iDatalink Maestro module is programme...

Страница 99: ...xt page BROWN RED and BROWN YELLOW wires are not used STEP 3 Connect the factory harness to the TO2 T harness STEP 4 Unplug the Black 2 pin connector near the 28 Pin connector of the TO2 T harness Plu...

Страница 100: ...RR SPEAKER CONNECTIONS NOT REQUIRED WITH AMP YELLOW YELLOW BLACK BLACK BLUE YELLOW BLUE YELLOW BLACK BLACK MAIN HARNESS RCA CABLES FACTORY RADIO HARNESS REVERSE CAMERA HARNESS TO2 T HARNESS STEP 2 STE...

Страница 101: ...the Maestro is ashing RED ONCE There is no rmware on the module ash the RR module MAESTRO RR RESET PROCEDURE Turn the key to the OFF position then disconnect all connectors from the module Press and h...

Страница 102: ...stallation performed by a certified technician Logos and trademarks used here in are the properties of their respective owners PRODUCTS REQUIRED iDatalink Maestro RR or RR2 Radio Replacement Interface...

Страница 103: ...ent solution You are now a few simple steps away from enjoying your new car radio with enhanced features Before starting your installation please ensure that your iDatalink Maestro module is programme...

Страница 104: ...STEP 3 Connect the factory harness to the TO2 T harness STEP 4 Unplug the Black 2 pin connector near the 28 Pin connector of the TO2 T harness Plug the Black 2 pin connector of the TO2 T harness into...

Страница 105: ...DIAGRAM with an Amplifier YELLOW 12V BLACK GROUND RED ACCESSORY YELLOW BLACK FOOT BRAKE YELLOW GREEN NOT CONNECTED ORANGE ILLUMINATION PURPLE WHITE REVERSE LIGHT PINK VEHICLE SPEED LTGREEN E BRAKE BL...

Страница 106: ...the Maestro is ashing RED ONCE There is no rmware on the module ash the RR module MAESTRO RR RESET PROCEDURE Turn the key to the OFF position then disconnect all connectors from the module Press and h...

Страница 107: ...nstallation performed by a certified technician Logos and trademarks used here in are the properties of their respective owners PRODUCTS REQUIRED iDatalink Maestro RR or RR2 Radio Replacement Interfac...

Страница 108: ...ement solution You are now a few simple steps away from enjoying your new car radio with enhanced features Before starting your installation please ensure that your iDatalink Maestro module is program...

Страница 109: ...icated in the wiring diagram next page BROWN RED and BROWN YELLOW wires are not used STEP 3 Connect the factory harness to the TO2 T harness STEP 4 Unplug the Black 2 pin connector near the 28 Pin con...

Страница 110: ...RNESS STEP 1 STEP 2 STEP 3 STEP 5 WIRES FROM VEHICLE CONNECT YELLOW RCA AUX IN IF VEHICLE IS EQUIPPED WITH AUXILIARY VIDEO SEE AFTERMARKET RADIO GUIDE FOR RADIO WIRE COLORS GREEN LR SPEAKER GREEN BLAC...

Страница 111: ...n the Maestro is ashing RED ONCE There is no rmware on the module ash the RR module MAESTRO RR RESET PROCEDURE Turn the key to the OFF position then disconnect all connectors from the module Press and...

Страница 112: ...nstallation performed by a certified technician Logos and trademarks used here in are the properties of their respective owners PRODUCTS REQUIRED iDatalink Maestro RR or RR2 Radio Replacement Interfac...

Страница 113: ...ement solution You are now a few simple steps away from enjoying your new car radio with enhanced features Before starting your installation please ensure that your iDatalink Maestro module is program...

Страница 114: ...ss to the backup camera harness STEP 3 Connect the factory harness to the TO2 T harness STEP 4 Unplug the Black 2 pin connector near the 28 Pin connector of the TO2 T harness Plug the Black 2 pin conn...

Страница 115: ...UX IN IF VEHICLE IS EQUIPPED WITH AUXILIARY VIDEO SEE AFTERMARKET RADIO GUIDE FOR RADIO WIRE COLORS GREEN LR SPEAKER GREEN BLACK LR SPEAKER PURPLE BLACK RR SPEAKER PURPLE RR SPEAKER CUT AND REMOVE THE...

Страница 116: ...n the Maestro is ashing RED ONCE There is no rmware on the module ash the RR module MAESTRO RR RESET PROCEDURE Turn the key to the OFF position then disconnect all connectors from the module Press and...

Страница 117: ...tallation performed by a certified technician Logos and trademarks used here in are the properties of their respective owners PRODUCTS REQUIRED iDatalink Maestro RR or RR2 Radio Replacement Interface...

Страница 118: ...nt solution You are now a few simple steps away from enjoying your new car radio with enhanced features Before starting your installation please ensure that your iDatalink Maestro module is programmed...

Страница 119: ...t page BROWN RED and BROWN YELLOW wires are not used STEP 3 Connect the factory harness to the TO2 T harness STEP 4 Unplug the Black 2 pin connector near the 28 Pin connector of the TO2 T harness Plug...

Страница 120: ...R SPEAKER CONNECTIONS NOT REQUIRED WITH AMP YELLOW YELLOW BLACK BLACK BLUE YELLOW BLUE YELLOW BLACK BLACK MAIN HARNESS RCA CABLES FACTORY RADIO HARNESS REVERSE CAMERA HARNESS TO2 T HARNESS STEP 2 STEP...

Страница 121: ...he Maestro is ashing RED ONCE There is no rmware on the module ash the RR module MAESTRO RR RESET PROCEDURE Turn the key to the OFF position then disconnect all connectors from the module Press and ho...

Страница 122: ...tallation performed by a certified technician Logos and trademarks used here in are the properties of their respective owners PRODUCTS REQUIRED iDatalink Maestro RR or RR2 Radio Replacement Interface...

Страница 123: ...nt solution You are now a few simple steps away from enjoying your new car radio with enhanced features Before starting your installation please ensure that your iDatalink Maestro module is programmed...

Страница 124: ...STEP 3 Connect the factory harness to the TO2 T harness STEP 4 Unplug the Black 2 pin connector near the 28 Pin connector of the TO2 T harness Plug the Black 2 pin connector of the TO2 T harness into...

Страница 125: ...DIAGRAM with an Amplifier YELLOW 12V BLACK GROUND RED ACCESSORY YELLOW BLACK FOOT BRAKE YELLOW GREEN NOT CONNECTED ORANGE ILLUMINATION PURPLE WHITE REVERSE LIGHT PINK VEHICLE SPEED LTGREEN E BRAKE BLU...

Страница 126: ...he Maestro is ashing RED ONCE There is no rmware on the module ash the RR module MAESTRO RR RESET PROCEDURE Turn the key to the OFF position then disconnect all connectors from the module Press and ho...

Страница 127: ...is installation performed by a certified technician Logos and trademarks used here in are the properties of their respective owners PRODUCTS REQUIRED iDatalink Maestro RR or RR2 Radio Replacement Inte...

Страница 128: ...lacement solution You are now a few simple steps away from enjoying your new car radio with enhanced features Before starting your installation please ensure that your iDatalink Maestro module is prog...

Страница 129: ...indicated in the wiring diagram next page BROWN RED and BROWN YELLOW wires are not used STEP 3 Connect the factory harness to the TO2 T harness STEP 4 Unplug the Black 2 pin connector near the 28 Pin...

Страница 130: ...HARNESS STEP 1 STEP 2 STEP 3 STEP 5 WIRES FROM VEHICLE CONNECT YELLOW RCA AUX IN IF VEHICLE IS EQUIPPED WITH AUXILIARY VIDEO SEE AFTERMARKET RADIO GUIDE FOR RADIO WIRE COLORS GREEN LR SPEAKER GREEN B...

Страница 131: ...t on the Maestro is ashing RED ONCE There is no rmware on the module ash the RR module MAESTRO RR RESET PROCEDURE Turn the key to the OFF position then disconnect all connectors from the module Press...

Страница 132: ...is installation performed by a certified technician Logos and trademarks used here in are the properties of their respective owners PRODUCTS REQUIRED iDatalink Maestro RR or RR2 Radio Replacement Inte...

Страница 133: ...lacement solution You are now a few simple steps away from enjoying your new car radio with enhanced features Before starting your installation please ensure that your iDatalink Maestro module is prog...

Страница 134: ...rness to the backup camera harness STEP 3 Connect the factory harness to the TO2 T harness STEP 4 Unplug the Black 2 pin connector near the 28 Pin connector of the TO2 T harness Plug the Black 2 pin c...

Страница 135: ...CA AUX IN IF VEHICLE IS EQUIPPED WITH AUXILIARY VIDEO SEE AFTERMARKET RADIO GUIDE FOR RADIO WIRE COLORS GREEN LR SPEAKER GREEN BLACK LR SPEAKER PURPLE BLACK RR SPEAKER PURPLE RR SPEAKER CUT AND REMOVE...

Страница 136: ...t on the Maestro is ashing RED ONCE There is no rmware on the module ash the RR module MAESTRO RR RESET PROCEDURE Turn the key to the OFF position then disconnect all connectors from the module Press...

Страница 137: ...g this installation performed by a certified technician Logos and trademarks used here in are the properties of their respective owners PRODUCTS REQUIRED iDatalink Maestro RR or RR2 Radio Replacement...

Страница 138: ...replacement solution You are now a few simple steps away from enjoying your new car radio with enhanced features Before starting your installation please ensure that your iDatalink Maestro module is...

Страница 139: ...T harness to the backup camera harness STEP 3 Connect the factory harness to the TO2 T harness STEP 4 Unplug the Black 2 pin connector near the 28 Pin connector of the TO2 T harness Plug the Black 2 p...

Страница 140: ...OW RCA AUX IN IF VEHICLE IS EQUIPPED WITH AUXILIARY VIDEO SEE AFTERMARKET RADIO GUIDE FOR RADIO WIRE COLORS GREEN LR SPEAKER GREEN BLACK LR SPEAKER PURPLE BLACK RR SPEAKER PURPLE RR SPEAKER CUT AND RE...

Страница 141: ...light on the Maestro is ashing RED ONCE There is no rmware on the module ash the RR module MAESTRO RR RESET PROCEDURE Turn the key to the OFF position then disconnect all connectors from the module Pr...

Страница 142: ...aving this installation performed by a certified technician Logos and trademarks used here in are the properties of their respective owners PRODUCTS REQUIRED iDatalink Maestro RR or RR2 Radio Replacem...

Страница 143: ...adio replacement solution You are now a few simple steps away from enjoying your new car radio with enhanced features Before starting your installation please ensure that your iDatalink Maestro module...

Страница 144: ...amera harness STEP 3 Connect the factory harness to the TO2 T harness STEP 4 Unplug the Black 2 pin connector near the 28 Pin connector of the TO2 T harness Plug the Black 2 pin connector of the TO2 T...

Страница 145: ...STEP 6 WIRING DIAGRAM with an Amplifier YELLOW 12V BLACK GROUND RED ACCESSORY YELLOW BLACK FOOT BRAKE YELLOW GREEN NOT CONNECTED ORANGE ILLUMINATION PURPLE WHITE REVERSE LIGHT PINK VEHICLE SPEED LTGRE...

Страница 146: ...The light on the Maestro is ashing RED ONCE There is no rmware on the module ash the RR module MAESTRO RR RESET PROCEDURE Turn the key to the OFF position then disconnect all connectors from the modul...

Страница 147: ...stallation performed by a certified technician Logos and trademarks used here in are the properties of their respective owners PRODUCTS REQUIRED iDatalink Maestro RR or RR2 Radio Replacement Interface...

Страница 148: ...ent solution You are now a few simple steps away from enjoying your new car radio with enhanced features Before starting your installation please ensure that your iDatalink Maestro module is programme...

Страница 149: ...STEP 3 Connect the factory harness to the TO2 T harness STEP 4 Unplug the Black 2 pin connector near the 28 Pin connector of the TO2 T harness Plug the Black 2 pin connector of the TO2 T harness into...

Страница 150: ...DIAGRAM with an Amplifier YELLOW 12V BLACK GROUND RED ACCESSORY YELLOW BLACK FOOT BRAKE YELLOW GREEN NOT CONNECTED ORANGE ILLUMINATION PURPLE WHITE REVERSE LIGHT PINK VEHICLE SPEED LTGREEN E BRAKE BL...

Страница 151: ...the Maestro is ashing RED ONCE There is no rmware on the module ash the RR module MAESTRO RR RESET PROCEDURE Turn the key to the OFF position then disconnect all connectors from the module Press and h...

Страница 152: ...tallation performed by a certified technician Logos and trademarks used here in are the properties of their respective owners PRODUCTS REQUIRED iDatalink Maestro RR or RR2 Radio Replacement Interface...

Страница 153: ...ent solution You are now a few simple steps away from enjoying your new car radio with enhanced features Before starting your installation please ensure that your iDatalink Maestro module is programme...

Страница 154: ...harness Note The reverse camera cannot be retained in this vehicle STEP 3 Connect the factory harness to the TO2 T harness STEP 4 Unplug the Black 2 pin connector near the 28 Pin connector of the TO2...

Страница 155: ...UMINATION PURPLE WHITE REVERSE LIGHT PURPLE WHITE REVERSE LIGHT PINK VEHICLE SPEED PINK VEHICLE SPEED LTGREEN E BRAKE LTGREEN E BRAKE BLUE WHITE AMP TURN ON BLUE WHITE AMP TURN ON STEP 1 WHITE WHITE W...

Страница 156: ...the Maestro is ashing RED ONCE There is no rmware on the module ash the RR module MAESTRO RR RESET PROCEDURE Turn the key to the OFF position then disconnect all connectors from the module Press and h...

Страница 157: ...nstallation performed by a certified technician Logos and trademarks used here in are the properties of their respective owners PRODUCTS REQUIRED iDatalink Maestro RR or RR2 Radio Replacement Interfac...

Страница 158: ...ment solution You are now a few simple steps away from enjoying your new car radio with enhanced features Before starting your installation please ensure that your iDatalink Maestro module is programm...

Страница 159: ...s to the backup camera harness STEP 3 Connect the factory harness to the TO2 T harness STEP 4 Unplug the Black 2 pin connector near the 28 Pin connector of the TO2 T harness Plug the Black 2 pin conne...

Страница 160: ...UX IN IF VEHICLE IS EQUIPPED WITH AUXILIARY VIDEO SEE AFTERMARKET RADIO GUIDE FOR RADIO WIRE COLORS GREEN LR SPEAKER GREEN BLACK LR SPEAKER PURPLE BLACK RR SPEAKER PURPLE RR SPEAKER CUT AND REMOVE THE...

Страница 161: ...the Maestro is ashing RED ONCE There is no rmware on the module ash the RR module MAESTRO RR RESET PROCEDURE Turn the key to the OFF position then disconnect all connectors from the module Press and...

Страница 162: ...tallation performed by a certified technician Logos and trademarks used here in are the properties of their respective owners PRODUCTS REQUIRED iDatalink Maestro RR or RR2 Radio Replacement Interface...

Страница 163: ...ent solution You are now a few simple steps away from enjoying your new car radio with enhanced features Before starting your installation please ensure that your iDatalink Maestro module is programme...

Страница 164: ...STEP 3 Connect the factory harness to the TO2 T harness STEP 4 Unplug the Black 2 pin connector near the 28 Pin connector of the TO2 T harness Plug the Black 2 pin connector of the TO2 T harness into...

Страница 165: ...DIAGRAM with an Amplifier YELLOW 12V BLACK GROUND RED ACCESSORY YELLOW BLACK FOOT BRAKE YELLOW GREEN NOT CONNECTED ORANGE ILLUMINATION PURPLE WHITE REVERSE LIGHT PINK VEHICLE SPEED LTGREEN E BRAKE BLU...

Страница 166: ...the Maestro is ashing RED ONCE There is no rmware on the module ash the RR module MAESTRO RR RESET PROCEDURE Turn the key to the OFF position then disconnect all connectors from the module Press and h...

Страница 167: ...nstallation performed by a certified technician Logos and trademarks used here in are the properties of their respective owners PRODUCTS REQUIRED iDatalink Maestro RR or RR2 Radio Replacement Interfac...

Страница 168: ...ment solution You are now a few simple steps away from enjoying your new car radio with enhanced features Before starting your installation please ensure that your iDatalink Maestro module is programm...

Страница 169: ...s to the backup camera harness STEP 3 Connect the factory harness to the TO2 T harness STEP 4 Unplug the Black 2 pin connector near the 28 Pin connector of the TO2 T harness Plug the Black 2 pin conne...

Страница 170: ...UX IN IF VEHICLE IS EQUIPPED WITH AUXILIARY VIDEO SEE AFTERMARKET RADIO GUIDE FOR RADIO WIRE COLORS GREEN LR SPEAKER GREEN BLACK LR SPEAKER PURPLE BLACK RR SPEAKER PURPLE RR SPEAKER CUT AND REMOVE THE...

Страница 171: ...the Maestro is ashing RED ONCE There is no rmware on the module ash the RR module MAESTRO RR RESET PROCEDURE Turn the key to the OFF position then disconnect all connectors from the module Press and...

Страница 172: ...tallation performed by a certified technician Logos and trademarks used here in are the properties of their respective owners PRODUCTS REQUIRED iDatalink Maestro RR or RR2 Radio Replacement Interface...

Страница 173: ...ent solution You are now a few simple steps away from enjoying your new car radio with enhanced features Before starting your installation please ensure that your iDatalink Maestro module is programme...

Страница 174: ...STEP 3 Connect the factory harness to the TO2 T harness STEP 4 Unplug the Black 2 pin connector near the 28 Pin connector of the TO2 T harness Plug the Black 2 pin connector of the TO2 T harness into...

Страница 175: ...DIAGRAM with an Amplifier YELLOW 12V BLACK GROUND RED ACCESSORY YELLOW BLACK FOOT BRAKE YELLOW GREEN NOT CONNECTED ORANGE ILLUMINATION PURPLE WHITE REVERSE LIGHT PINK VEHICLE SPEED LTGREEN E BRAKE BLU...

Страница 176: ...the Maestro is ashing RED ONCE There is no rmware on the module ash the RR module MAESTRO RR RESET PROCEDURE Turn the key to the OFF position then disconnect all connectors from the module Press and h...

Страница 177: ...installation performed by a certified technician Logos and trademarks used here in are the properties of their respective owners PRODUCTS REQUIRED iDatalink Maestro RR or RR2 Radio Replacement Interf...

Страница 178: ...acement solution You are now a few simple steps away from enjoying your new car radio with enhanced features Before starting your installation please ensure that your iDatalink Maestro module is progr...

Страница 179: ...ness to the backup camera harness STEP 3 Connect the factory harness to the TO2 T harness STEP 4 Unplug the Black 2 pin connector near the 28 Pin connector of the TO2 T harness Plug the Black 2 pin co...

Страница 180: ...YELLOW RCA AUX IN IF VEHICLE IS EQUIPPED WITH AUXILIARY VIDEO SEE AFTERMARKET RADIO GUIDE FOR RADIO WIRE COLORS GREEN LR SPEAKER GREEN BLACK LR SPEAKER PURPLE BLACK RR SPEAKER PURPLE RR SPEAKER CUT A...

Страница 181: ...on the Maestro is ashing RED ONCE There is no rmware on the module ash the RR module MAESTRO RR RESET PROCEDURE Turn the key to the OFF position then disconnect all connectors from the module Press a...

Страница 182: ...nstallation performed by a certified technician Logos and trademarks used here in are the properties of their respective owners PRODUCTS REQUIRED iDatalink Maestro RR or RR2 Radio Replacement Interfac...

Страница 183: ...ment solution You are now a few simple steps away from enjoying your new car radio with enhanced features Before starting your installation please ensure that your iDatalink Maestro module is programm...

Страница 184: ...s to the backup camera harness STEP 3 Connect the factory harness to the TO2 T harness STEP 4 Unplug the Black 2 pin connector near the 28 Pin connector of the TO2 T harness Plug the Black 2 pin conne...

Страница 185: ...UX IN IF VEHICLE IS EQUIPPED WITH AUXILIARY VIDEO SEE AFTERMARKET RADIO GUIDE FOR RADIO WIRE COLORS GREEN LR SPEAKER GREEN BLACK LR SPEAKER PURPLE BLACK RR SPEAKER PURPLE RR SPEAKER CUT AND REMOVE THE...

Страница 186: ...the Maestro is ashing RED ONCE There is no rmware on the module ash the RR module MAESTRO RR RESET PROCEDURE Turn the key to the OFF position then disconnect all connectors from the module Press and...

Страница 187: ...tallation performed by a certified technician Logos and trademarks used here in are the properties of their respective owners PRODUCTS REQUIRED iDatalink Maestro RR or RR2 Radio Replacement Interface...

Страница 188: ...nt solution You are now a few simple steps away from enjoying your new car radio with enhanced features Before starting your installation please ensure that your iDatalink Maestro module is programmed...

Страница 189: ...STEP 3 Connect the factory harness to the TO2 T harness STEP 4 Unplug the Black 2 pin connector near the 28 Pin connector of the TO2 T harness Plug the Black 2 pin connector of the TO2 T harness into...

Страница 190: ...ifier YELLOW 12V BLACK GROUND RED ACCESSORY YELLOW BLACK FOOT BRAKE ORANGE ILLUMINATION PINK VEHICLE SPEED LTGREEN E BRAKE BLUE WHITE AMP TURN ON STEP 1 WHITE WHITE BLACK GRAY GRAY BLACK LF RCA INPUT...

Страница 191: ...he Maestro is ashing RED ONCE There is no rmware on the module ash the RR module MAESTRO RR RESET PROCEDURE Turn the key to the OFF position then disconnect all connectors from the module Press and ho...

Страница 192: ...installation performed by a certified technician Logos and trademarks used here in are the properties of their respective owners PRODUCTS REQUIRED iDatalink Maestro RR or RR2 Radio Replacement Interf...

Страница 193: ...cement solution You are now a few simple steps away from enjoying your new car radio with enhanced features Before starting your installation please ensure that your iDatalink Maestro module is progra...

Страница 194: ...next page BROWN RED and BROWN YELLOW wires are not used STEP 3 Connect the factory harness to the TO2 T harness STEP 4 Unplug the Black 2 pin connector near the 28 Pin connector of the TO2 T harness...

Страница 195: ...REEN LR SPEAKER GREEN BLACK LR SPEAKER GREEN BLACK LR SPEAKER PURPLE BLACK RR SPEAKER PURPLE BLACK RR SPEAKER PURPLE RR SPEAKER PURPLE RR SPEAKER CONNECTIONS NOT REQUIRED WITH AMP CONNECTIONS NOT REQU...

Страница 196: ...on the Maestro is ashing RED ONCE There is no rmware on the module ash the RR module MAESTRO RR RESET PROCEDURE Turn the key to the OFF position then disconnect all connectors from the module Press an...

Страница 197: ...stallation performed by a certified technician Logos and trademarks used here in are the properties of their respective owners PRODUCTS REQUIRED iDatalink Maestro RR or RR2 Radio Replacement Interface...

Страница 198: ...ment solution You are now a few simple steps away from enjoying your new car radio with enhanced features Before starting your installation please ensure that your iDatalink Maestro module is programm...

Страница 199: ...to the backup camera harness STEP 3 Connect the factory harness to the TO2 T harness STEP 4 Unplug the Black 2 pin connector near the 28 Pin connector of the TO2 T harness Plug the Black 2 pin connec...

Страница 200: ...QUIPPED WITH AUXILIARY VIDEO SEE AFTERMARKET RADIO GUIDE FOR RADIO WIRE COLORS GREEN LR SPEAKER GREEN BLACK LR SPEAKER PURPLE BLACK RR SPEAKER PURPLE RR SPEAKER CUT AND REMOVE THE SPEAKER WIRE JUNCTIO...

Страница 201: ...the Maestro is ashing RED ONCE There is no rmware on the module ash the RR module MAESTRO RR RESET PROCEDURE Turn the key to the OFF position then disconnect all connectors from the module Press and...

Отзывы: