background image

Manual IB-M2HSF-702

Manual IB-M2HSF-702

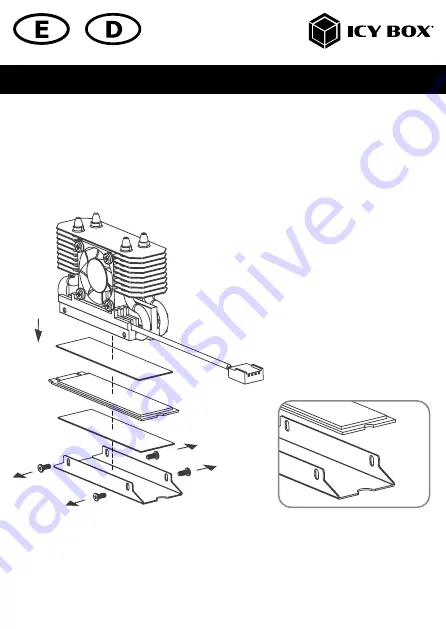
2. Install both thermal pads. Install the first thermal pad on the counter plate and the second thermal pad on the top of 
your M.2 SSD. Now gently press the SSD together with the thermal pad on the counter plate. Then press the M.2 SSD 
together with the counter plate on the bottom of the main heat sink and fix it with all four screws.
2. Befestigen Sie beide Wärmeleitpads. Das erste Wärmeleitpad auf die Konterplatte und das zweite Wärmeleitpad auf 
die Oberseite Ihrer M.2 SSD. Nun drücken Sie die SSD mitsamt dem Wärmeleitpad auf der Oberseite vorsichtig auf die 
Konterplatte mit dem zweiten, bereits installierten, Wärmeleitpad. Dann drücken Sie vorsichtig die Konterplatte mit SSD 
an den Hauptkühlkörper und fixieren diese mit den vier Schrauben.

Hint

: Make sure that the contacts of the M.2 SSD protrude over the counter plate. Also, when installing 22 x 80 mm M.2 

SSD, make sure that the M.2 SSD and the counter plate are aligned in the same way (notch at the end).

Hinweis

: Achten Sie darauf, dass die Kontakte der M.2 SSD über die Konterplatte hinausragen. Achten Sie außerdem 

darauf, dass bei der Installation einer 22 x 80 mm M.2 SSD, M.2 SSD und Konterplatte gleich ausgerichtet sind (Kerbe 
am Ende).

Hint / Hinweis

Содержание IB-M2HSF-702

Страница 1: ...Manual IB M2HSF 702 M 2 heat pipe heat sink with fan Handbuch IB M2HSF 702 M 2 Heatpipe Kühler mit Lüfter ...

Страница 2: ... vor Benutzung Betriebsanleitung lesen vor Arbeiten am Gerät Spannungsfreiheit sicherstellen Kontaktschutzblenden nicht entfernen Kontakt mit Spannungsführenden Komponenten vermeiden Steckkontakte nicht mit spitzen und metallischen Gegenständen berühren Verwendung nur in dafür vorgesehenen Umgebungen Gerät ausschließlich mit Typenschildkonformen Netzteil betreiben Gerät Netzteil fern von Feuchtigk...

Страница 3: ...wenden 6 Reinigung des Gerätes Schädigende Reinigungsmittel Kratzer Farbveränderungen Feuchteschäden oder Kurzschluss am Gerät vor Reinigung das Gerät außer Betrieb nehmen aggressive bzw scharfe Reinigungs und Lösungsmittel sind ungeeignet nach der Reinigung sicherstellen dass keine Restfeuchtigkeit vorhanden ist Reinigung der Geräte am besten mit trockenem Antistatiktuch durchführen 7 Entsorgung ...

Страница 4: ...rior to working on it Do not remove contact p otection panels Avoid contact with conducting parts Do not bring plug contacts in contact with pointed and metal objects Use in intended environments only Operate the device using a power unit meeting the specifications of the type plate only Keep the device power unit away from humidity liquid vapour and dust Do not modify the device Do not connect th...

Страница 5: ...tches discolouration damage caused by moisture or short circuit in the device Disconnect the device prior to cleaning Aggressive or intense cleaning agents and solvents are unsuitable Make sure there is no residual moisture after cleaning We recommend cleaning devices using a dry anti static cloth 7 Disposing of the device Environmental pollution unsuitable for recycling Potential environmental po...

Страница 6: ...g der SSD und sorgt so für eine langanhaltende und stabile Leistung in Ihrem Arbeitsablauf Der Lüfter sorgt dafür dass die Wärme ideal abtransportiert wird Package Content 1x IB M2HSF 702 1x counter plate 2x thermal pad 1x screwdriver 1x set of screws 1x quick installation guide Verpackungsinhalt 1x IB M2HSF 702 1x Konterplatte 2x Wärmeleitpad 1x Schraubendreher 1x Schraubenset 1x Schnellinstallat...

Страница 7: ...Manual IB M2HSF 702 Installation Montage 1 Unscrew all four screws of the counter plate on the bottom of the heat sink 1 Lösen Sie alle vier Schrauben der Konterplatte am Boden des Kühlkörpers ...

Страница 8: ...die SSD mitsamt dem Wärmeleitpad auf der Oberseite vorsichtig auf die Konterplatte mit dem zweiten bereits installierten Wärmeleitpad Dann drücken Sie vorsichtig die Konterplatte mit SSD an den Hauptkühlkörper und fixieren diese mit den vier Schrauben Hint Make sure that the contacts of the M 2 SSD protrude over the counter plate Also when installing 22 x 80 mm M 2 SSD make sure that the M 2 SSD a...

Страница 9: ... Kühlkörper vorsichtig in einem Winkel von etwa 30 in den M 2 Steckplatz Ihres Mother boards Fixieren Sie nun Kühlkörper und M 2 SSD mit der mitgelieferten Schraube Hint Please make sure that M 2 SSD and M 2 socket fit together e g M Key NVMe M 2 SSD and M Key socket on motherboard Hinweis Achten Sie darauf dass M 2 SSD und M 2 Sockel zueinander passen z B M Key NVMe M 2 SSD und M Key Sockel auf d...

Страница 10: ... fan is NOT temperature controlled and speed is NOT adjustable 4 Abschließend stecken Sie den 4 PIN Lüfterstecker in einen freien 4 PIN Konnektor auf Ihrem Motherboard Der Lüfter läuft durchgehend wenn er angeschlossen ist Der Lüfter ist NICHT temperaturgesteuert Die Geschwindigkeit ist NICHT einstellbar Manual IB M2HSF 702 ...

Страница 11: ......

Страница 12: ...r design of the above mentioned product without prior notice The diagrams contained in this manual may also not fully represent the product that you are using and are there for illustration purposes only RaidSonic Technology GmbH assumes no responsibility for any differences between the product mentioned in this manual and the product you may have Apple and macOS MAC iTunes and Macintosh are regis...

Отзывы: