background image

NAV6 Series NAVTEX System User Guide 


25 

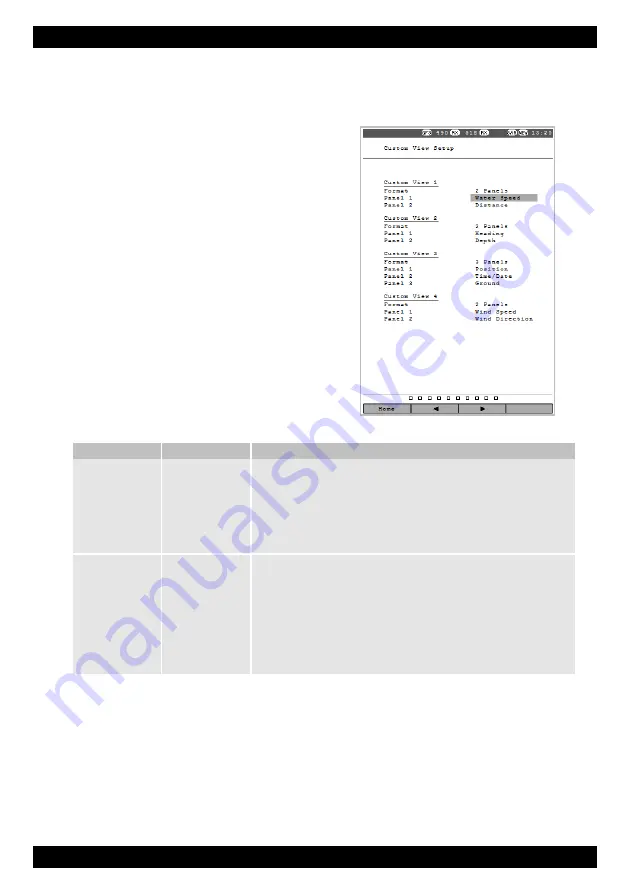
Custom Views Settings 

Access the Custom View Settings from the Settings Menu to show settings for the Custom 
Navigation Views Screens. 
 
Set the format for each user view page to either 2, 3 
or 4 panels.  Individual Custom Views can be 
enabled/disabled on the General Settings page. 
 
Set the contents of each panel. Panel 1 is displayed 
at the top and panel 4 is at the bottom of the page. 
 
Use the UP and DOWN keys to select the setting that 
you wish to edit. Use the 

 and 

 Softkeys 2 and 3 

or RIGHT key to change the setting. 
 
Note: The overall control of which Views are available 
at the top level and the order they appear is set up on 
the General Settings Page. 


Option 

Setting 

Notes 

 Format 

2 Panels 

Display the user view page with two large panels. 


3 Panels 

Display the user view page with one large panel at the top and two small 
panels at the bottom. 


4 Panels 

Display the user view page with four small panels. 

Panel n 

See right 

Choose the data to be displayed in large panels from the following: 
Time, Date, Position, COG, SOG, Heading, Water Speed, Wind Direction, Wind 
Speed, Set, Drift,  Distance, Trip, Depth, Turn Rate, Waypoint, Wpt Position, 
Range, Bearing, TTG, Closing Spd, XTE. 
Choose the data to be displayed in small panels from the following: 
Time/Date, Latitude, Longitude, Ground, Water, Wind, Current, Odometer, 
Depth, Turn Rate, Waypoint, Wpt Latitude, Wpt Longitude, Range/Bearing, 
TTG, Closing Spd, XTE. 


Содержание NAV6 V3 Series

Страница 1: ...of our knowledge correct at the time of going to print We reserve the right to change specifications equipment installation and maintenance instructions without notice as part of our policy of continu...

Страница 2: ...use as an aid to sailors and should not lead to a reduction in the level of good seamanship required at all times Reception of messages cannot always be guaranteed as this depends on local radio prop...

Страница 3: ...g 20 Custom Views 20 Setup Menu 21 NAVTEX 21 Navigate 23 LCD 27 General 28 Database 33 Installation 35 Configuration Options 35 Mounting the Display Unit 37 Installing the Receiver Unit 37 Connecting...

Страница 4: ...this manual carefully as it contains some essential information regarding the operation and maintenance of the product and a useful background to the NAVTEX system We recommend that you regularly vis...

Страница 5: ...simpler Follow the installation guidelines Re check the cable connections Apply power If you have not connected a GPS navigation receiver make sure that you set the date and time on the screen which w...

Страница 6: ...he Global Maritime Distress and Safety System GMDSS Since 1 August 1993 NAVTEX receiving capability has become mandatory equipment for certain vessels under the provisions of the International Convent...

Страница 7: ...X App It has a large 4MB message store for saving messages when the unit is not connected to a display device The USB interface can also be used for updates to the receiver and to a connected display...

Страница 8: ...by periods with minimum power consumption such as when the vessel is left in a marina with main batteries being trickle charged from the shore eNAVTEX Receiver Unit The Receiver Unit contains dual rec...

Страница 9: ...The View Screens are enabled or disabled on the General Settings Page The Softkey 1 is normally the Home key and will take you back to the top level view screens from wherever you are in the menus Pre...

Страница 10: ...to scroll through the displayed messages If you press and hold the keys the scroll speed will increase so you can scan through the messages more quickly The messages currently displayed may be a sub s...

Страница 11: ...nted or sent to the serial interface see the settings Menus section for more information In the Settings Menu or any one of the filter pages press Next Prof to change to the next profile number You wi...

Страница 12: ...only displayed if they also fall within the ageing limit error limit and message category filter settings An asterisk to the right of the station name indicates that the station is enabled for viewin...

Страница 13: ...ng all stations that are set to Auto As soon as the NMEA data becomes available again only the Nearest or In Range stations will be displayed dependent upon your current settings Manual Station Select...

Страница 14: ...moved from the message header It is possible to hide messages once they have been read go to the Message Type Filter Page and set the message types that you want to hide after they have been marked as...

Страница 15: ...will increase the scrolls speed incrementally to aid moving through the message store more quickly This view can be used for keeping track of new messages as they are received and displayed Each new m...

Страница 16: ...ailable on the NMEA input are indicated by a series of dashes e g Important The correct magnetic variation must be input at the navigation instruments e g GPS electronic compass for the accurate displ...

Страница 17: ...the and Softkeys 2 and 3 to scale the time axis between 12 hours 1 day 2 days up to 7 days Position View The Position View shows GPS information Position COG and SOG Depth reading and Distance log usi...

Страница 18: ...relative to the course line The rolling road display can be used to steer the boat along the course line whilst keeping the cross track error within chosen limits the XTE limit may be changed on the...

Страница 19: ...w in the familiar manner The wind vector displays variable tail patterns according to the strength of the wind It follows the usual meteorological wind symbol rules 5 kts per half feather 10 kts per f...

Страница 20: ...the Log to automatically print new log entries and you can also enable manual printing of the log If Auto Print is set on then whenever a new log entry is created it will be output on the serial conne...

Страница 21: ...LCD General and Database NAVTEX The NAVTEX section of the Settings Menu contains the options for the storage and display of NAVTEX messages NAVTEX Filters Station and Message Filtering are described i...

Страница 22: ...celled Repeat Antenna alarms repeated until cancelled Press any key to silence the alarm SAR Alarm Off SAR alarm off Timed SAR alarms repeated 5 times unless cancelled Repeat SAR alarms repeated until...

Страница 23: ...as characters Navigate The Navigate section of the Settings Menu contains the options for controlling the display of the Navigation Views Navigate Settings NAV6plus and NAV6repeater only The Settings...

Страница 24: ...ed and direction displayed Relative Relative wind speed and direction displayed Damping None Low Medium High Sets the damping level applied to COG SOG Heading Water Speed Set and Drift readings Demo M...

Страница 25: ...le at the top level and the order they appear is set up on the General Settings Page Option Setting Notes Format 2 Panels Display the user view page with two large panels 3 Panels Display the user vie...

Страница 26: ...X System User Guide 26 Monitor NMEA The Monitor NMEA page shows a view of live NMEA0183 data received at the NMEA input The monitor page displays ALL incoming sentences and can be paused by pressing t...

Страница 27: ...an approximation to ambient temperature The LCD setting has three modes that are selected using Softkey 4 Day Night and Sleep Different Contrast and Brightness levels may be set for each mode In Sleep...

Страница 28: ...w Note Date and time will be taken from NMEA input data if available There is no battery backup so date and time will be incorrect when power is switched on unless NMEA data is available or the date a...

Страница 29: ...Rescue NAVTEX message Antenna Alarm Short dah dee dah dee Repeated every eight seconds Indicates that there is a fault in the NAVTEX antenna or the cabling see the Fault Finding section for more detai...

Страница 30: ...etting Notes Time zone offset HH MM Adjusts the time axis offset in 15 minute steps Sensor Location Sea Land Adjusts the wind forecast for use over land or at sea Weather Warning Alarm Off Timed Repea...

Страница 31: ...en received repeats are not printed during the next 72 hours After 72 hours the message is treated as a new message and printed again The Navigation Log auto print facility prints navigation log entri...

Страница 32: ...e setup to output NAVTEX messages to a PC or compatible chart plotter Setup the NAV6plus as per Setting up a printer but with the following exceptions Instead of connecting a serial printer connect th...

Страница 33: ...lus will automatically select the NAVTEX transmitting station names nearest to the boat s current location for each station letter If Manual is selected then the user can manually select the transmitt...

Страница 34: ...he changes Field Notes Station The station letter A to X Area The NAVAREA I to XVI Name The station name as displayed on NAVTEX messages Up to 17 characters Latitude Longitude The transmitter position...

Страница 35: ...Antenna Receiver and Display options that have been selected The figures below show examples of various options NAV6 Standard Passive Antenna NAV6 eNAVTEX Receiver and NAV6 Standard Display NAV6plus...

Страница 36: ...NAV6 Series NAVTEX System User Guide 36 NAV6plus with eNAVTEX App on Tablet PC NAV6 with Active Antenna with PSU Splitter NAV6plus Serial Printer or Data Connection...

Страница 37: ...Apply a releasing agent grease or petroleum jelly to the rubber seal around the back of the NAV6 This will prevent the seal from sticking to the bulkhead surface over time Position the NAV6 over the h...

Страница 38: ...ISP A YELLOW twisted with BLACK YELLOW NOT USED Aux V Ensure this cannot short BLACK NOT USED GREEN twisted with BLACK GREEN NOT USED BLACK NOT USED Screen Silver 15 Nominally 0V The diagram on the ne...

Страница 39: ...NAV6 Series NAVTEX System User Guide 39...

Страница 40: ...as offer a wider bandwidth and when used with a suitable splitter they may be shared with other receivers onboard such as an SSB or weatherfax Alternatively you may wish to use a backstay as an antenn...

Страница 41: ...erface to power the antenna The antenna should be connected to ANT antenna coax centre and ANT GND antenna coax screen on the receiver unit connector CONNECTOR PIN CONNECTION 1 Antenna coax centre con...

Страница 42: ...ON 1 Antenna coax centre connection 2 Antenna coax screen Grounding For some installations where local interference is thought to be limiting receiver performance it may be necessary to ground the scr...

Страница 43: ...tible with most sources of NMEA0183 data such as a GPS receiver or adapter boxes supplied for use with networked instrument systems Please note that you may need to program the source of NMEA data to...

Страница 44: ...ol A terminal emulator program such as HyperTerminal can be used to monitor the data output If you wish to make up your own PC interface cable please follow the diagram below Note that the PC Interfac...

Страница 45: ...play to Slave Connecting a Notebook or Tablet PC Both the NAV6 Receiver V3 and the NAV6 eNAVTEX Receiver include a type B USB connector for connecting to a Notebook or Tablet PC The USB interface on t...

Страница 46: ...ext screen Check that the receiver is working Check that both the 490 and the 518 icon appear on the status line at the top of the NAVTEX display If the correct icons do not appear then switch off the...

Страница 47: ...symbol appears for short periods don t worry it s caused by one or more NAVTEX stations transmitting carrier but no modulation or by local interference If this symbol persists then you may have a rece...

Страница 48: ...coax cable The power must be supplied from an external interface box Software Upgrade The NAV6 has FLASH memory based software This allows the NAV6 to be upgraded when new software releases are develo...

Страница 49: ...r from whom it was first purchased This limited warranty shall not apply if the product is modified tampered with misused subjected to abnormal working conditions including but not limited to lightnin...

Страница 50: ...S 6020 10 NAV6 Printer Connection Cable ICS 500 10 PSU 24V 12V DC to DC Converter ICS 500 09 PSU 12V 12V DC to DC Isolator ICS 6020 29 NAV6 Screw Covers Black MAN03030 Printed NAV6 User Manual Softwar...

Страница 51: ...45 g approx Power 10 8V to 15 6V Splash proof Message Storage Sufficient non volatile storage for 3 days transmissions under normal operating conditions Normally much longer than 3 days of storage wil...

Страница 52: ...ception of the PC USB connection Environmental Not for outside use Unit must be mounted below decks in a suitable dry location Receive Frequency 490kHz and 518kHz Antenna Passive Length 0 5m 1 5ft Wei...

Страница 53: ...rogrammed NAVTEX station database For information purposes only ICS do not accept any liability for this information always check with the local NAVTEX provider for the latest NAVTEX information Addit...

Страница 54: ...ion and pirate warnings E Meteorological forecasts F Pilot service messages G DECCA messages H LORAN messages I OMEGA messages Note OMEGA has been discontinued J SATNAV messages i e GPS or GLONASS L N...

Страница 55: ...peed MWV VWR VWT Wind Angle MWV VWR VWT Distance VLW Trip VLW Depth DPT DBT Rate Of Turn ROT Waypoint RMB BWC BWR APB Name RMB BWC BWR Lat Long ETA RMB ZTG Range RMB BWC BWR Closing Speed RMB WCV Bear...

Отзывы: