background image

Installation Guide

 
Before you can install the product, you need to prepare your site:

1.  

Determine where the computer is to be located and set up the computer.

2.  

Determine where you want to locate the remote desktop, including the monitor, keyboard, mouse  


and any other USB device(s).

3.  

If you are using surface cabling, the product supports a maximum distance of 100m (330 ft).


 OR 
 
If you are using premise cabling, ensure Cat 5e cabling is installed between the two locations,with  
Cat 5e information outlets located near both the computer and the USB device(s), and the total 
length, including patch cords, is no more than 100m.


Installing the LEX Unit

1.  

Place the LEX unit near the computer.

2.  

 Connect the supplied USB cable to the USB port on the LEX, and an available USB 2.0/1.1 Type A Port 
on the computer.

3.  

 Connect  the 

supplied HDMI cable to the LEX 

(HDMI In), and an available HDMI Port on the 

computer. 

Installing the REX Unit 

1.  

Place the REX unit near the monitor and USB device(s) in the desired remote location.

2.  

Connect an HDMI cable (not included) to the REX (HDMI Out) to the monitor. 

3.  

Plug your USB Device(s) into the USB ports on the REX.

8

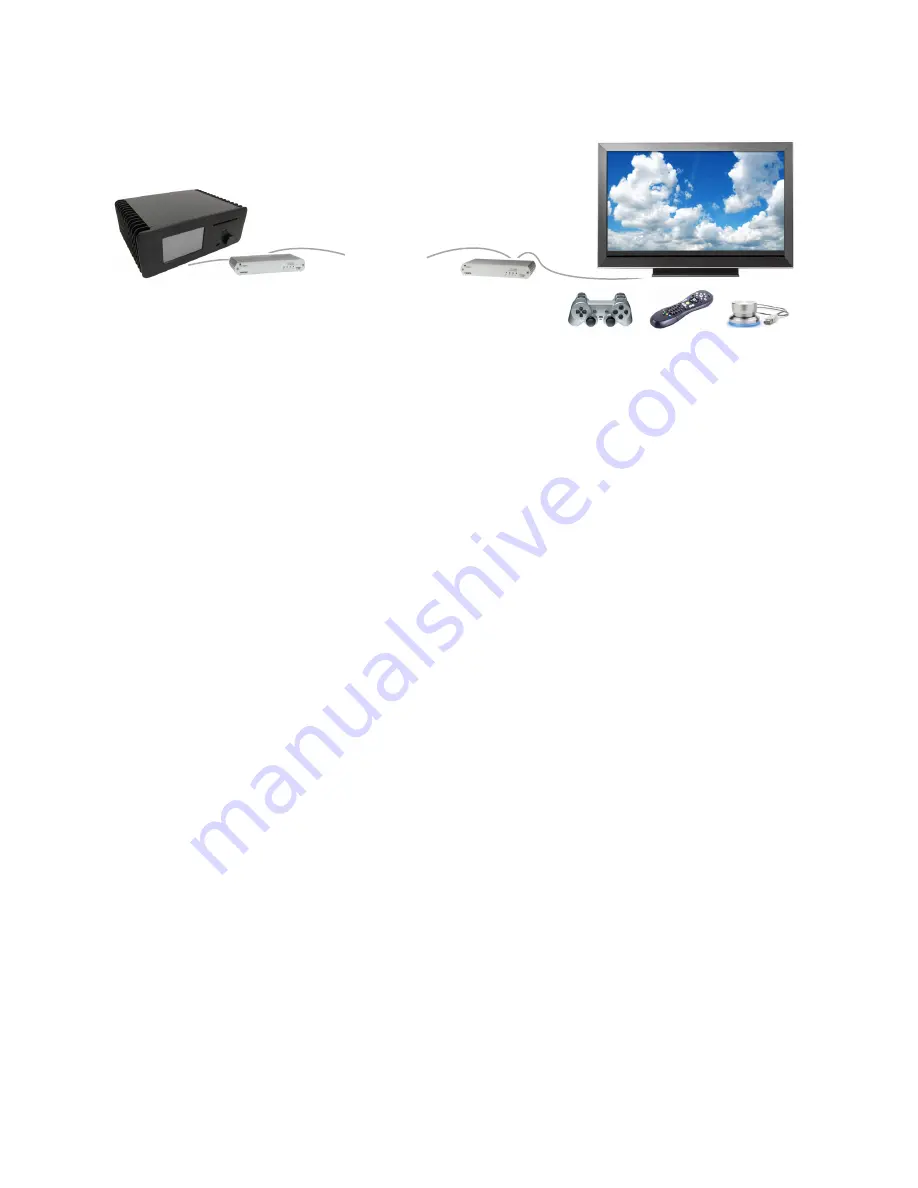
LEX

Home Theater PC

(source)

HD TV/Monitor

(sink)

HDMI® & USB

up to 100m Cat 5e

REX

Содержание EL5200

Страница 1: ...EL5200 HDMI USB 2 0 Extender HDMI and USB 2 0 100m Cat 5e KVM Extender System User Guide ...

Страница 2: ... meets European Standard EMC EN 55022 Class A EN 61000 and EN 55024 IC Statement This Class A digital apparatus complies with Canadian ICES 003 The terms HDMI and High Definition Multimedia Interface and the HDMI Logo are trademarks or registered trademarks of HDMI Licensing LLC in the United States and other countries Information contained herein is subject to change without notice Document 90 01...

Страница 3: ...Remote Extender REX Description and Markings 7 Installation Guide 8 Installing the LEX Unit 8 Installing the REX Unit 8 Connecting the LEX to the REX 9 Connecting Power to the LEX and REX 9 Checking the Installation 9 Connecting a USB Device 9 Troubleshooting Guide 10 Specifications 12 Contacting Technical Support 13 Warranty Information 13 Obtaining Warranty Service 14 Technical Glossary 15 ...

Страница 4: ...atible device s A minimum of Cat 5e Shielded Twisted Pair STP cable with two Cat 5e RJ45 connectors if using surface cabling OR A minimum of Cat 5e cabling with two information outlets and two Cat 5e patch cords with Cat 5e RJ45 connectors if using premise cabling While Cat 5e STP is the minimum category of twisted pair cabling for the best experience and to minimize interference and cross talk Ca...

Страница 5: ...d high quality HDMI cables for all other HDMI connections Cabling Solid core Category 6 STP cable with Category 6 RJ45 connectors is recommended for best performance Using Cat 5e or unshielded Cat 6 cabling may leave your signal more susceptible to interference and noise which may result in poor video performance or reduced extension distance Cable Type Maximum Distance Notes Solid Core Cat 5e UTP...

Страница 6: ...ating with each other and working Blinking Green Light The host has suspended communication with the LEX No Light The host and the LEX are not communicating or not connected 4 Video LED Green Solid Green Light HDCP digital rights management content is being transmitted Blinking Green Light Video non HDCP content is being transmitted No Light There is no video being transmitted 5 Link Port RJ45 Acc...

Страница 7: ...other and working Blinking Green Light The host has suspended communication with the LEX No Light The host and the LEX are not communicating or not connected 4 Video LED Green Solid Green Light HDCP digital rights management content is being transmitted Blinking Green Light Video non HDCP content is being transmitted No Light There is no video being transmitted 5 Link Port RJ45 Accepts RJ45 connec...

Страница 8: ...ted near both the computer and the USB device s and the total length including patch cords is no more than 100m Installing the LEX Unit 1 Place the LEX unit near the computer 2 Connect the supplied USB cable to the USB port on the LEX and an available USB 2 0 1 1 Type A Port on the computer 3 Connect the supplied HDMI cable to the LEX HDMI In and an available HDMI Port on the computer Installing t...

Страница 9: ...se only the power adapters supplied with the product Use of substitute adapters may cause permanent damage to the system and will void the warranty Checking the Installation 1 On the LEX and REX units check that the Power Link USB and Video LEDs are on If the Link LED is off then the cabling between the LEX and REX unit is not installed properly or is defective 2 Check to see if the USB LED is on ...

Страница 10: ...cal power Link LEDs on LEX and REX are off There is no connection between the LEX and REX 1 Ensure a Cat 5e cable is connected between the LEX and REX Ensure Cat 5e STP or better cabling with conductor RJ45 connectors is used 2 Connect a new short Cat 5e patch cord between the LEX and REX to determine if the original Cat 5e cable is defective 3 Ensure the Cat 5e cable is as straight as possible i ...

Страница 11: ...other device of a different type to the KVM extender product Connect the KVM extender product to the computer 7 If the second device does not operate the KVM extender product may be malfunctioning Contact Technical Support for assistance 8 If the second device does operate properly the first device may not be compatible with the KVM extender product Blinking Video on the Sink Monitor A poor qualit...

Страница 12: ... W Power Available to USB Device at REX 500 mA each port Enclosure Material Silver anodized aluminum LOCAL EXTENDER LEX Video Connector 1 x HDMI In USB Connector 1 x USB Type B Receptacle Link Connector 1 x RJ45 Dimensions 112 mm x 175 mm x 30 mm 4 4 x 6 9 x 1 18 REMOTE EXTENDER REX Video Connector 1 x HDMI Out USB Connector 3 x USB Type A Receptacles Link Connector 1 x RJ45 Dimensions 112 mm x 17...

Страница 13: ...dware which will be warranted for the remainder of the original warranty period or 30 days whichever is longer These remedies are void if failure of the hardware has resulted from accident abuse or misapplication Limitation of Liability The hardware warranty set forth in this agreement replaces all other warranties Icron Technologies Corporation expressly disclaims all other merchantability and fi...

Страница 14: ...epaired or replaced item will be shipped to you at Icron Technologies Corporation s expense not later than thirty days after Icron Technologies Corporation receives the defective product Address the returned product to RMA Coordinator Icron Technologies Corporation 4664 Lougheed Highway Suite 221 Burnaby BC Canada V5C 5T5 Contacting Sales Email sales icron com Tel 1 604 638 3920 Contacting Technic...

Страница 15: ...ctor is used to attach the USB cable to a USB device RJ45 The Registered Jack RJ physical interface is what connects the network cabling Cat 5e to the Local Extender LEX unit and Remote Extender REX unit You may use either the T568A scheme Table 1 or the T568B scheme Table 2 for cable termination as the extender uses all four pairs of the cable RJ45 connectors are sometimes also referred to as 8P8...

Страница 16: ...Icron Technologies Corporation 4664 Lougheed Highway Suite 221 Burnaby BC Canada V5C 5T5 Tel 1 604 638 3920 Fax 1 604 638 3930 www icron com ...

Отзывы: