background image


21 

If you want to modify the device IP address without logging in the device web interface, you can 

go to the configuration tool main interface to set.  

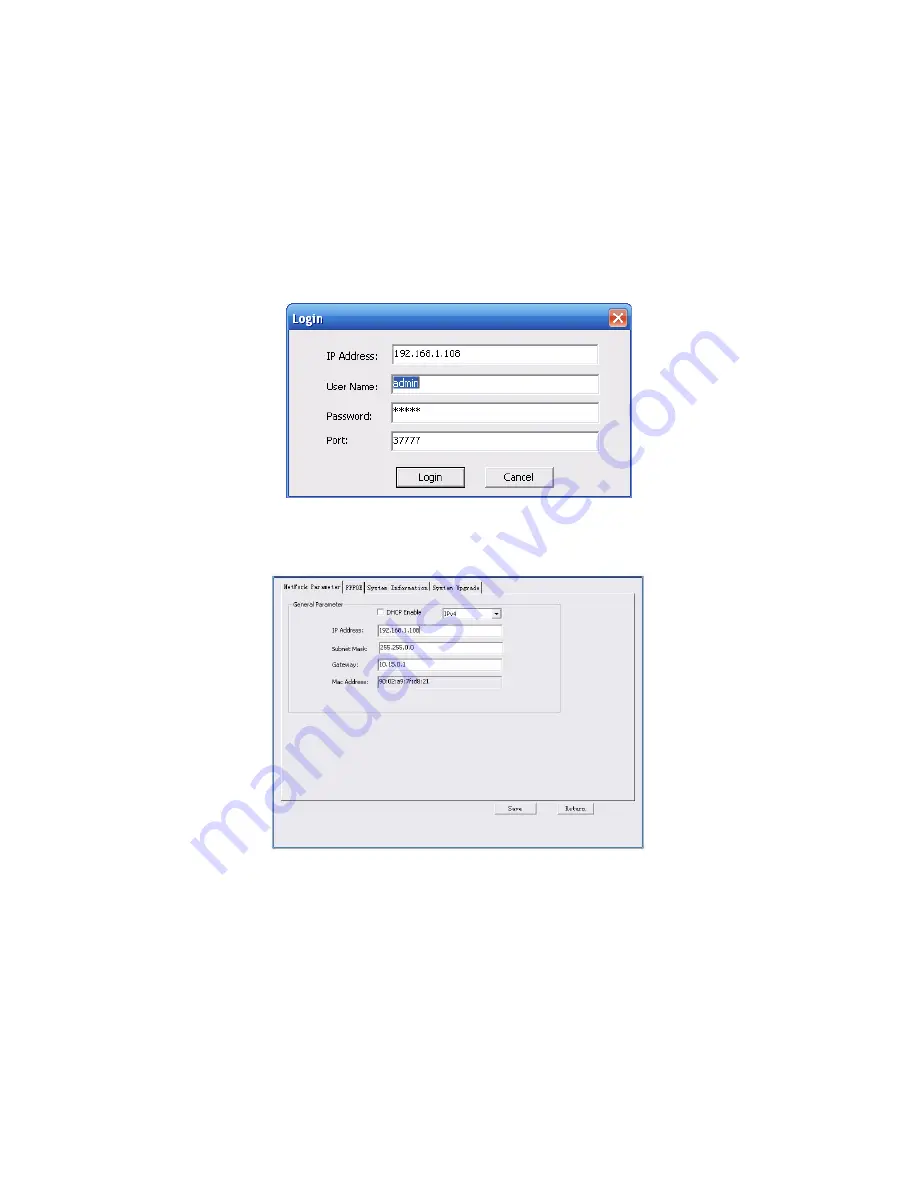
In the configuration tool search interface (Figure 4-1), please select a device IP address and then 

double click it to open the login interface. Or you can select an IP address and then click the 

Login button to go to the login interface. See Figure 4-3. 

In Figure 4-3, you can view device IP address, user name, password and port. Please modify the 

corresponding information to login.  

Please note the port information here shall be identical with the port value you set in TCP port in 

Web Network interface. Otherwise, you cannot login the device.  

If you are using device background upgrade port 3800 to login, other setups are all invalid. 


Figure 4-3 Login prompt 

After you logged in, the configuration tool main interface is shown as below. See Figure 4-4. 


Figure 4-4 Main interface 

For detailed information and operation instruction of the quick configuration tool, please 

refer to the

 Quick Configuration Tool User

’s Manual

 included in the resources CD. 


Содержание ICIPS1300WDR

Страница 1: ...Megapixel Indoor Network Camera User s Manual Version 4 1 1 ...

Страница 2: ...ur network camera This user s manual is designed to be a reference tool for your system Please read the following safeguard and warnings carefully before you use this series product Please keep this user s manual well for future reference ...

Страница 3: ...y power to the camera before completing installation Please install the proper power cut off device during the installation connection Always follow the instruction guide the manufacturer recommended 4 Qualified engineers needed All the examination and repair work should be done by the qualified service engineers We are not liable for any problems caused by unauthorized modifications or attempted ...

Страница 4: ...en you do not use the camera Dome enclosure is the optical component do not touch the enclosure when you are installing the device or clean the enclosure when you are doing maintenance work Please use professional optical clean method to clean the enclosure Improper enclosure clean method such as use cloth may result in poor IR effect of camera with IR function 7 Accessories Be sure to use all the...

Страница 5: ...rectional talk 10 2 4 1 Device end to PC end 10 2 4 2 PC end to the Device end 10 2 5 Alarm Setup 10 2 5 1 Alarm Input and Output Connection 11 2 5 2 IR Light Connection 12 3 Installation 13 3 1 Lens Installation 13 3 1 1 Auto Aperture Lens 13 3 1 2 Manual Lens 13 3 1 3 Remove Lens 14 3 2 SD Card 14 3 2 1 Installation 14 3 2 2 Remove 15 3 3 3G Card 16 3 3 1 Installation 16 3 3 2 Remove 16 ...

Страница 6: ...tion 17 3 4 2 Remove 18 3 5 I O Port 19 4 Quick Configuration Tool 20 4 1 Overview 20 4 2 Operation 20 5 Web Operation 22 5 1 Network Connection 22 5 2 Login and Main Interface 22 6 FAQ 24 Appendix Toxic or Hazardous Materials or Elements 25 ...

Страница 7: ...nction Support central server backup function in accordance with your configuration and setup in alarm or schedule setting Support record via Web and the recorded file are storage in the client end PC Support local SD card hot swap Support short time storage when encounter disconnection Support network storage such as FTP Alarm Function Real time respond to external on off alarm input and video de...

Страница 8: ...ifications 1 3 1 Performance Please refer to the following sheet for network camera performance specification Model Parameter ICIP S1300WDR System Main Processor TI Davinci high performance DSP OS Embedded LINUX System Resources Support real time network local record and remote operation at the same time User Interface Remote operation interface such as WEB DSS PSS System Status SD card status bit...

Страница 9: ... to 100 Activation event alarm device audio video storage image snapshot log email function and etc Camera Masking Activation event alarm device audio video storage image snapshot log email SMTP function and etc Alarm Input 1 channel input 1 channel output Record and Backup Record Priority Manual External alarm Video detect Schedule Storage Management Support SD card storage NAS storage Network Wi...

Страница 10: ...mption 10W For WIFI and 3G device it is below 12W Working Temperature 20 60 Working Humidify 95 Dimensions 70 63 2 149 5 Weight 650g Installation Support various installation modes Enclosure and bracket are optional ...

Страница 11: ...ies IP camera real panel is shown as below See Figure 2 1 The rear panel with the network port The rear panel with the 100M fiber port Figure 2 1 Rear panel Note Picture in this chapter is for reference only and actual rear panel may vary ...

Страница 12: ...V STATUS Indication Light Red light System boot up red light is on System upgrades red light flashes System resets red light flashes Green light Normal working status green light is on Display record status Record green light flashes Yellow light Detect the wireless device yellow light is on 3G Connect to 3G card Please note it is for 3G series product only WIFI Antenna port Connect to 3G WIFI ant...

Страница 13: ... open alarm output end C Alarm output public end C G GND Alarm input ground end A RS485 port RS485_A port control external PTZ B RS485_B port control external PTZ RX RS232 port RS232_RX RS232 receive end TX RS232_TX RS232 COM send out end G GND RS232 ground end NA IR light port External IR light signal control port RESET RESET button Restore factory default setup When system is running normally pr...

Страница 14: ...LAN Network port Ethernet port Connect to standard Ethernet cable Support PoE function OPT 100M fiber port 155M single fiber dual direction SFP fiber module Transmit 100M Ethernet data SD SD card port Connect to SD card Note When you install the SD card please make sure current card is not in write mode and then you can install it to the camera When you remove the SD card please make sure current ...

Страница 15: ...tion GND Please make sure the device is securely earthed to prevent the thunderstorm strike 2 2 Side Panel Please refer to the following interface for side panel dimension information The unit is mm See Figure 2 2 Figure 2 2 Side panel 2 3 Front Panel ...

Страница 16: ...a the speaker or the pickup and then you can get the audio from the earphone or sound box at the pc end 2 4 2 PC end to the Device end Device Connection Connect the speaker or the MIC to the audio input port in the PC and then connect the earphone to the audio output port in the device rear panel Login the Web and then click the Audio button to enable the bidirectional talk function You can see th...

Страница 17: ...ccording to the high low level type when an alarm occurs Step 4 Set the WEB alarm output The alarm output 01 is the alarm output port of the device rear panel as the NO port 2 5 1 Alarm Input and Output Connection Please refer to the following figure for alarm input information See Figure 2 5 Alarm input When the input signal is idle or grounded the device can collect the different statuses of the...

Страница 18: ...n Note Device shall have external port for IR function Log in Web select Setup Camera Day Night and select sensor input If it is not available then you do need to set it Please refer to the following figure for external IR light information See Figure 2 7 IR synchronization input signal When the external IR light is on the signal cable from the board outputs the 3 3V 1mA It outputs the 0V when the...

Страница 19: ...e installation position of the C CS adapter Turn clockwise to fix the lens Use slotted screwdriver to fasten the screw near the focusing ring and then turn counter clockwise to move the focusing ring out for several millimeters Now you can focus manually and check the video is clear or not If you can not see the clear video you can adjust via the flange back After you completed the focus setup use...

Страница 20: ...he steps listed below to remove lens The interface is shown as in Figure 3 3 Turn the lens counter clockwise and then remove it from the camera Unplug the auto lens cable socket from the auto lens connector If you are using the manual aperture lens please skip to the following step If there is no lens please put the CCD protection cap back to protect the CCD Figure 3 3 Remove lens 3 2 SD Card 3 2 ...

Страница 21: ...cap screw firmly to secure the SD card protection cap in the camera Figure 3 4 SD card installation 1 Figure 3 5 SD card installation 2 3 2 2 Remove Please follow the steps listed below to remove SD card The interface is shown as Figure 3 6 Use the screwdriver to loosen the screw of SD card protection cap in the rear panel Remove the cap from the camera Follow the SD card direction to remove the S...

Страница 22: ... the proper installation position Put the 3G card protection cap back Use the screwdriver to fix the 3G card protection cap screw firmly to secure the 3G card protection cap Figure 3 7 3G card installation 1 Figure 3 8 3G card installation 2 3 3 2 Remove Please follow the steps listed below to remove 3G card The interface is shown as Figure 3 9 Use the screwdriver to loosen the screw of 3G card pr...

Страница 23: ... rear panel See Figure 3 10 Please turn according to the direction in the following figure until antenna is secure firmly See Figure 3 11 Figure 3 10 3G Wifi antenna installation 1 Figure 3 11 3G Wifi antenna installation 2 After you fix the 3G WIFI antenna to the WIFI port of the rear panel you can adjust the antenna direction See Figure 3 12 ...

Страница 24: ...I thread end and then turn according to the following figure See Figure 3 13 Now you can see the antenna is away from the thread See Figure 3 14 Figure 3 13 Remove 3G Wifi antenna 1 Figure 3 14 Remove 3G Wifi antenna 2 Remove the 3G WIFI antenna from the port of the rear panel See Figure 3 15 ...

Страница 25: ...ewdriver to press the corresponding button of cable groove Insert the cable into the groove and then release the screwdriver Remove Cable Please follow the steps listed below to remove the cable Use the small slotted screwdriver to press the corresponding button of cable groove Remove the cable out of the groove and then release the screwdriver Figure 3 16 I O port ...

Страница 26: ...tion Double click the ConfigTools exe icon you can see an interface is shown as in Figure 4 1 In the device list interface you can view device IP address port number subnet mask default gateway MAC address and etc Figure 4 1 Search interface Select one IP address and then right click mouse you can see an interface is shown as in Figure 4 2 Select the Open Device Web item you can go to the correspo...

Страница 27: ... user name password and port Please modify the corresponding information to login Please note the port information here shall be identical with the port value you set in TCP port in Web Network interface Otherwise you cannot login the device If you are using device background upgrade port 3800 to login other setups are all invalid Figure 4 3 Login prompt After you logged in the configuration tool ...

Страница 28: ... the PC and the network camera respectively Network camera default IP address is 192 168 1 108 Subnet mask is 255 255 255 0 Gateway is 192 168 1 1 Use order ping network camera address to check connection is OK or not 5 2 Login and Main Interface Open IE and input network camera address in the address bar See Figure 5 1 Figure 5 1 IP address The login interface is shown as below See Figure 5 2 Ple...

Страница 29: ...ogin After you successfully logged in please install WEB plug in unit Please refer to the Web Operation Manual included in the resource CD for detailed operation instruction See Figure 5 3 Figure 5 3 Web monitoring window ...

Страница 30: ...he schedule record file It may damage the SD card duration I can not use the disk as the storage media When disk information is shown as hibernation or capacity is 0 please format it first Via Web I can not upgrade the device via network The status indication light is shown as red when network upgrade operation failed You can use port 3800 to continue upgrade Recommended SD card brand Kingston 4GB...

Страница 31: ...e toxic or hazardous substance or elements contained in products will not leak or mutate so that the use of these substances or elements will not result in any severe environmental pollution any bodily injury or damage to any assets The consumer is not authorized to process such kind of substances or elements please return to the corresponding local authorities to process according to your local g...

Отзывы: