background image

3.


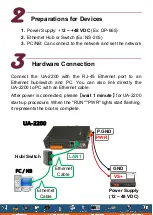
Type 

http://192.168.255.1

 in the URL address. Use default 

Web UI username/password 

root

/

root


to login the system. 


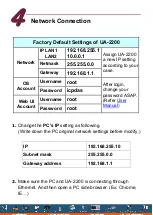
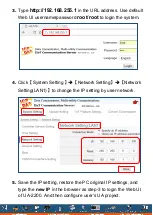
4.


Click

System Setting

Network Setting

Network 

Setting(LAN1)

to change the IP setting by user network. 


5.


Save the IP setting, restore the PC original IP settings, and 
type the 

new IP

 in the browser as step-3 to login the Web UI 

of UA-2200. And then configure user

’s UA project. 

Содержание UA-2200 Series

Страница 1: ...0910 Cable Pin Terminalx 16 Screw Driver Technical Support UA Series User Manual http ftp icpdas com pub cd UA Series user_manual UA 5231_UA 2241 ICP DAS Website http www icpdas com Technical Support E Mail service icpdas com What s in the box UA 2200 Series Quick Start English v1 0 Apr 2019 ...

Страница 2: ...an Ethernet hub switch and PC You can also link directly the UA 2200 to PC with an Ethernet cable After power is connected please wait 1 minute for UA 2200 start up procedure When the RUN PWR lights start flashing it represents the boot is complete Preparations for Devices Hardware Connection Power Supply 12 48 VDC VS GND Ethernet Cable Ethernet Cable Hub Switch P GND PWR LAN1 ...

Страница 3: ...r login change your password ASAP Refer User Manual Password icpdas Web UI Account Username root Password root 1 Change the PC s IP setting as following Write down the PC original network settings before modify IP 192 168 255 10 Subnet mask 255 255 0 0 Gateway address 192 168 1 1 2 Make sure the PC and UA 2200 is connecting through Ethernet And then open a PC side browser Ex Chrome IE Network Conn...

Страница 4: ... to login the system 4 Click System Setting Network Setting Network Setting LAN1 to change the IP setting by user network 5 Save the IP setting restore the PC original IP settings and type the new IP in the browser as step 3 to login the Web UI of UA 2200 And then configure user s UA project ...

Отзывы: