ICP DAS USA ET-2254 Скачать руководство пользователя страница 7

Technical support: 

[email protected]

                                                    P7 

6  

Testing your Ethernet I/O Module


1) 

Wait 2 seconds and click
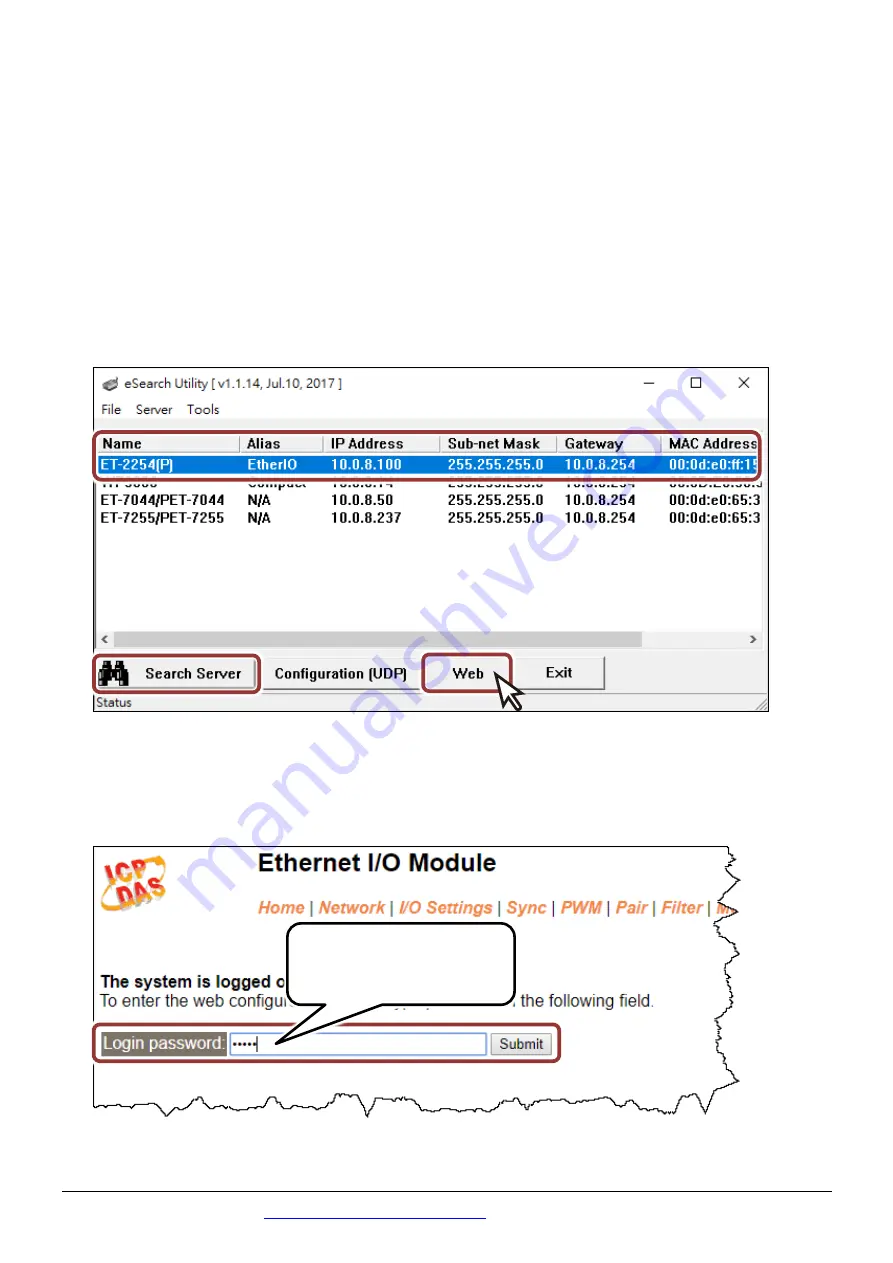
 

“Search Servers”

 button again to ensure the 

ET-2254(P) is working well with new configuration. 

2) 

Click the name of ET-2254(P) to select it. 

3) 

Click the


“Web”

 button to log in to the web configuration pages.   

(Or enter the URL address of the ET-2254(P) in the address bar of the 

browser.)   


4)  Enter the password (default: Admin)

in the 

“login password” field and 

click 

“Submit”


Use the default 
password: 

Admin


Содержание ET-2254

Страница 1: ...54P Quick Start v1 2 May 2018 What s in the box Related Information The package includes the following items ET 2254 ET 2254P Module x 1 Quick Start x1 This Document ET 2200 Series Product Page Documentation Firmware NS 205 MDR 20 24 Product Page optional ...

Страница 2: ...our Windows firewall and Anti Virus firewall first else the Search Servers on Chapter 5 may not work Please contact with your system Administrator 2 Connect both the ET 2254 P and your PC to the same sub network or the same Ethernet switch 3 Supply power 10 30 VDC to the ET 2254 P 4 Verify that the PWR LED indicator on the ET 2254 P is flashing Red OK ...

Страница 3: ...e Connections Readback as 1 ON State Output Type Drive Relay Resistance Load Readback as 0 OFF State EXT PWR DOx EXT GND EXT PWR DOx EXT GND EXT PWR DOx EXT GND EXT PWR DOx EXT GND Readback as 1 Readback as 0 Input Type Open Close to GND Dry Contact EXT PWR DIOx EXT GND EXT PWR DIOx EXT GND ...

Страница 4: ... Self test A tip for connecting the wire to the connector A tip for removing the wire from the connector 1 Connect the DIO0 pin Pin01 to the DIO1 pin Pin03 2 Connect the External Power 24V to the EXT PWR pin Pin17 3 Connect the External Power GND to the EXT GND Pin19 ...

Страница 5: ...sed on DO requests 1 Static I O type by configuration web or Modbus 1 0 Dynamic 1 Static R W 300 315 0x12C 0x13B 1 UDIO Sets the Universal DIO channels to DI or DO Port 1 0 DO 1 DI R W R Read W Write F Settings are recorded in flash memory by default 1xxxx DI address Begin address Points Description Bits Per Point Range Access Type 0 0x0 1 nDI Digital Input 1 0 OFF 1 ON R 32 0x20 1 nDI Digital lat...

Страница 6: ...arch Servers to search your ET 2254 P 3 Double click your ET 2254 P to configure the settings Factory Default Settings of ET 2254 P IP Address 192 168 255 1 Subnet Mask 255 255 0 0 Gateway 192 168 0 1 4 Contact your Network Administrator to obtain a correct network configuration such as IP Mask Gateway Enter the network settings and click OK Note The ET 2254 P will use the new settings 2 seconds l...

Страница 7: ...e ET 2254 P is working well with new configuration 2 Click the name of ET 2254 P to select it 3 Click the Web button to log in to the web configuration pages Or enter the URL address of the ET 2254 P in the address bar of the browser 4 Enter the password default Admin in the login password field and click Submit Use the default password Admin ...

Страница 8: ...ons and check the checkbox for Ch0 to set Ch0 is DI Port then click the Update Settings button to save the revised settings to the ET 2254 P module 7 Click the Home tag to allow a simple test to be performed to verify the Digital Input and Output functionality 8 In the Digital I O section click the DO1 button to ON Red and verify that the DI0 LED status for high green ...

Отзывы: