

- 2 -
- 3 -
D
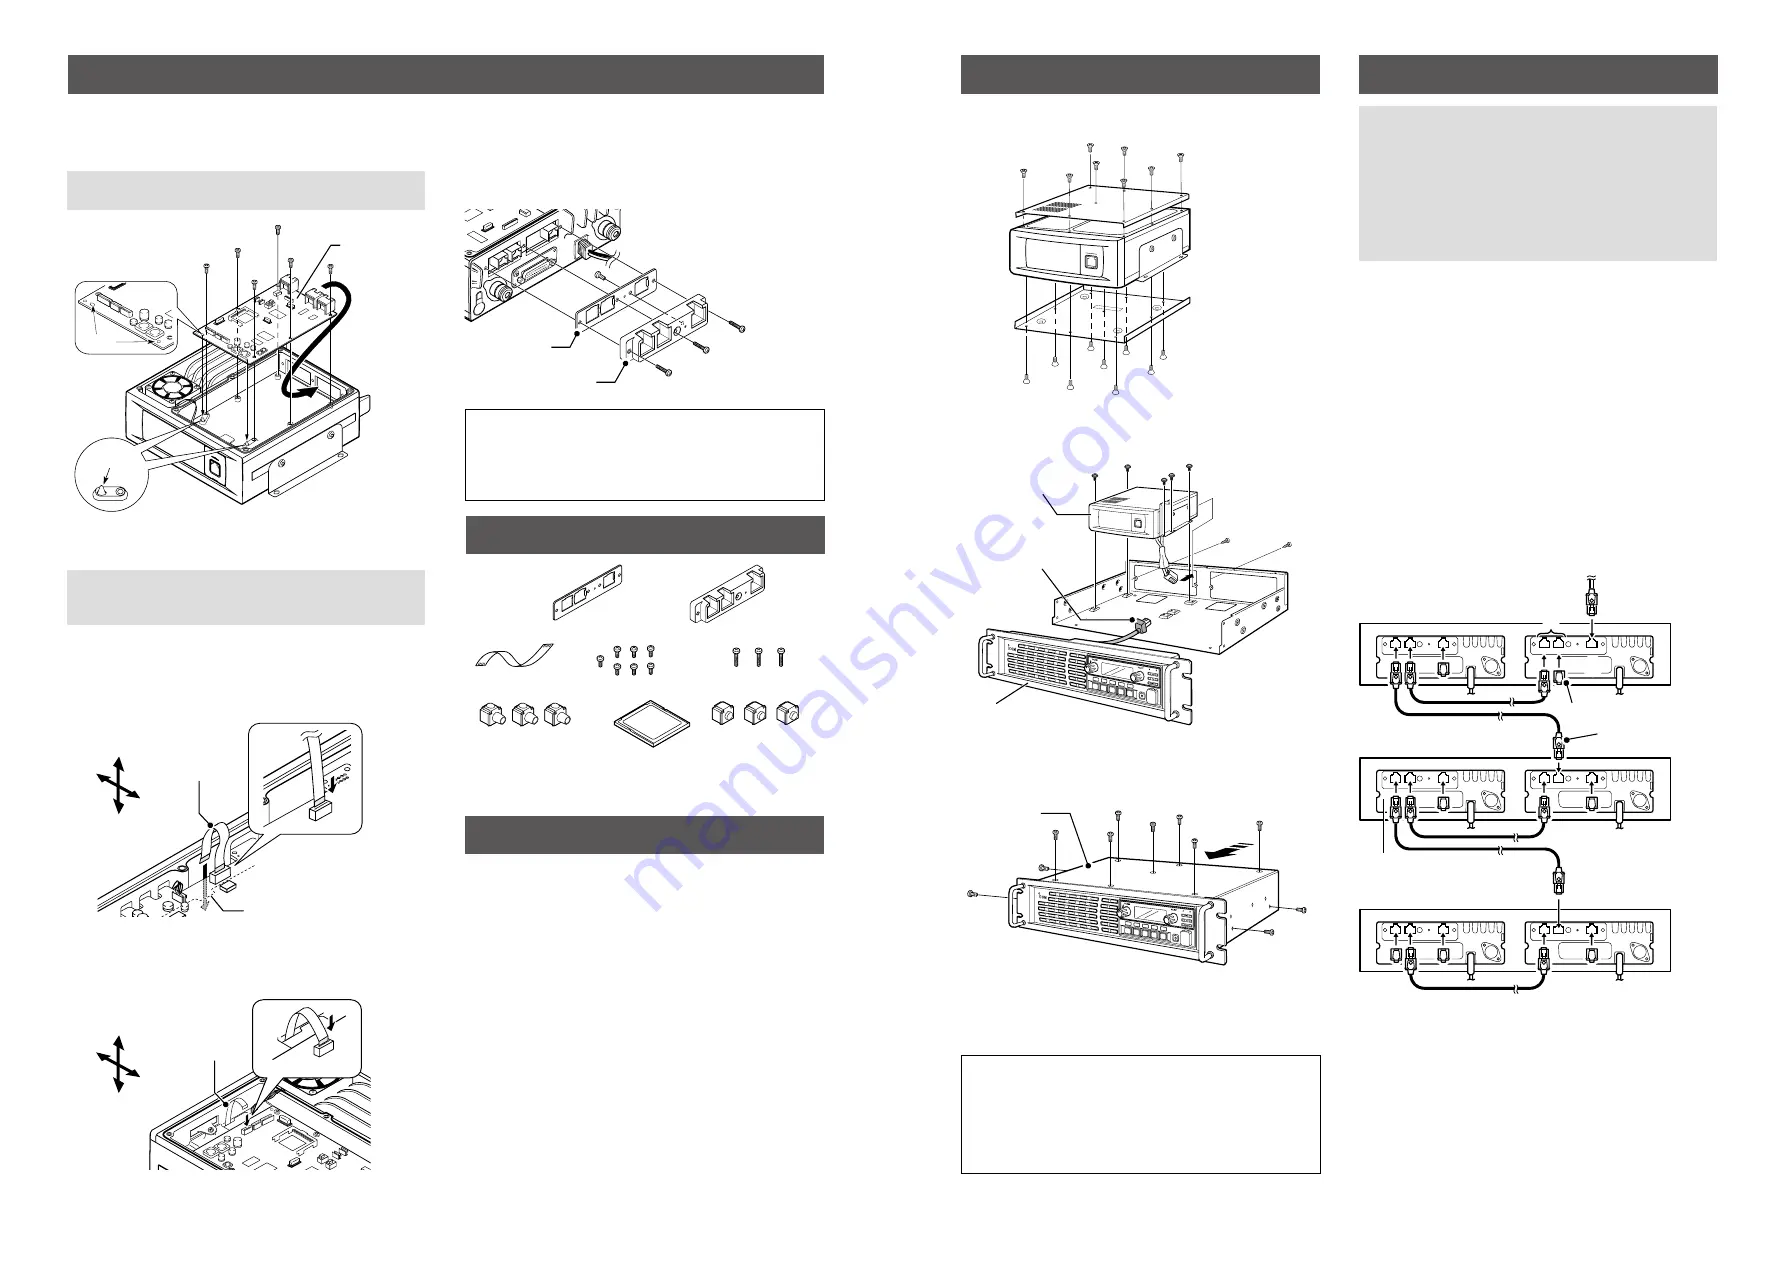
Attaching the rear panel
1. Attach the supplied rear panel to the rear panel holder
using one of the seven supplied 3 × 8 mm screws.
2. Attach the rear panel and holder set to the channel
module using the three supplied 3 × 8 mm screws.
w
q
Channel module
Rear panel
Rear panel holder
TIP:
If you have installed a channel extension module
(optional UR-FR5000/UR-FR6000 series), an additional
controller in it enables you to control each channel
module from a PC in the Conventional/Trunking operation
mode.
D
Installing the UC-FR5000
Install the controller into the channel module using six of the
seven supplied 3 × 8 mm screws.
NOTE: BE SURE
to match the holes in the controller to
the projections on the channel module’s chassis.
Projections
Holes
Channel module
Controller
D
Connecting the flat cable
NOTE: BE SURE
to insert the flat cable with the metal
strips facing the edge of the Printed Circuit Board (PCB),
and not the opposite way.
1. Turn the channel module upside down.
Insert one end of the flat cable into J8 on the PCB of
the channel module. Then, carefully pass the flat cable
through the opening of the channel module’s chassis to
the top side.
J8
Top
Bottom
Front
Rear
Flat cable
Opening
2. Turn over the channel module.
Carefully pull out the other end of the flat cable from the
opening, and then insert it into J1 on the controller.
J1
Top
Bottom
Front
Rear
Flat cable
CF-FR5000MC
cf
card
Upgrades the UC-FR5000 #01 to enable Multi Site
Conventional mode operation.
Same as that supplied with UC-FR5000 #02.
CF-FR5000MT
cf
card
Upgrades the UC-FR5000 #01 to enable Multi Site
Conventional/Trunking mode operation.
Same as that supplied with UC-FR5000 #03.
Screws
(
3 × 12 mm
)
Screws
(
3 × 8 mm
)
Flat cable
Connector caps
Dust protectors
Rear panel
Rear panel
holder
CF card*
*Not supplied, depending on the controller’s version.
INSTALLATION
SUPPLIED ACCESSORIES
OPTION
NOTE:
• CAT-5 straight cables are required for connection. (User
supplied)
•
BE SURE
to cover each connected cable with a supplied
dust protector. Even if the cable has its own cover,
replace it with the supplied dust protector.
•
KEEP
the supplied connector caps attached when the
connectors are not in use, to avoid getting bad contacts
from dust and moisture.
Each controller has a LAN connector and two BUS
connectors.
q
[LAN] connector
For an Ethernet connection. Connect the controller to an
Ethernet (LAN) port of a PC.
In the Trunking mode, the controller at one end of the
chain must be connected. You can control the controller
and all others in the chain from the PC.
w
[BUS] connectors (BUS-1, BUS-2)
For data communication between the controllers in the
Trunking mode, either BUS-1 or BUS-2 can be used.
They enable the controllers to be “daisy-chained”
together, and form a network that allows trunking and
other data to pass among them.
L
The illustration below describes one example of a connection
for the Trunking mode.
q
w
BUS-1 BUS-2
LAN
PC
Dust protector
Connector cap
Channel extension module
Up to 30 channel modules with
controllers can be daisy-chained.
Repeater
1. Reattach the top and bottom covers of the channel
module, and then tighten all the screws.
Channel module
2. Reinstall the channel module and the screws to their
original positions, and then connect the control cable of
the repeater’s front panel to the channel module.
P0
P1
P2
P3
P4
Channel module
Control cable
Front panel
Repeater
3. Reattach the top cover of the repeater, and then tighten
the seven screws for the top and the two screws on
both sides of the repeater.
P0
P1
P2
P3
P4
Top cover
Repeater
ASSEMBLING THE UNIT
CONNECTION
Icom, Icom Inc. and the Icom logo are registered trademarks of Icom
Incorporated (Japan) in Japan, the United States, the United Kingdom,
Germany, France, Spain, Russia, Australia, New Zealand, and/or other
countries.
JavaScript is a registered trademark of Sun Microsystems, Inc.
All other products or brands are registered trademarks or trademarks of their
respective holders.
Icom is not responsible for the destruction or damage to the
Icom transceiver, if the malfunction is because of:
• Force majeure, including, but not limited to, fires, earthquakes,
storms, floods, lightning, other natural disasters, disturbances,
riots, war, or radioactive contamination.
• The use of Icom transceivers with any equipment that is not
manufactured or approved by Icom.