background image

NI-707533 

Gigabit Wireless Router 300N 


-76- 

4.15 IP & MAC Binding Setting 


Figure 4-65 the IP & MAC Binding menu 

There  are  two  submenus  under  the  IP  &MAC  Binding  menu  (shown  in  Figure  4-61): 

Binding 

Setting 

and

  ARP  List

.  Click  any  of  them,  and  you  will  be  able  to  scan  or  configure  the 

corresponding function. The detailed explanations for each submenu are provided below. 

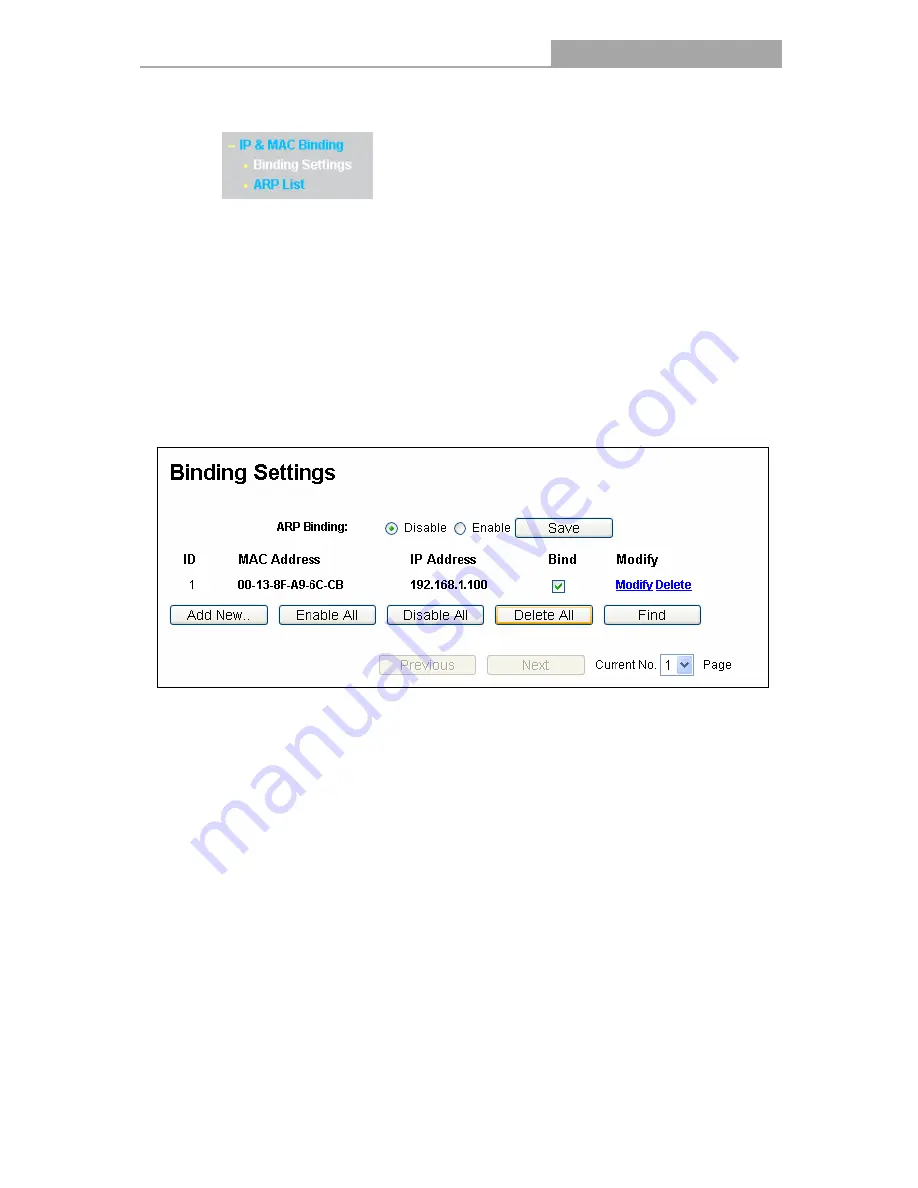
4.15.1 Binding Setting 

This page displays the

 IP & MAC Binding Setting

 table; you can operate it in accord with your 

desire. (shown in Figure 4-62).   

Figure 4-66 Binding Setting 


MAC Address


The MAC address of the controlled computer in the LAN.   


IP Address -

 The assigned IP address of the controlled computer in the LAN.   


Bind


-

 Check this option to enable ARP binding for a specific device.   


Modify


To modify or delete an existing entry.   

When you want to add or modify an IP & MAC Binding entry, you can click the 

Add New

 button 

or 

Modify

  button,  and  then  you  will  go  to  the  next  page.  This  page  is  used  for  adding  or 

modifying an IP & MAC Binding entry


(shown in Figure 4-63).     


Содержание NI-707533

Страница 1: ...1910020349 ...

Страница 2: ...II ...

Страница 3: ...III ...

Страница 4: ...stem Requirements 6 2 2 Installation Environment Requirements 6 2 3 Connecting the Router 6 Chapter 3 Quick Installation Guide 8 3 1 TCP IP Configuration 8 3 2 Quick Installation Guide 10 Chapter 4 Configuring the Router 15 4 1 Login 15 4 2 Status 15 4 3 Quick Setup 16 4 4 WPS 17 4 5 Network 23 4 5 1 LAN 23 4 5 2 WAN 23 4 5 3 MAC Clone 33 4 6 Wireless 34 4 6 1 Wireless Settings 34 4 6 2 Wireless S...

Страница 5: ...ers 51 4 9 2 Port Triggering 53 4 9 3 DMZ 55 4 9 4 UPnP 55 4 10 Security 56 4 10 1 Basic Security 56 4 10 2 Advanced Security 58 4 10 3 Local Management 59 4 10 4 Remote Management 60 4 11 Parental Control 61 4 12 Access Control 64 4 12 1 Rule 64 4 12 2 Host 67 4 12 3 Target 69 4 12 4 Schedule 71 4 13 Static Routing 72 4 14 Bandwidth Control 74 4 14 1 Control Settings 74 4 14 2 Rules List 74 4 15 ...

Страница 6: ...DNS 80 4 17 System Tools 81 4 17 1 Time Setting 82 4 17 2 Diagnostic 83 4 17 3 Firmware Upgrade 84 4 17 4 Factory Defaults 85 4 17 5 Backup Restore 85 4 17 6 Reboot 86 4 17 7 Password 87 4 17 8 System Log 87 4 17 9 Statistics 90 Appendix A FAQ 92 Appendix B Configuring the PCs 97 Appendix C Specifications 101 Appendix D Glossary 102 ...

Страница 7: ...abit Router DC Power Adapter for NI 707533 Wireless N Gigabit Router Quick Installation Guide Resource CD for NI 707533 Wireless N Gigabit Router including This Guide Other Helpful Information Note Make sure that the package contains the above items If any of the listed items are damaged or missing please contact with your distributor ...

Страница 8: ...roadcast control and wireless LAN 64 128 152 bit WEP encryption Wi Fi protected Access WPA2 PSK WPA PSK as well as advanced Firewall protections the NI 707533 Wireless N Gigabit Router provides complete data privacy The NI 707533 Wireless N Gigabit Router provides flexible access control so that parents or network administrators can establish restricted access policies for children or staff It als...

Страница 9: ...heduled Connection on certain time to the Internet Built in NAT and DHCP server supporting static IP address distributing Supports Parental Control and Access Control Connects Internet on demand and disconnects from the Internet when idle for PPPoE Provides 64 128 152 bit WEP encryption security and wireless LAN ACL Access Control List Supports Flow Statistics Supports firmware upgrade and Web man...

Страница 10: ... network by WPS function Quick Flash A wireless device failed to be added to the network by WPS function Table 1 1 The LEDs description Note After a device is successfully added to the network by WPS function the WPS LED will keep on for about 5 minutes and then turn off 1 4 2 The Rear Panel Figure 1 2 Rear Panel sketch The following parts are located on the rear panel View from left to right POWE...

Страница 11: ...n for five seconds and then wait for the Router to reboot USB Connect with USB Mass Storage Device WAN This WAN port is where you will connect the DSL cable Modem or Ethernet 1 2 3 4 LAN These ports 1 2 3 4 connect the Router to the local PC s Wireless antenna To receive and transmit the wireless data ...

Страница 12: ...3 Connecting the Router Before installing the Router make sure your PC is connected to the Internet through the broadband service successfully If there is any problem please contact your ISP After that please install the Router according to the following steps Don t forget to pull out the power plug and keep your hands dry 1 Power off your PC Cable DSL Modem and the Router 2 Locate an optimum loca...

Страница 13: ...3 Gigabit Wireless Router 300N 7 electrical outlet The Router will start to work automatically 7 Power on your PC and Cable DSL Modem Figure 2 1 Hardware Installation of the NI 707533 Wireless N Gigabit Router ...

Страница 14: ...uctions as to how to do this please refer to Appendix B Configuring the PC 2 Configure the network parameters The IP address is 192 168 1 xxx xxx is any number from 2 to 254 Subnet Mask is 255 255 255 0 and Gateway is 192 168 1 1 The Router s default IP address Obtain an IP address automatically 1 Set up the TCP IP Protocol in Obtain an IP address automatically mode on your PC If you need instruct...

Страница 15: ...e 3 2 it means the connection between your PC and the Router is failed Figure 3 2 Failure result of Ping command Please check the connection following these steps 1 Is the connection between your PC and the Router correct Note The 1 2 3 4 LEDs of LAN ports which you link to on the Router and LEDs on your PC s adapter should be lit ...

Страница 16: ...nfiguration utility open a web browser and type in the default address http 192 168 1 1 in the address field of the browser Figure 3 3 Login the Router After a moment a login window will appear similar to the Figure 3 4 Enter admin for the User Name and Password both in lower case letters Then click the OK button or press the Enter key Figure 3 4 Login Windows Note If the above screen does not pop...

Страница 17: ...t function If you are sure of what kind of connection type your ISP provides you can select the very type and click Next to go on configuring 4 If you select Auto Detect the Router will automatically detect the connection type your ISP provides Make sure the cable is securely plugged into the WAN port before detection The appropriate configuration page will be displayed when an active Internet ser...

Страница 18: ...P the next screen will appear as shown in Figure 3 8 Figure 3 8 Quick Setup Static IP IP Address This is the WAN IP address as seen by external users on the Internet including your ISP Enter the IP address into the field Subnet Mask The Subnet Mask is used for the WAN IP address it is usually 255 255 255 0 Default Gateway Enter the gateway IP address into the box if required Primary DNS Enter the ...

Страница 19: ...of the Router can be used It may be illegal to use the wireless function of the Router in a region other than one of those specified in this field If your country or region is not listed please contact your local government agency for assistance Channel This field determines which operating frequency will be used The default channel is set to Auto so the AP will choose the best channel automatical...

Страница 20: ... also note the key is case sensitive this means that upper and lower case keys will affect the outcome It would also be a good idea to write down the key and all related wireless security settings No Change If you chose this option wireless security configuration will not change These settings are only for basic wireless parameters For advanced settings please refer to Section 4 6 Wireless 6 Click...

Страница 21: ...in After your successful login you will see the fifteen main menus on the left of the Web based utility On the right there are the corresponding explanations and instructions The detailed explanations for each Web page s key function are listed below 4 2 Status The Status page provides the current status information about the Router All information is read only ...

Страница 22: ...NI 707533 Gigabit Wireless Router 300N 16 Figure 4 1 Router Status 4 3 Quick Setup Please refer to Section 3 2 Quick Installation Guide ...

Страница 23: ...n ensure the network security by generating a new PIN Add device You can add the new device to the existing network manually by clicking this button b To add a new device If the wireless adapter supports Wi Fi Protected Setup WPS you can establish a wireless connection between wireless adapter and Router using either Push Button Configuration PBC method or PIN method Note To build a successful con...

Страница 24: ...he router by WPS automatically Method Two Step 1 Press the WPS button on the front panel of the Router Step 2 For the configuration of the wireless adapter please choose Push the button on my access point in the configuration utility of the WPS as below and click Next The WPS Configuration Screen of Wireless Adapter Step 3 Wait for a while until the next screen appears Click Finish to complete the...

Страница 25: ...click the Add device button in Figure 4 2 then the following screen will appear Figure 4 3 Add A New Device Step 2 Choose Press the button of the new device in two minutes and click Connect Step 3 For the configuration of the wireless adapter please choose Push the button on my access point in the configuration utility of the WPS as below and click Next ...

Страница 26: ...le until the next screen appears Click Finish to complete the WPS configuration The WPS Configuration Screen of Wireless Adapter II By PIN If the new device supports Wi Fi Protected Setup and the PIN method you can add it to the network by PIN with the following two methods Method One Enter the PIN into my Router ...

Страница 27: ...ss adapter please choose Enter a PIN into my access point or a registrar in the configuration utility of the WPS as below and click Next The WPS Configuration Screen of Wireless Adapter Note In this example the default PIN code of this adapter is 26499123 as the above figure shown Method Two Enter the PIN from my Router Step 1 Get the Current PIN code of the Router in Figure 4 2 each Router has it...

Страница 28: ...the WPS configuration screen as Figure 4 2 c You will see the following screen when the new device successfully connected to the network Note a The status LED on the Router will light green all the time if the device has been successfully added to the network b The WPS function cannot be configured if the Wireless Function of the Router is disabled Please make sure the Wireless Function is enabled...

Страница 29: ...on factory default 192 168 1 1 Subnet Mask An address code that determines the size of the network Normally use 255 255 255 0 as the subnet mask Note a If you change the IP Address of LAN you must use the new IP Address to login the Router b If the new LAN IP Address you set is not in the same subnet the IP Address pool of the DHCP server will change accordingly at the same time while the Virtual ...

Страница 30: ...you one or two DNS addresses select Use These DNS Servers and enter the primary and secondary addresses into the correct fields Otherwise the DNS servers will be assigned dynamically from your ISP Note If you find error when you go to a Web site after entering the DNS addresses it is likely that your DNS servers are set up improperly You should contact your ISP to get DNS server addresses Get IP w...

Страница 31: ...r the gateway IP address in dotted decimal notation provided by your ISP MTU Size The normal MTU Maximum Transmission Unit value for most Ethernet networks is 1500 Bytes It is not recommended that you change the default MTU Size unless required by your ISP Primary Secondary DNS Optional Enter one or two DNS addresses in dotted decimal notation provided by your ISP 3 If your ISP provides a PPPoE co...

Страница 32: ...only This is recommended Dynamic IP You can check this radio button to use Dynamic IP as the secondary connection to connect to the local area network provided by ISP Static IP You can check this radio button to use Static IP as the secondary connection to connect to the local area network provided by ISP Connect on Demand In this mode the Internet connection can be terminated automatically after ...

Страница 33: ...onnect on Demand mode The Internet connection can be disconnected automatically after a specified inactivity period and re established when you attempt to access the Internet again Caution Sometimes the connection cannot be terminated although you specify a time to Max Idle Time since some applications are visiting the Internet continually in the background If you want to do some advanced configur...

Страница 34: ... Access Concentrator online at every interval The default value is 0 You can input the value between 0 and 120 The value 0 means no detect DNS IP address If your ISP does not automatically assign DNS addresses to the Router during login please click Use the following DNS servers check box and enter the IP address in dotted decimal notation of your ISP s primary DNS server If a secondary DNS server...

Страница 35: ...he time please enter 0 in the Max Idle Time field Otherwise enter the number of minutes you want to have elapsed before your Internet access disconnects Connect Automatically The connection can be re established automatically when it was down Connect Manually You can click the Connect Disconnect button to connect disconnect immediately This mode also supports the Max Idle Time function as Connect ...

Страница 36: ...re the Router to disconnect from your Internet connection after a specified period of inactivity Max Idle Time If your Internet connection has been terminated due to inactivity Connect on Demand enables the Router to automatically re establish your connection as soon as you attempt to access the Internet again If you wish to activate Connect on Demand click the radio button If you want your Intern...

Страница 37: ...tomatically as soon as you attempt to access the Internet again To use this option click the radio button If you want your Internet connection to remain active at all times enter 0 in the Max Idle Time field Otherwise enter the number in minutes that you wish to have the Internet connecting last unless a new link is requested Caution Sometimes the connection cannot be disconnected although you spe...

Страница 38: ...ose either as you are given by your ISP and enter the ISP s IP address or the domain name If you choose static IP and enter the domain name you should also enter the DNS assigned by your ISP And click the Save button Click the Connect button to connect immediately Click the Disconnect button to disconnect immediately Connect on Demand You can configure the Router to disconnect from your Internet ...

Страница 39: ... all times enter 0 in the Max Idle Time field Otherwise enter the number in minutes that you wish to have the Internet connecting last unless a new link is requested Caution Sometimes the connection cannot be disconnected although you specify a time to Max Idle Time since some applications are visiting the Internet continually in the background Note If you don t know how to choose the appropriate ...

Страница 40: ...you can click the Clone MAC Address To button and this MAC address will fill in the WAN MAC Address field Click Restore Factory MAC to restore the MAC address of WAN port to the factory default value Click the Save button to save your settings Note Only the PC on your LAN can use the MAC Address Clone function 4 6 Wireless Figure 4 14 Wireless menu There are five submenus under the Wireless menu s...

Страница 41: ...le TEST is NOT the same as test Region Select your region from the pull down list This field specifies the region where the wireless function of the Router can be used It may be illegal to use the wireless function of the Router in a region other than one of those specified in this field If your country or region is not listed please contact your local government agency for assistance When you sel...

Страница 42: ...of 802 11b 802 11g and 802 11n wireless stations can connect to the Router Channel width Select any channel width from the pull down list The default setting is automatic which can adjust the channel width for your clients automatically Note If 11b only 11g only or 11bg mixed is selected in the Mode field the Channel Width selecting field will turn grey and the value will become 20M which is unabl...

Страница 43: ... you do not want to use wireless security select this check box but it s strongly recommended to choose one of the following modes to enable security WEP It is based on the IEEE 802 11 standard If you select this check box you will find a notice in red as show in Figure 4 17 ...

Страница 44: ...P key length 64 bit or 128 bit or 152 bit for encryption Disabled means this WEP key entry is invalid 64 bit You can enter 10 hexadecimal digits any combination of 0 9 a f A F zero key is not promoted or 5 ASCII characters 128 bit You can enter 26 hexadecimal digits any combination of 0 9 a f A F zero key is not promoted or 13 ASCII characters 152 bit You can enter 32 hexadecimal digits any combin...

Страница 45: ...e Enter 0 to disable the update WPA PSK WPA2 PSK It s the WPA WPA2 authentication type based on pre shared passphrase Version you can choose the version of the WPA PSK security on the drop down list The default setting is Automatic which can select WPA PSK Pre shared key of WPA or WPA2 PSK Pre shared key of WPA automatically based on the wireless station s capability and request Encryption When WP...

Страница 46: ... wireless access by configuring the Wireless MAC Address Filtering function shown in Figure 4 20 Figure 4 20 Wireless MAC address Filtering To filter wireless users by MAC Address click Enable The default setting is Disable MAC Address The wireless station s MAC address that you want to filter Status The status of this entry either Enabled or Disabled Description A simple description of the wirele...

Страница 47: ...ll button to delete all entries Click the Next button to go to the next page Click the Previous button to return to the previous page For example If you desire that the wireless station A with MAC address 00 0A EB 00 07 8A and the wireless station B with MAC address 00 0A EB 00 23 11 are able to access the Router but all the other wireless stations cannot access the Router you can configure the Wi...

Страница 48: ...ds for Beacon Interval here The beacons are the packets sent by the router to synchronize a wireless network Beacon Interval value determines the time interval of the beacons The default value is 100 RTS Threshold Here you can specify the RTS Request to Send Threshold If the packet is larger than the specified RTS Threshold size the router will send RTS frames to a particular receiving station and...

Страница 49: ...ecommended for it will increase the data capacity by reducing the guard interval time Enabled AP Isolation This function can isolate wireless stations on your network from each other Wireless devices will be able to communicate with the Router but not with each other To use this function check this box AP Isolation is disabled by default Note If you are not familiar with the setting items in this ...

Страница 50: ... seconds 4 7 DHCP Figure 4 24 The DHCP menu There are three submenus under the DHCP menu shown in Figure 4 24 DHCP Settings DHCP Clients List and Address Reservation Click any of them and you will be able to configure the corresponding function 4 7 1 DHCP Settings Choose menu DHCP DHCP Settings you can configure the DHCP Server on the page shown in Figure 4 25 The Router is set up by default as a ...

Страница 51: ...of the time is 1 2880 minutes The default value is 120 minutes Default Gateway Optional Suggest to input the IP address of the LAN port of the Router default value is 192 168 1 1 Default Domain Optional Input the domain name of your network Primary DNS Optional Input the DNS IP address provided by your ISP Or consult your ISP Secondary DNS Optional Input the IP address of another DNS server if you...

Страница 52: ...you specify a reserved IP address for a PC on the LAN that PC will always receive the same IP address each time when it accesses the DHCP server Reserved IP addresses should be assigned to the servers that require permanent IP settings Figure 4 27 Address Reservation MAC Address The MAC address of the PC for which you want to reserve IP address Assigned IP Address The IP address of the Router rese...

Страница 53: ... Click the Delete All button to delete all entries Click the Next button to go to the next page and Click the Previous button to return the previous page 4 8 Network Sharing Figure 4 29 The Network Sharing menu There are two submenus under the Network Sharing menu shown in Figure 4 29 Sharing Service and User Accounts Click any of them and you will be able to configure the corresponding function 4...

Страница 54: ...ed or non shared status of the volume Properties Displays the Edit link to specify a volume that the Network Sharing users can access Click the Start button to start the Network Sharing service Click the Stop button to stop the Network Sharing service Click the Eject Disk button to safely remove the USB storage device that is connected to USB port This takes the drive offline A message will appear...

Страница 55: ... 192 168 1 1 MyShare Figure 4 31 Sharing Settings Note 1 The Router cannot automatically locate new USB drive You have to click the Rescan button manually to display a list of volumes and information about them 2 The new settings will not take effect until you restart the service 3 To unplug the USB drive click Eject Disk button first Simply pulling USB drive out of the USB port can cause damage t...

Страница 56: ...me that you want to give access to the USB drive The user name must be composed of alphanumeric symbols not exceeding 15 characters in length Password Enter the password in the Password field The password must be composed of alphanumeric symbols not exceeding 15 characters in length For security purposes the password for each user account is not displayed Confirm Password Re enter the password her...

Страница 57: ...equests from the Internet to this service port will be redirected to the computer specified by the server IP Any PC that was used for a virtual server must have a static or reserved IP Address because its IP Address may be changed when using the DHCP function Figure 4 34 Virtual Servers Service Port The numbers of External Ports You can type a service port or a range of service ports in XXX YYY fo...

Страница 58: ...han one type of available service please select another service and enter the same IP Address for that computer or server To modify or delete an existing entry 1 Click the Modify in the entry you want to modify If you want to delete the entry click the Delete 2 Modify the information 3 Click the Save button Click the Enable Disabled All button to make all entries enabled disabled Click the Delete ...

Страница 59: ...When necessary the external host will be able to connect to the local host using one of the ports defined in the Incoming Ports field Trigger Port The port for outgoing traffic An outgoing connection using this port will Trigger this rule Trigger Protocol The protocol used for Trigger Ports either TCP UDP or All all protocols supported by the Router Incoming Ports Range The port or port range used...

Страница 60: ... 5 Select Enable in Status field 6 Click the Save button to save the new rule Figure 4 37 Add or Modify a Triggering Entry To modify or delete an existing entry 1 Click the Modify in the entry you want to modify If you want to delete the entry click the Delete 2 Modify the information 3 Click the Save button Click the Enable All button to make all entries enabled Click the Disabled All button to m...

Страница 61: ...s IP Address may be changed when using the DHCP function Figure 4 38 DMZ To assign a computer or server to be a DMZ server 1 Click the Enable radio button 2 Enter the local host IP Address in the DMZ Host IP Address field 3 Click the Save button Note After you set the DMZ host the firewall related to the host will not work 4 9 4 UPnP Choose menu Forwarding UPnP you can view the information about U...

Страница 62: ...nternal Port Internal port which the router opened for local host IP Address The UPnP device that is currently accessing the router Status The port s status displayed here Enabled means that port is still active Otherwise the port is inactive Click Refresh to update the Current UPnP Settings List 4 10Security Figure 4 40 The Security menu There are four submenus under the Security menu as shown in...

Страница 63: ...ol PPTP allows the Point to Point Protocol PPP to be tunneled through an IP network To allow PPTP tunnels to pass through the Router keep the default Enabled L2TP Passthrough Layer 2 Tunneling Protocol L2TP is the method used to enable Point to Point sessions via the Internet on the Layer 2 level To allow L2TP tunnels to pass through the Router keep the default Enabled IPSec Passthrough Internet P...

Страница 64: ... can protect the Router from being attacked by TCP SYN Flood UDP Flood and ICMP Flood in the screen as shown in Figure 4 42 Figure 4 42 Advanced Security Packets Statistics Interval 5 60 The default value is 10 Select a value between 5 and 60 seconds from the drop down list The Packets Statistics Interval value indicates the time section of the packets statistics The result of the statistics is us...

Страница 65: ...LOOD Attack Filtering TCP SYN FLOOD Packets Threshold 5 3600 The default value is 50 Enter a value between 5 3600 When the current TCP SYN FLOOD Packets numbers is beyond the set value the Router will startup the blocking function immediately Ignore Ping Packet From WAN Port Enable or Disable Ignore Ping Packet From WAN Port The default setting is disabled If enabled the ping packet from the Inter...

Страница 66: ...imal digit Only the PCs with MAC address listed can use the password to browse the built in web pages to perform Administrator tasks while all the others will be blocked After click the Add button your PC s MAC Address will be placed in the list above Click the Save button to save your settings Note If your PC is blocked but you want to access the Router again use a pin to press and hold the Reset...

Страница 67: ...255 255 then all the hosts can access the Router from internet Note 1 To access the Router you should type your Router s WAN IP address into your browser s address in IE or Location in Navigator box followed by a colon and the custom port number For example if your Router s WAN address is 202 96 12 8 and the port number used is 8080 please enter http 202 96 12 8 8080 in your browser Later you may ...

Страница 68: ...Control Schedule Modify Here you can edit or delete an existing entry To add a new entry please follow the steps below 1 Click the Add New button and the next screen will pop up as shown in Figure 4 46 2 Enter the MAC address of the PC e g 00 11 22 33 44 AA you d like to control in the MAC Address of Child PC field Or you can choose the MAC address from the All Address in Current LAN drop down lis...

Страница 69: ... Add or Modify Parental Control Entry For example If you desire that the child PC with MAC address 00 11 22 33 44 AA can access www google com on Saturday only while the parent PC with MAC address 00 11 22 33 44 BB is without any restriction you should follow the settings below 1 Click Parental Control menu on the left to enter the Parental Control Settings page Check Enable and enter the MAC addr...

Страница 70: ...ime drop down list In Status field select Enable 4 Click Save to complete the settings Then you will go back to the Parental Control Settings page and see the following list as shown in Figure 4 47 Figure 4 47 Parental Control Settings 4 12Access Control Figure 4 48 Access Control There are four submenus under the Access Control menu as shown in Figure 4 48 Rule Host Target and Schedule Click any ...

Страница 71: ...y Allow means that the Router permits the packets to go through the Router Deny means that the Router rejects the packets to go through the Router Status This field displays the status of the rule Enabled means the rule will take effect Disabled means the rule will not take effect Modify Here you can edit or delete an existing rule To add a new rule please follow the steps below 1 Click the Add Ne...

Страница 72: ...r click the Previous button return to the previous page Figure 4 50 Add or Modify Internet Access Control Entry For example If you desire to allow the host with MAC address 00 11 22 33 44 AA to access www google com only from 18 00 to 20 00 on Saturday and Sunday and forbid other hosts in the LAN to access the Internet you should follow the settings below 1 Click Access Control Host in the left to...

Страница 73: ...In Status field select Enable Click Save to complete the settings Then you will go back to the Access Control Rule Management page and see the following list 4 12 2 Host Choose menu Access Control Host you can view and set a Host list in the screen as shown in Figure 4 51 The host list is necessary for the Access Control Rule Figure 4 51 Host Settings Host Description Here displays the description...

Страница 74: ...n to go to the next page or click the Previous button return to the previous page Figure 4 52 Add or Modify a Host Entry Figure 4 53 Add or Modify a Host Entry For example If you desire to restrict the internet activities of host with MAC address 00 11 22 33 44 AA you should first follow the settings below 1 Click Add New button in Figure 4 51 to enter the Add or Modify a Host Entry page 2 In Mode...

Страница 75: ...e 4 55 1 In Target Description field create a unique description for the target e g Target_1 2 In IP Address field enter the IP address of the target 3 Select a common service from Common Service Port drop down list so that the Target Port will be automatically filled If the Common Service Port drop down list doesn t have the service you want specify the Target Port manually 4 In Protocol field se...

Страница 76: ... the internet activities of host with MAC address 00 11 22 33 44 AA in the LAN to access www google com only you should first follow the settings below 1 Click Add New button in Figure 4 54 to enter the Add or Modify an Access Target Entry page 2 In Mode field select Domain Name from the drop down list 3 In Target Description field create a unique description for the target e g Target_1 4 In Domai...

Страница 77: ... you can edit or delete an existing schedule To add a new schedule follow the steps below 1 Click Add New button shown in Figure 4 57 and the next screen will pop up as shown in Figure 4 58 2 In Schedule Description field create a unique description for the schedule e g Schedule_1 3 In Day field select the day or days you need 4 In Time field you can select all day 24 hours or you may enter the St...

Страница 78: ... In Schedule Description field create a unique description for the schedule e g Schedule_1 3 In Day field check the Select Days radio button and then select Sat and Sun 4 In Time field enter 1800 in Start Time field and 2000 in Stop Time field 5 Click Save to complete the settings Then you will go back to the Schedule Settings page and see the following list 4 13Static Routing Choose menu static r...

Страница 79: ...Mask determines which portion of an IP Address is the network portion and which portion is the host portion Gateway This is the IP Address of the gateway device that allows for contact between the Router and the network or host 3 Select Enabled or Disabled for this entry on the Status pull down list 4 Click the Save button to make the entry take effect Other configurations for the entries Click th...

Страница 80: ...nd Ingress Bandwidth in the next screen Their values you configure should be less than 100000Kbps For optimal control of the bandwidth please select the right Line Type and ask your ISP for the total bandwidth of the egress and ingress Figure 4 62 Bandwidth Control Settings Enable Bandwidth Control Check this box so that the Bandwidth Control settings can take effect Line Type Select the right typ...

Страница 81: ...his field displays the max and mix download bandwidth through the WAN port the default is 0 Enable This displays the status of the rule Modify Click Modify to edit the rule Click Delete to delete the rule To add modify a Bandwidth Control rule follow the steps below Step 1 Click Add New shown in Figure 4 63 you will see a new screen shown in Figure 4 64 Step 2 Enter the information like the screen...

Страница 82: ...IP MAC Binding Setting table you can operate it in accord with your desire shown in Figure 4 62 Figure 4 66 Binding Setting MAC Address The MAC address of the controlled computer in the LAN IP Address The assigned IP address of the controlled computer in the LAN Bind Check this option to enable ARP binding for a specific device Modify To modify or delete an existing entry When you want to add or m...

Страница 83: ...steps below 1 Find the desired entry in the table 2 Click Modify or Delete as desired on the Modify column To find an existing entry follow the steps below 1 Click the Find button as shown in Figure 4 62 2 Enter the MAC Address or IP Address 3 Click the Find button in the page as shown in Figure 4 64 Figure 4 68 Find IP MAC Binding Entry Click the Enable All button to make all entries enabled Clic...

Страница 84: ...e Load All button to load all items to the IP MAC Binding list Click the Refresh button to refresh all items Note An item could not be loaded to the IP MAC Binding list if the IP address of the item has been loaded before Error warning will prompt as well Likewise Load All only loads the items without interference to the IP MAC Binding list 4 16Dynamic DNS Choose menu Dynamic DNS and you can confi...

Страница 85: ...ollow these instructions 1 Type the Domain Name received from your dynamic DNS service provider 2 Type the User Name for your DDNS account 3 Type the Password for your DDNS account 4 Click the Login button to log in to the DDNS service Connection Status The status of the DDNS service connection is displayed here Click Logout to log out of the DDNS service 4 16 2 Dyndns org DDNS If the dynamic DNS ...

Страница 86: ...r DDNS account 3 Type the Domain Name you received from dynamic DNS service provider here 4 Click the Login button to log in to the DDNS service Connection Status The status of the DDNS service connection is displayed here Click Logout to logout of the DDNS service 4 16 3 No ip com DDNS If the dynamic DNS Service Provider you select is www no ip com the page will appear as shown in Figure 4 68 ...

Страница 87: ...vider 4 Click the Login button to log in the DDNS service Connection Status The status of the DDNS service connection is displayed here Click Logout to log out the DDNS service 4 17System Tools Figure 4 73 The System Tools menu Choose menu System Tools and you can see the submenus under the main menu Time Settings Diagnostic Firmware Upgrade Factory Defaults Backup Restore Reboot Password System L...

Страница 88: ... Server preferentially In addition the Router built in some common NTP Servers so it can get time automatically once it connects the Internet To configure the system manually 1 Select your local time zone 2 Enter date and time in the right blanks 3 Click Save to save the configuration To configure the system automatically 1 Select your local time zone 2 Enter the IP address for NTP Server Prior 3 ...

Страница 89: ...ty reachability and name resolution to a given host or gateway Traceroute This diagnostic tool tests the performance of a connection Note You can use ping traceroute to test both numeric IP address or domain name If pinging tracerouting the IP address is successful but pinging tracerouting the domain name is not you might have a name resolution problem In this case ensure that the domain name you ...

Страница 90: ...ternet is fine Figure 4 76 Diagnostic Results Note Only one user can use this tool at one time Options Number of Pings Ping Size and Ping Timeout are used for Ping function Option Tracert Hops are used for Tracert function 4 17 3 Firmware Upgrade Choose menu System Tools Firmware Upgrade you can update the latest version of firmware for the Router on the following screen Figure 4 77 Firmware Upgra...

Страница 91: ...ng the firmware please write down some of your customized settings to avoid losing important settings 3 Do not turn off the Router or press the Reset button while the firmware is being upgraded otherwise the Router may be damaged 4 The Router will reboot after the upgrading has been finished 4 17 4 Factory Defaults Choose menu System Tools Factory Defaults and you can restore the configurations of...

Страница 92: ... button Note The current configuration will be covered by the uploading configuration file The upgrade process lasts for 20 seconds and the Router will restart automatically Keep the Router on during the upgrading process to prevent any damage 4 17 6 Reboot Choose menu System Tools Reboot you can click the Reboot button to reboot the Router via the next screen Figure 4 80 Reboot the Router Some se...

Страница 93: ...1 Password It is strongly recommended that you should change the factory default user name and password of the Router because all users who try to access the Router s Web based utility or Quick Setup will be prompted for the Router s default user name and password Note The new user name and password must not exceed 14 characters in length and not include any spaces Enter the new Password twice to ...

Страница 94: ...2 System Log Auto Mail Feature Indicates whether auto mail feature is enabled or not Mail Settings Set the receiving and sending mailbox address server address validation information as well as the timetable for Auto Mail Feature as shown in Figure 4 83 ...

Страница 95: ...in Note Only when you select Authentication do you have to enter the User Name and Password in the following fields User Name Your mail account name filled in the From field The part behind is excluded Password Your mail account password Confirm The Password Enter the password again to confirm Enable Auto Mail Feature Select it to mail logs automatically You could mail the current logs either at a...

Страница 96: ...ls Statistics you can view the statistics of the Router including total traffic and current traffic of the last Packets Statistic Interval Figure 4 84 Statistics Current Statistics Status Enable or Disable The default value is disabled To enable click the Enable button Packets Statistics Interval 5 60 The default value is 10 Select a value between 5 and 60 seconds in the pull down list The Packets...

Страница 97: ...c interval seconds Bytes The total amount of bytes received and transmitted in the last Packets Statistic interval seconds ICMP Tx The total amount of the ICMP packets transmitted to WAN in the last Packets Statistic interval seconds UDP Tx The total amount of the UDP packets transmitted to WAN in the last Packets Statistic interval seconds TCP SYN Tx The total amount of the TCP SYN packets transm...

Страница 98: ...d password in the Password field finish by clicking Connect Figure A 1 PPPoE Connection Type 4 If your ADSL lease is in pay according time mode select Connect on Demand or Connect Manually for Internet connection mode Type an appropriate number for Max Idle Time to avoid wasting paid time Otherwise you can select Auto connecting for Internet connection mode Figure A 2 PPPoE Connection Mode Note i ...

Страница 99: ...ess field Or else type the MAC Address into the WAN MAC Address field The format for the MAC Address is XX XX XX XX XX XX Then click the Save button It will take effect after rebooting Figure A 3 MAC Clone 3 I want to use Netmeeting what do I need to do 1 If you start Netmeeting as a host you don t need to do anything with the Router 2 If you start as a response you need to configure Virtual Serve...

Страница 100: ...of your browser and click DMZ submenu On the DMZ page click Enable radio button and type your IP address into the DMZ Host IP Address field using 192 168 1 169 as an example remember to click the Save button Figure A 6 DMZ 5 How to enable H323 ALG Log in to the Router click the Security menu on the left of your browser and click Basic Security submenu On the Basic Security page check the Enable ra...

Страница 101: ...ote Management submenu On the Remote Management page type a port number except 80 such as 88 into the Web Management Port field Click Save and reboot the Router Figure A 8 Remote Management Note If the above configuration takes effect to configure to the Router by typing http 192 168 1 1 88 the Router s LAN IP address Web Management Port in the address field of the Web browser 3 Log in to the Rout...

Страница 102: ...dify a Virtual server Entry 5 The wireless stations cannot connect to the Router 1 Make sure the Wireless Router Radio is enabled 2 Make sure that the wireless stations SSID accord with the Router s SSID 3 Make sure the wireless stations have right KEY for encryption when the Router is encrypted 4 If the wireless connection is ready but you can t access the Router check the IP Address of your wire...

Страница 103: ...ter s manual if needed 1 Install TCP IP component 1 On the Windows taskbar click the Start button point to Settings and then click Control Panel 2 Click the Network and Internet Connections icon and then click on the Network Connections tab in the appearing window 3 Right click the icon that showed below select Properties on the prompt page Figure B 1 4 In the prompt page that showed below double ...

Страница 104: ...ies window will display and the IP Address tab is open on this window by default Now you have two ways to configure the TCP IP protocol below Setting IP address automatically Select Obtain an IP address automatically Choose Obtain DNS server automatically as shown in the Figure below ...

Страница 105: ...r s LAN IP address is 192 168 1 1 type IP address is 192 168 1 x x is from 2 to 254 and Subnet mask is 255 255 255 0 3 Type the Router s LAN IP address the default IP is 192 168 1 1 into the Default gateway field 4 Select Use the following DNS server addresses radio button In the Preferred DNS Server field you can type the DNS server IP address which has been provided by your ISP ...

Страница 106: ...NI 707533 Gigabit Wireless Router 300N 100 Figure B 4 ...

Страница 107: ...imum 100m EIA TIA 568 100Ω STP maximum 100m LEDs Power System WLAN WAN LAN 1 4 USB WPS Safety Emissions FCC CE Wireless Frequency Band 2 4 2 4835GHz Radio Data Rate 11n up to 300Mbps Automatic 11g 54 48 36 24 18 12 9 6Mbps Automatic 11b 11 5 5 2 1Mbps Automatic Channels 13 Frequency Expansion DSSS Direct Sequence Spread Spectrum Modulation DBPSK DQPSK CCK OFDM 16 QAM 64 QAM Security WEP WPA WPA2 W...

Страница 108: ...ncryption for security DDNS Dynamic Domain Name System The capability of assigning a fixed host and domain name to a dynamic Internet IP Address DHCP Dynamic Host Configuration Protocol A protocol that automatically configure the TCP IP parameters for the all the PC s that are connected to a DHCP server DMZ Demilitarized Zone A Demilitarized Zone allows one local host to be exposed to the Internet...

Страница 109: ...k name WEP Wired Equivalent Privacy A data privacy mechanism based on a 64 bit or 128 bit or 152 bit shared key algorithm as described in the IEEE 802 11 standard Wi Fi A trade name for the 802 11b wireless networking standard given by the Wireless Ethernet Compatibility Alliance WECA see http www wi fi net an industry standards group promoting interoperability among 802 11b devices WLAN Wireless ...

Страница 110: ...ranty or support is provided for the software and rechargeable batteries that are provided Claims under warranty can be made only via the dealer from whom the item was purchased ICIDU is a registered trademark All other brand names and rights in connection with them are and remain the property of the rightful owner Copyright 2011 ICIDU All rights expressly reserved ...

Отзывы: