


CORONA CAMERA USER MANUAL
26
DELETED IMAGES CANNOT BE RECOVERED.
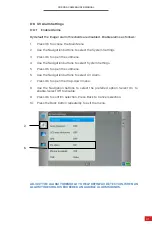
8-6-4 Delete Images
When an image is captured it will be stored to the memory card. Media can be
deleted at any time as follows:
1.
Press OK to access the Main Menu.
2.
Use the Navigation buttons to select the Image Gallery.
3.
Press OK to open gallery submenu.
4.
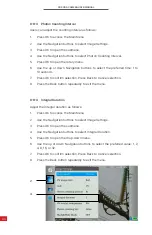
Use the Navigation buttons to select layout.
5.
Press OK to open enter the library.
6.
Use the Navigation buttons to select an image.
7.
Press OK to open the submenu.
8.
Use the Navigation buttons to select Delete.
9.
Press OK.
10. Use the Navigation buttons to select OK to confirm deletion or select
Cancel to cancel deletion; then, press OK to confirm selection.
11. Press the Back button repeatedly to exit the gallery.
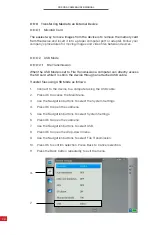
8-6-5 Image Information
When an image is captured it will be stored to the memory card. Media information
can be viewed at any time as follows:
1.
Press OK to access the Main Menu.
2.
Use the Navigation buttons to select the Image Gallery.
3.
Press OK to open gallery submenu.
4.
Use the Navigation buttons to select layout.
5.
Press OK to open enter the library.
6.
Use the Navigation buttons to select an image.
7.
Press OK to open the submenu.
8.
Use the Navigation buttons to select Details.
9.
Press OK. Information is displayed.
10. Press the Back button repeatedly to exit the gallery.