background image

27

ICE RS26L+ / RS32L+

OPERATOR MANUAL

PREVENTIVE MAINTENANCE

Daily Maintenance

1.

2.

3.

Remove pad driver/ brush and clean 
with approved cleaner.

Drain recovery and solution tanks 
completely and rinse out with clean 
water. Visually check
the recovery tank for debris and clean 
out as necessary.

Raise the squeegee assembly off the 
floor and wipe it down with a damp 
towel. 

Be sure to store the squeegee 

in the up position.

         WARNING: 

Before performing any maintenance on the machine, 

be sure that the power is turned off, or the batteries are disconnected!

         WARNING: 

Repairs are to be completed by authorized service centers only.  Any repairs 

completed by unauthorized persons will not be covered by the warranty.

Remove the float shut-off assembly 
and rinse it out with clean water.

Clean the machine with an approved 
cleaner and a damp towel.

Recharge the batteries.

Check the condition of the squeegee 
blade wiping edge, rotate blade if it 
is worn.

4.

5.

6.

7.

Monthly Maintenance

1.

2.

3.

Clean the battery tops to prevent cor-
rosion.

Check for loose battery cable connec-
tions.

Inspect and clean the recovery tank 
cover seal. 
Replace it if damaged.

Lubricate all grease points and pivot 
points with silicon spray and approved 
grease.

Check the machine for loose nuts and 
bolts.

Check the machine for leaks.

4.

5.

6.

Содержание RS26L+

Страница 1: ...RS26L RS32L Ride On Auto Scrubber Operator Manual...

Страница 2: ......

Страница 3: ...81863000 Specifications and parts are subject to change without notice PROTECT THE ENVIRONMENT Please dispose of packaging materials old machine components such as bat teries hazardous fluids includi...

Страница 4: ...t return your warranty card Please fill out at the time of installation for future reference Model No ____________________________________________________ Serial No ___________________________________...

Страница 5: ...ion Filling The Detergent Bottle MACHINE OPERATION Pre Operation Checks Operating the Machine WHILE OPERATING MACHINE Brake Device Emergency Stop Button TANK DRAINING Draining The Recovery Tank Draini...

Страница 6: ...Never allow children to play on or around Before leaving or servicing the machine Stop on a level surface Turn off the machine When servicing the machine Read operators manual thoroughly prior to oper...

Страница 7: ...eep sparks and open flames away Keep battery compartment open when charging WARNING Flammable materials can cause an explosion or fire Do not use flammable materials in tanks WARNING Flammable materia...

Страница 8: ...8 ICE RS26L RS32L OPERATOR MANUAL...

Страница 9: ...squeegee assembly Cup holder Brake pedal Propel pedal Front drive wheel Operator seat Steering wheel Control panel Touch screen i SynergyTM ID card scanning area LED light work Emergency Stop button...

Страница 10: ...10 ICE RS26L RS32L OPERATOR MANUAL...

Страница 11: ...meter Date Time Solution flow adjusting button 1 Step starting button Work mode select button Detergent adjusting button Timer Brush pressure adjusting button Direction button Setting button Vacuum mo...

Страница 12: ...nes usage and even specific timings Besides i SynergyTM also collects data from the lithium ion battery vacuum motor brush deck motor drive wheel motor and other electrical components at least once ev...

Страница 13: ...en box place the top board on the edge of the pallet placing it in the front of themachine as shown to the right Install batteries see INSTALLING BATTERIES Place the ID card on the scanning area Machi...

Страница 14: ...atteries to the machine Installing Batteries for i Synergy machines only Turn off the machine 1 WARNING Fire or Explosion Hazard Keep sparks and open flames away Keep battery compartment open when cha...

Страница 15: ...voltage of 24Volt 1 2 3 4 5 Transport the machine to a well ven tilated area Turn the machine off Prop up the Operator seat by the sup port stand for ventilation Connect the charger s AC power supply...

Страница 16: ...level surface en sure the machine is turned off If using the pad driver first attach the appropriate pad to the pad driver surface 1 2 Align the pad driver or brush under the motor hub and push it up...

Страница 17: ...squeegee pivot bracket make sure the knobs are completely seated into the slots before securing knobs 1 2 Connect the vacuum hose Machine com ponents 42 to the squeegee assembly Loop the hose by using...

Страница 18: ...ery tank is empty WARNING Do not put any flammable materials into the solution tank This can cause an explosion or a fire Only use the recommended cleaning chemicals Contact your janitorial supply dis...

Страница 19: ...t off when solution tank is full and then turn the water supply off The machine has an optional Auto fill hose port Machine components 2 you can fill the solution tank by using filling hose equipped w...

Страница 20: ...screen machine com ponents 14 if the machine has a fault the fault icon Machine components 39 will blink please Do Not operate the machine unless the fault has been eliminated please see FAULT CODES A...

Страница 21: ...d the brush pressure adjusting button Machine components 35 Turn on the 1 Step starting button the scrub head assembly and the squeegee assembly will lower down automatical ly all the presetting funct...

Страница 22: ...of the foot on the pedal light is slow heavy is fast See Fig 14 To stop scrubbing turn off the 1 Step starting button the scrub head will raise automatically the squeegee will also raise after a shor...

Страница 23: ...ng to prevent damage to floor finish If the squeegee assembly leaves streaks on the floor raise the squee gee off the floor and wipe the blades down with a damp cloth Pre sweep the area to prevent lea...

Страница 24: ...select turn ON or OFF by the warning light button Machine compo nents 40 If the fault icon is blinking on the touch screen stop using the machine to eliminate the fault Please see FAULT CODES AND SOLU...

Страница 25: ...e machine is equipped with a brake pedal Machine components 9 that can be used to control the machine if quicker stopping is needed or if operating on an incline See Fig 16 The machine is equipped wit...

Страница 26: ...ery tank Clean the filter with a damp cloth or low pressure water hose if dirty Allow the vacuum fan filter to dry completely before reinstalling it in the machine Rinse the solution tank with clean w...

Страница 27: ...WARNING Repairs are to be completed by authorized service centers only Any repairs completed by unauthorized persons will not be covered by the warranty Remove the float shut off assembly and rinse i...

Страница 28: ...machine with the pad driver brush raised off the floor Always store the machine with the squeegee assembly raised off the floor If storing in an area which may reach freezing temperatures be sure to...

Страница 29: ...ellow icon rep resents a low level fault you can click it to pop up a fault message window it will guide you how to eliminate the fault Red icon represents a serious fault the fault mes sage window wi...

Страница 30: ...tor Sensor Open Circuit Brake Sensor Open Circuit Brush Motor Left Open Circuit Vacuum motor Open Circuit and Connector Solenoid Valve Short Circuit SOLUTION Sit in seat Check Squeegee or Scrub head A...

Страница 31: ...Wiring and Connector Check Drive motor wiring and Connector Check Brush Motor Right Wiring and Connector Check Proximity switch Release Emergency stop button Replace Main controller Replace Main contr...

Страница 32: ...Circuit Scrub Head Actuator Short Circuit Squeegee Actuator Short Circuit Check Main Relay 2 Wiring and Connector Check Drive Motor Wiring and Connector Check Brush Motor Left Wiring and Connector Ch...

Страница 33: ...P switch Battery meter lockout activated Recharge batteries Faulty control handle bail switch Contact ICE service center Faulty brush motor or wiring Contact ICE service center Worn Motor carbon brush...

Страница 34: ...hose connections Secure hose connections Clogged vacuum hose Remove clogged debris Damaged vacuum hose Replace vacuum hose Recovery tank cover not in place Properly position cover Damaged recovery ta...

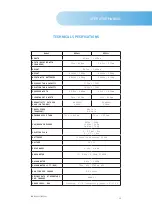
Страница 35: ...DTH 26in 650mm 32in 810mm PRODUCTIVITY RATE PER HOUR IN THEORY 46 300ft2 4 300m2 55 600ft2 5 200m2 TRAVEL SPEED TRANSPORT 4Mile h 6 5Km h MINIMUM AISLE TURN 71in 1 800mm 75in 1 900mm PAD BRUSH PRESSUR...

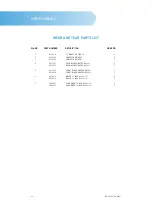
Страница 36: ...1 1 1 1 2 2 2 2 10 WHEEL PU TIRE 10 PROTECTIVE WHEEL PROTECTIVE WHEEL REAR BLADE LINATEX RS26L REAR BLADE LINATEX RS32L FRONT BLADE LINATEX RS26L FRONT BLADE LINATEX RS32L BRUSH 13 INCH RS26L 13 BRUS...

Страница 37: ...37 PARTS MANUAL ICE RS26L RS32L...

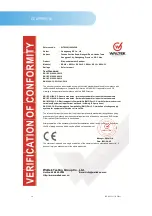
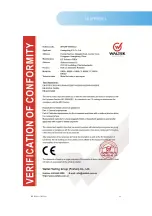
Страница 38: ...nity standard for industrial environments EN IEC 61000 6 4 Generic standards Emission standard for industrial environments EN IEC 61000 3 2 Electromagnetic Compatibility EMC Part 3 2 Limits for harmon...

Страница 39: ...39 ICE RS26L RS32L CE APPROVAL...

Страница 40: ...Netherlands 31 0 297 303010 31 0 800 9099 info emea icerobo com ICE Robotics USA 101 E Roosevelt Zeeland MI 49464 833 ICE ROBO info us icerobo com ICE Robotics China 2F Building 5 1151 Lianxi Road Pud...

Отзывы: