background image

i

i

C

C

a

a

n

n

V

V

i

i

e

e

w

w

3

3

7

7

2

2


U

U

s

s

e

e

r

r

s

s


G

G

u

u

i

i

d

d

e

e


(Rev.2.0  Oct.  2012) 

30 of 32 


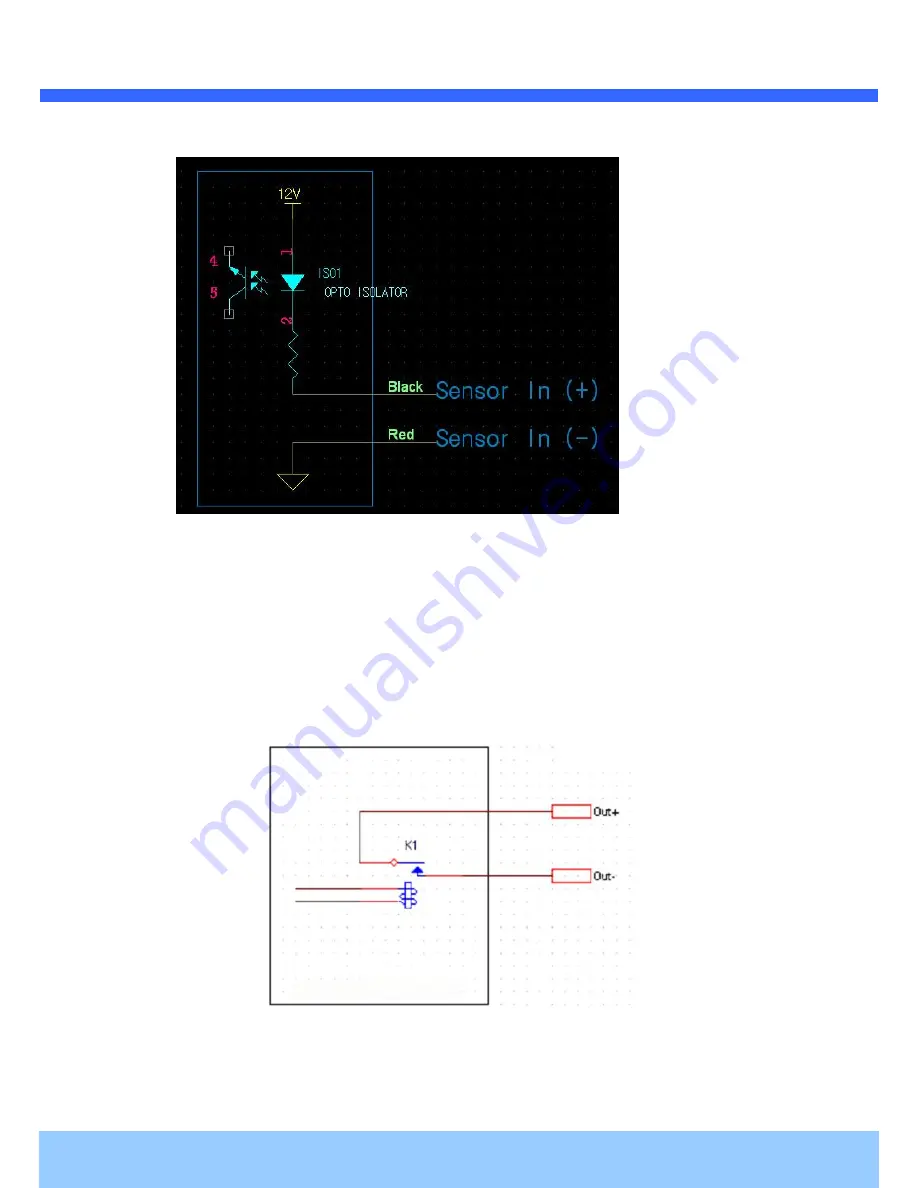
Fig 6-2.    Alarm Input of iCanView372 


6

6

.

.

1

1

.

.

2

2

.

.


A

A

U

U

X

X


P

P

o

o

r

r

t

t


f

f

o

o

r

r


R

R

e

e

l

l

a

a

y

y


O

O

u

u

t

t

p

p

u

u

t

t


As for connection with several alarm output devices, consists of Relay Circuit as in Fig 6-3. Relay is available 

for Electrical Signal Switching AC/DC 24V, 1A, Relay Junction Point will be closed by Alarm Output. 

Connect the as relay desired device to AUX(AUX1,AUX2) port of iCanView372 regardless of electrical polarity. 

AUX1, AUX2 is refer to Out+ ,Out- of Fig 6-3. 


Fig 6-3. Relay Output Diagram 


Содержание iCanView372

Страница 1: ...iCanView372 User s Guide M Rev 2 0 Oct 2012...

Страница 2: ...0 Oct 2012 2 of 32 Copyright 2010 iCanTek Corporation Certification iCanTek provides the best products with the certifications below Revision History Date Rev No Description 2010 11 1 0 Creation of t...

Страница 3: ...p ersonnel Immediately stop using when the product emits smoke or abnormal heat Never install the product in area exposed to oil or gas Never install the product on a ceiling that cannot hold its wei...

Страница 4: ...Gu ui id de e Rev 2 0 Oct 2012 4 of 32 Indications Warning Death or Serious Injury will occur without following Warning Caution Operational Problem Faulty Malfunction will occur without complying wit...

Страница 5: ...view 9 2 3 Physical Description 10 3 Bracket Installation 13 4 Installation 18 4 1 Required System Specification 18 4 2 Quick Installation Guide 19 5 Trouble Shooting 23 5 1 No Power on Product 23 5 2...

Страница 6: ...edded Web Server Embedded Streaming Server various Network Protocols transmits synchronized video and audio data in real time with D1 resolution at full frame rate through IP Network as well as suppor...

Страница 7: ...o 150 sec of manual speed and it s adjustable from 100 sec to 150 sec 1 4 Sony Super HAD CCD Sony Super HAD CCD for excellent sensitivity and low smear levels Multiple language support Intelligent Pan...

Страница 8: ...in Page Line Out 1V p p Audio Output CVBS Output Analog Video Output for convenient installation Power DC In 12V DC Adaptor 2A Installation Type Stand Mount Motion Detection Optional Shape Sensitivity...

Страница 9: ...d DC Adaptor can be purchased by User or from iCanTek 2 2 2 2 P Pr re ev vi ie ew w iCanView372 IP Installer NVR Pro H 264 Speed Dome Network Camera IP Assignment Program PC based Client for monitorin...

Страница 10: ...s si ic ca al l D De es sc cr ri ip pt ti io on n 2 3 1 Bottom View Connection Fig 2 1 Detailed Terminal Block View of iCanView372 Network Connection 10 100 Base T As Ethernet Port connects iCanView37...

Страница 11: ...h as sirens flashing light etc to network camera Please refer to the section 6 1 for more detailed description GND Ground D D RS 485 Connection Port VIDEO Video Output Composite video output from the...

Страница 12: ...i iC Ca an nV Vi ie ew w3 37 72 2 U Us se er r s s G Gu ui id de e Rev 2 0 Oct 2012 12 of 32 2 3 2 Dimension of iCanView372 Fig 2 2 Dimension of iCanView372...

Страница 13: ...Gu ui id de e Rev 2 0 Oct 2012 13 of 32 3 Bracket Installation A Installation Preparation A 1 Ceiling Mount Type 1 Fix the surface mount adaptor with 4 pcs of screws on the desired place FIG 4 2 When...

Страница 14: ...IP Switches as in the following picture If required to control Speed Dome Camera via System Controller Please set the RS 485 Communication Configuration as below Baud Rate 2400 bps Data 8 bit Stop Bit...

Страница 15: ...e of Cable Gland on the bottom case and coat the attached line between top bottom of Cable Gland bottom case with silicon 2 Drill 4 holes on the wall to fix bracket as Fig A 4 3 Fix the Wall Mounting...

Страница 16: ...i iC Ca an nV Vi ie ew w3 37 72 2 U Us se er r s s G Gu ui id de e Rev 2 0 Oct 2012 16 of 32 A 4 Corner Mounting A 5 Pole Mounting...

Страница 17: ...i iC Ca an nV Vi ie ew w3 37 72 2 U Us se er r s s G Gu ui id de e Rev 2 0 Oct 2012 17 of 32 A 5 Mounting Accessories Optional...

Страница 18: ...ci if fi ic ca at ti io on n Recommended Specification of PC for Camera Configuration Monitoring will be as below Class Recommended Specification Remark CPU Pentium 4 3Ghz RAM 1GB Graphic Card Higher...

Страница 19: ...needed to be connected to Network II Connect PC or Lap Top with Product using LAN Cable Connect IP Camera as dotted line in Fig 4 1 Power will be applied to product via separate DC Adaptor 2 IP Camer...

Страница 20: ...Installer Manual You can select the most appropriate LAN ADSL Static Dynamic IP per Cable to user s circumstance via menu In case of selecting Dynamic Automatic IP menu will be deactivated In case of...

Страница 21: ...access to the relevant product For the use of Web Viewer Active X module should be installed If internet access is available you can download it by accessing Camera or if you install NVR Pro Active X...

Страница 22: ...have to configure all required information at NVR Pro For the detail please refer to NVR Pro User Manual 4 Initial Configuration by connecting Admin Mode All Parameters of iCanView372 are initially s...

Страница 23: ...c ct t DC Adaptor User Users who do not use PoE have to connect LAN Cable and separate Power to Camera For the Power Adaptor supplied from iCanTek will be recommended in case of individually purchase...

Страница 24: ...work Connection Status by doing Ping Test Start Run cmd Ping IP Address EX ping 172 16 42 51 If you get the response such as Reply from Network Configuration Connection Status is good Please re try to...

Страница 25: ...Configuration If not configure Recorded File won t be generated or Captured Image on Web Viewer won t be saved Windows Vista Configuration 1 User Account Configuration 1 Select User Account on Contro...

Страница 26: ...se er r s s G Gu ui id de e Rev 2 0 Oct 2012 26 of 32 Windows 7 Configuration 1 User Account Configuration 1 Select User Account on Control Panel 2 Select Change User Account Control Setting 3 Set the...

Страница 27: ...e Rev 2 0 Oct 2012 27 of 32 2 Program Execution Entitlement Configuration 1 Select NVR icon on the wallpaper 2 Select Properties menu popped up by clicking right button on Mouse 3 Select Check Box of...

Страница 28: ...Te ec ch hn ni ic ca al l I In nq qu ui ir ry y Please contact to your supplier if you still have problem even taking all trouble shootings For the quickest solution please prepare all information bel...

Страница 29: ...as loud speaker flashing light etc 6 6 1 1 1 1 A AL LA AR RM M P Po or rt t f fo or r S Se en ns so or r I In np pu ut t Connect the two wires of the sensors The sensor type can be set by Virtual Syst...

Страница 30: ...tp pu ut t As for connection with several alarm output devices consists of Relay Circuit as in Fig 6 3 Relay is available for Electrical Signal Switching AC DC 24V 1A Relay Junction Point will be clo...

Страница 31: ...a an nd d R Re el la ay y O Ou ut tp pu ut t D De ev vi ic ce e 6 1 3 1 Sensor Connection Diagram Sensor Device Sensor Power Supply NO NCType Sensor1 Sensor1 12V GND Sensor Device Sensor Power Supply...

Отзывы: