9
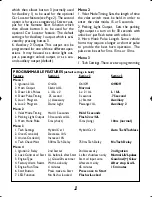
options for use with Hybrid cars, plus the
default setting for tach or tachless operation.
Hybrid Car 1: Requires connection to a fuel
injector, coil pack or crank position sensor.
The system will automatically learn the tach
the first time the vehicle is started. The start
wire acts as the trigger to enter learn mode.
After the system has been successfully
remote started, the tach input will no longer
be monitored for the remainder of the run
cycle.
Hybrid Car 2: Requires no connection of the
tach wire. Upon remote start activation, the
starter output will crank for two seconds
then turn off.
Tach and Tachless operation: Requires
connection to a fuel injector, coil pack or
crank position sensor. For tach operation,
the system monitors the start wire and the
tach setting will automatically learn when the
car is first started after installation. For some
new GM and Chrysler vehicles that do not
have a start wire, manual tach learning is
necessary (see
Manual Learn Mode
). For
Tachless operation no connection to the
tach wire is necessary. When first starting
the vehicle after installation the tach setting
will automatically be learned and the system
will respond with light flashes and horn
honks to confirm.
The tach must be learned
prior to remote starting!
• The lights will flash and horn will honk
2 times to confirm tach learning.
• The lights will flash and horn will honk
4 times to confirm tachless operation.
• The lights will flash and horn will honk
7 times to indicate nothing was learned.
2. Over Crank Adjustment. There may by
instances where normal tach learning may
still slightly over or under crank the starter.
To correct an over crank condition, use
setting 2 to increase the tach setting by 10%.
Test the system and if necessary adjust using
feature 2 again and repeat until proper
operation is achieved.
3. Under Crank Adjustment. To correct an
under crank condition, use setting 3 to
decrease the tach setting by 10%. Test the
system and if necessary adjust using feature 2
again and repeat until proper operation is
achieved.
4. Tach Wait. Selects between a 300ms wait,
750ms wait, or no wait (default) after
starting to begin monitoring the tach signal.
Menu 4
1. Ignition 2 Relay Programming. Sets the
Ignition 2 relay for use as a 2nd Starter
output, 2nd Accessory output or 2nd Ignition
output (default).
2. Door Lock Control For Factory Alarm.
This feature allows three different door lock
control functions to aid integration with
factory security systems. Setting 1 pulses
unlock before start and pulses lock both
after starting and after shutdown. Setting 2
pulses the lock only after remote start
shutdown. Setting 3 provides only normal
door lock pulses for the lock/unlock output.
3. Start Settings. Selects between multiple
start options for both diesel and gasoline
engine types.
Setting 1: (-) Glow Plug Monitor / 20-Second
Timer Mode. For vehicles with a wait-to-
start wire that shows ground when the indi-
cator light goes out, connect to the proper
vehicle wire and set Engine Type to setting 1.
For diesel engines where a proper glow plug
wire cannot be located, setting 1 also pro-
vides a 20-second wait-to-start timer which
automatically cranks the starter after a 20-
second warm up period for the glow plugs.
Setting 2: External Start Input (+). Setting 2
allows to vehicle to automatically start when
it receives a positive (+) input the Blue glow
plug input wire.
RS160manualRev3:BW2450.qxd 1/7/2010 2:24 PM Page 9
Содержание RS160
Страница 14: ...14 NOTES ...


