background image

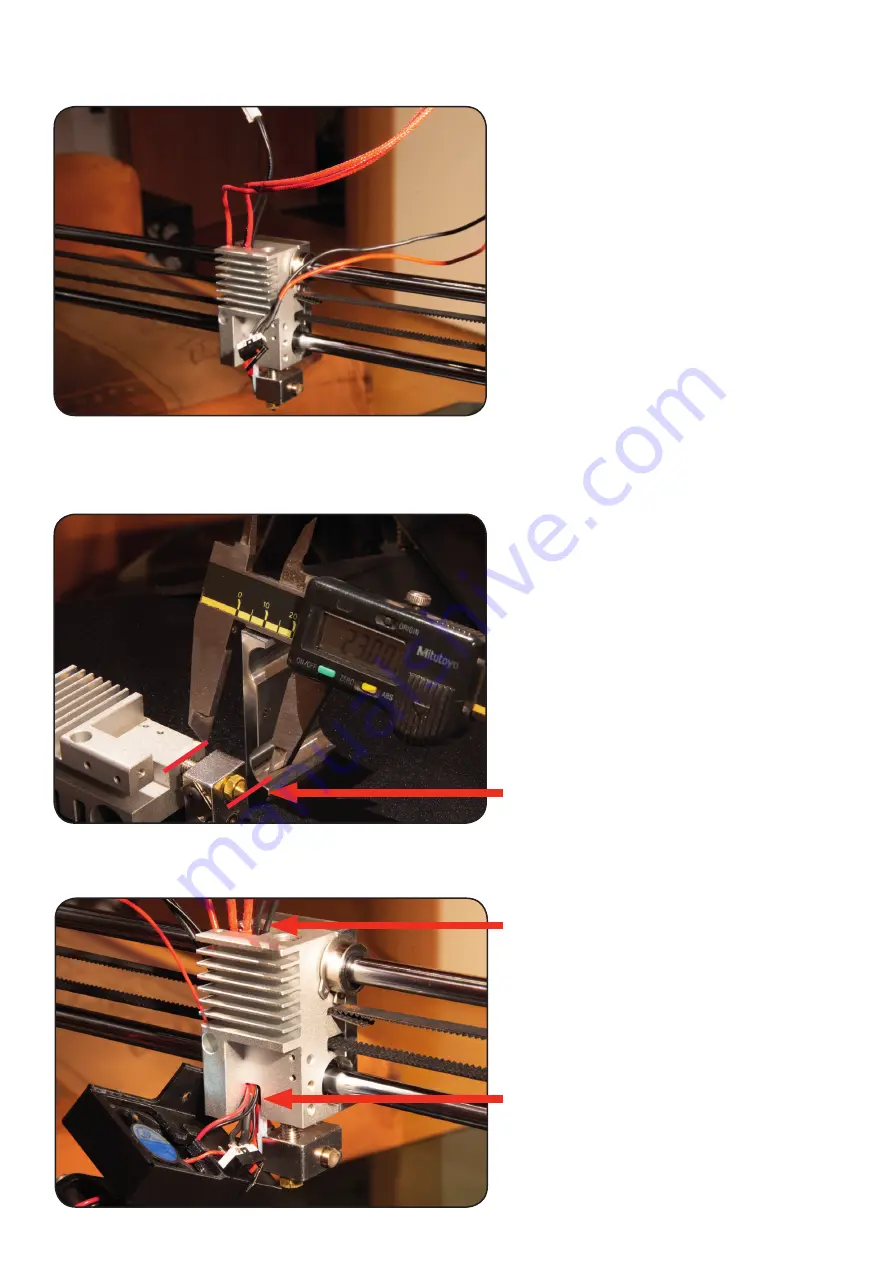
Der Abstand von Kühlkörper zur Spitze 

der Nozzle muss bei 20mm liegen!

The distance from the heat sink to the tip 

of the nozzle must be 20mm.

Führen Sie sorgfältig alle Kabel durch 

die Kerbe am Kühlkörper und legen Sie 

diese nach Oben. Das Kabel des Tem-

peraturfühlers muss unbedingt zuerst 

eingelegt werden!

Carefully pass all cables through the 

notch on the heat sink and insert them 

up. The cable of the temperature sensor 

must be inserted first!

www.inventbox.com

3. Nozzle Abstand einstellen

    Set Nozzle distance

4. Kühler montieren

    Mount radiator

2. Druckkopf demontieren

    Dismantle the printhead

Demontieren Sie vorsichtig sämtliche 

Teile am Druckkopf und entfernen

Sie alle Stecker bis nur noch Endschal-

ter, Heizer und Temperaturfühler übrig 

sind.

Dismount all parts of the printhead and 

remove all plugs until only limit switches,

heaters and temperature sensors are 

over.

Содержание JG Titan MKII

Страница 1: ... the Z axis limit switch and replace it with the 40cm 3 pin female female cable see Fig Führen Sie das Kabel durch die rechte Gehäuseöffnung siehe Abb Feed the cable through the right housing opening see picture Schließen Sie das Gehäuse und montie ren Sie den Z Rahmen Führen Sie das Kabel während der Montage wie abge bildet zur Oberseite Close the housing and mount the frame Guide the cable to th...

Страница 2: ...rough the notch on the heat sink and insert them up The cable of the temperature sensor must be inserted first www inventbox com 3 Nozzle Abstand einstellen Set Nozzle distance 4 Kühler montieren Mount radiator 2 Druckkopf demontieren Dismantle the printhead Demontieren Sie vorsichtig sämtliche Teile am Druckkopf und entfernen Sie alle Stecker bis nur noch Endschal ter Heizer und Temperaturfühler ...

Страница 3: ...embly details at www inventbox com Wichtige Infos zum Extruder Information about the extruder Die Spannmutter A muss korrekt in die Führung eingelegt sein Die Materialzu führung B muss bis ganz knapp an das Kugellager führen Die Schraube E ist extrem problematisch fest zu ziehen Sie müssen diese ganz langsam gegen den Uhrzeigersinn drehen bis Sie das 1ste von 2 klicken des überspringen Gewin des h...

Страница 4: ...TFE tube Make sure that the PTFE tube really goes all the way to the heat break Put the guide on and measure the distance Cut exactly the measured length so that the guide sits flush on the aluminum head Do not use pliers or scissors www inventbox com 6 PTFE Schlauch anpassen Adjust PTFE tube 5 Extruder vorbereiten Prepare extruder Lösen Sie die 3 schwarzen Kreuzschlitz Schrauben und die silberne ...

Страница 5: ...lers zuletzt eingelegt wird Setzen Sie danach den Extruder Deckel auf Lay all cables through the side cover Make sure that the cable of the tempera ture sensor is inserted last Then put the extruder lid on 9 Seitendeckel fixieren Mount side cover Schrauben Sie mit der M2x10mm Schraube den Seitendeckel am Kühlkör per fest Hierzu benötigen Sie evtl einen hochwertigen 1 5mm Inbus Schlüssel da billige...

Страница 6: ...ontieren Mount Extruder flush Please note the information under Extruder regarding the problematic Allen screw Demontieren Sie die Frontplatte des Druckkopfes und setzen Sie die beiden schwarzen ABS Distanzhülsen in die Bohrungen ein Disassemble the front panel of the printhead and insert the two black ABS spacers into the holes Schieben Sie dann den IR Sensor vor sichtig von oben nach unten auf T...

Страница 7: ... Sie den PTFE Schlauch auf die korrekte Länge Benutzen Sie keine Zange oder Schere Das Ende sollte bis knapp an das Kugellager des Extruders reichen Cut the PTFE tube to the correct length Do not use pliers or scissors The end should reach almost to the ball bearing of the extruder PTFE Schlauch evtl etwas anspit zen und in den Extruder schieben Es sollte zwischen Kugellager und PTFE Schlauch ca 1...

Страница 8: ... können Sie die Kabel nach unten schieben Pass the IR sensor cable through the cable channel and connect it to the output of the controller Then you can push the cables down Benutzen Sie ein Stück 1 78mm Fila ment um den alten Extruder in geöffne ter Stellung zu fixieren Schieben Sie es nicht zu weit hinein da es sonst die Zufuhr blockiert Use a piece of 1 78mm filament to fix the old extruder in ...

Страница 9: ... the next step it is important that you align the bed as well as possible parallel to the top of the housing Set all 4 cor ners to the same height Benutzen Sie eine Schieblehre oder etwas ähnliches um die X Achse auf beiden Seiten auf die gleiche Höhe zu schrauben Drehen Sie hierzu langsam an den Spindelkupplungen Use a caliper or something similar to screw the x axis to the same height on both si...

Страница 10: ...t 0 5mm Höhe Jetzt wiederholen Sie dass Homing und die Nozzle sollte nun ca 0 5mm Von der Oberseite ent fernt sein Sollte dies nicht der Fall sein benutzen Sie den kalibrierungsstreifen indem Sie die Nozzle mit Move 0 1mm so lange nach unten oder oben fahren bis der Streifen exakt passt Jetzt stellen Sie den IR Sensor genau so ein dass die LED exakt in dieser Position beginnt zu leuchten Sollten S...

Страница 11: ...case use the calibration strip by moving the nozzle up or down 0 1 mm with Move until the strip fits exactly Now set the IR sensor exactly so that the LED starts to glow in this position If you can not move the nozzle down far enough turn the set screw to the left and re homing Fine adjustment of the IR sensor After printing starts you can go to the Baby Stepping via the More button Use UP and Dow...

Отзывы: