background image

www.inventbox.com

5. Kühler montieren

    Mount radiator

Setzen Sie den Kühler auf und ziehen 

Sie die 2x M2x12mm Schrauben durch 

den Endschalter und die 2x M2x5mm 

auf der Gegenseite fest. 

(Achten Sie auf die Kabelführung!)

Montage Details unter www.inventbox.

com

Put on the cooler and tighten the 2x 

M2x12mm screws through the limit 

switch and the 2x M2x5mm on the oppo-

site side.

(Pay attention to the cable guide!)


Assembly details at www.inventbox.com

!

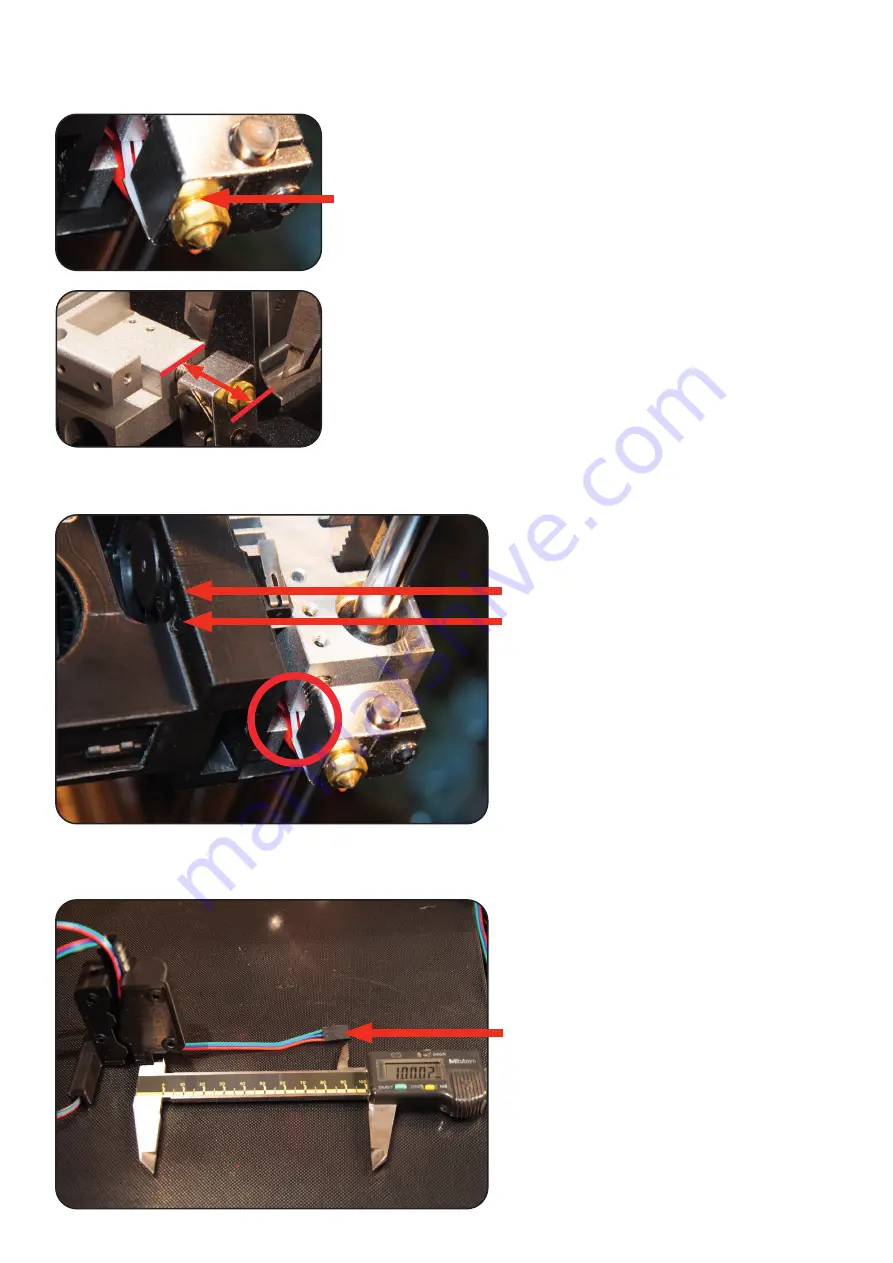
4. Heatblock montieren

    Mount heatblock

Montieren Sie nun den Heatblock und die Nozzle in um-

gekehrter Reheinfolge zu Schritt 1.

 Der Abstand zwischen 

Heatblock und dem Nozzle Gewindeende sollte 1mm sein.

Now mount the heat block and the nozzle in reverse order to 

step 1.

 The distance between the heatblock and the Nozzle 

threaded end should be 1mm.

6. Seitendeckel vorbereiten

    Prepare side cover

Legen Sie das 130cm 3-Pol Kabel mit 

dem Weibchen in den Seitendeckel. 

Das 

Kabel sollte ca. 10cm Herausstehen.


Insert the 130cm 3-pole cable with the 

female into the side cover. 

The cable 

should stand out about 10cm.

Sollten Sie unsere optionale 

Fullmetall Heatbrake (ArtNr.: 

1020-2320)

 oder eine andere Nozzle verwenden, justieren Sie 

das System bitte auf einen 

Abstand von 20mm von Noz-

zle-Spitze zu Unterseite-Kühlkörper.

If you are using our optional 

Full Metal Heatbrake (Art.: 

1020-2320)

 or another Nozzle, please adjust the system to a 

distance of 20mm from Nozzle Tip to Bottom Heat Sink.

Содержание JG Titan MKII V2

Страница 1: ...witch and replace it with the 40cm 3 pin female female cable see Fig Führen Sie das Kabel durch die rechte Gehäuseöffnung siehe Abb Feed the cable through the right housing opening see picture Schließen Sie das Gehäuse und montie ren Sie den Z Rahmen Führen Sie das Kabel während der Montage wie abge bildet zur Oberseite Close the housing and mount the frame Guide the cable to the top during assem ...

Страница 2: ... HD Tube und Heatbrake montieren Mount HD Tube and heatbrake 2 Alte Heatbrake demontieren Dissemble old heatbrake Entfernen Sie die Nozzle im beheiztem Zustand Demontieren Sie anschließend die Heizpatrone und den Temperatursen sor im kalten Zustand Achten Sie hierbei auf Kabelbruch Schrauben Sie nun den Heatblock und die alte Heatbrake ab Vorher seitliche Inbusschrauben lösen Remove the nozzle whe...

Страница 3: ...em Nozzle Gewindeende sollte 1mm sein Now mount the heat block and the nozzle in reverse order to step 1 The distance between the heatblock and the Nozzle threaded end should be 1mm 6 Seitendeckel vorbereiten Prepare side cover Legen Sie das 130cm 3 Pol Kabel mit dem Weibchen in den Seitendeckel Das Kabel sollte ca 10cm Herausstehen Insert the 130cm 3 pole cable with the female into the side cover...

Страница 4: ...sor is inserted last Then place the extruder on the aluminum connector Note that you will have to align the extruder later in a clockwise direction otherwise the aluminum connection piece loosens 8 Extruder montieren Mount extruder Setzen Sie den Extruder Deckel auf Achten Sie auf den korrekten sitz der Stellmutter für die Spannfeder Drehen Sie nun den Extruder im Uhr zeigersinn in die korrekte Po...

Страница 5: ...iden Lüfter sowie den Temperaturfühler Schneiden Sie nun das überschüssige Ende Ab Insert all cables and the PTFE hose into the cable duct and connect the two fans and the temperature sensor Now cut off the excess end 10 Kabel in den Kabelkanal legen Lay the cable in the cable duct 11 PTFE Schlauch kürzen Cut PTFE Tube Schneiden Sie den PTFE Schlauch auf die korrekte Länge Benutzen Sie keine Zange...

Страница 6: ... to bottom Schrauben Sie den IR Sensor mit den 2x M3x12mm Schrauben mit viel Gefühl fest und Verbinden Sie das Kabel wie in der Abbildung Tighten the IR sensor very gently with the 2x M3x12mm screws and connect the cable as shown in the picture 13 IR Sensor montieren Mount IR Sensor 12 Kabel und Bowden fixieren Fix cable and bowden Fixieren Sie den Kabelbaum mit Kabel bindern am Seitendeckel und s...

Страница 7: ...erung An schließen können Sie die Kabel nach unten schieben Pass the IR sensor cable through the cable channel and connect it to the output of the controller Then you can push the cables down Benutzen Sie ein Stück 1 78mm Fila ment um den alten Extruder in geöffne ter Stellung zu fixieren Schieben Sie es nicht zu weit hinein da es sonst die Zufuhr blockiert Use a piece of 1 78mm filament to fix th...

Страница 8: ... the next step it is important that you align the bed as well as possible parallel to the top of the housing Set all 4 cor ners to the same height Benutzen Sie eine Schieblehre oder etwas ähnliches um die X Achse auf beiden Seiten auf die gleiche Höhe zu schrauben Drehen Sie hierzu langsam an den Spindelkupplungen Use a caliper or something similar to screw the x axis to the same height on both si...

Страница 9: ...early defined Z reference value will be possible when moving the X axis 20 Firmware flashen Flash firmware Laden Sie nun auf unserer Webseite unter www inventbox com die neueste Firmware herunter und installieren diese Hilfe zur Installation finden Sie unter anderem auf https jgaurorawiki com Download and install the latest firmware on our website www inventbox com For help with installation visit...

Страница 10: ...bis es möglich ist die Nozzle min 0 5mm an das Druckbett zu fahren 10 Mit move in 0 1mm Schritten Nozzle an den Calibrierungsstreifen fahren bzw 0 5mm zum Druckbett ausrichten 11 IR Sensor nach unter oben stellen bis LED schaltet IR Sensor mit Konsole manuell justieren 1 IR Sensor nach ganz unten stellen 2 G28 Homing durchführen 3 IR Sensor nach ganz oben stellen 4 M211 S0 Z Offset deaktivieren 5 ...

Страница 11: ...stance Repeat steps 2 9 until it is possible to move the nozzle to the print bed by at least 0 5mm 10 Move Nozzle to the calibration strip with 0 1 mm increments or align 0 50mm to the print bed 11 Set IR sensor up down until LED switches Manually adjust IR sensor with console 1 Move the IR sensor to the bottom 2 Perform G28 homing 3 Move the IR sensor to the top 4 M211 S0 disable Z offset 5 Move ...

Отзывы: