Adding or replacing the power supply
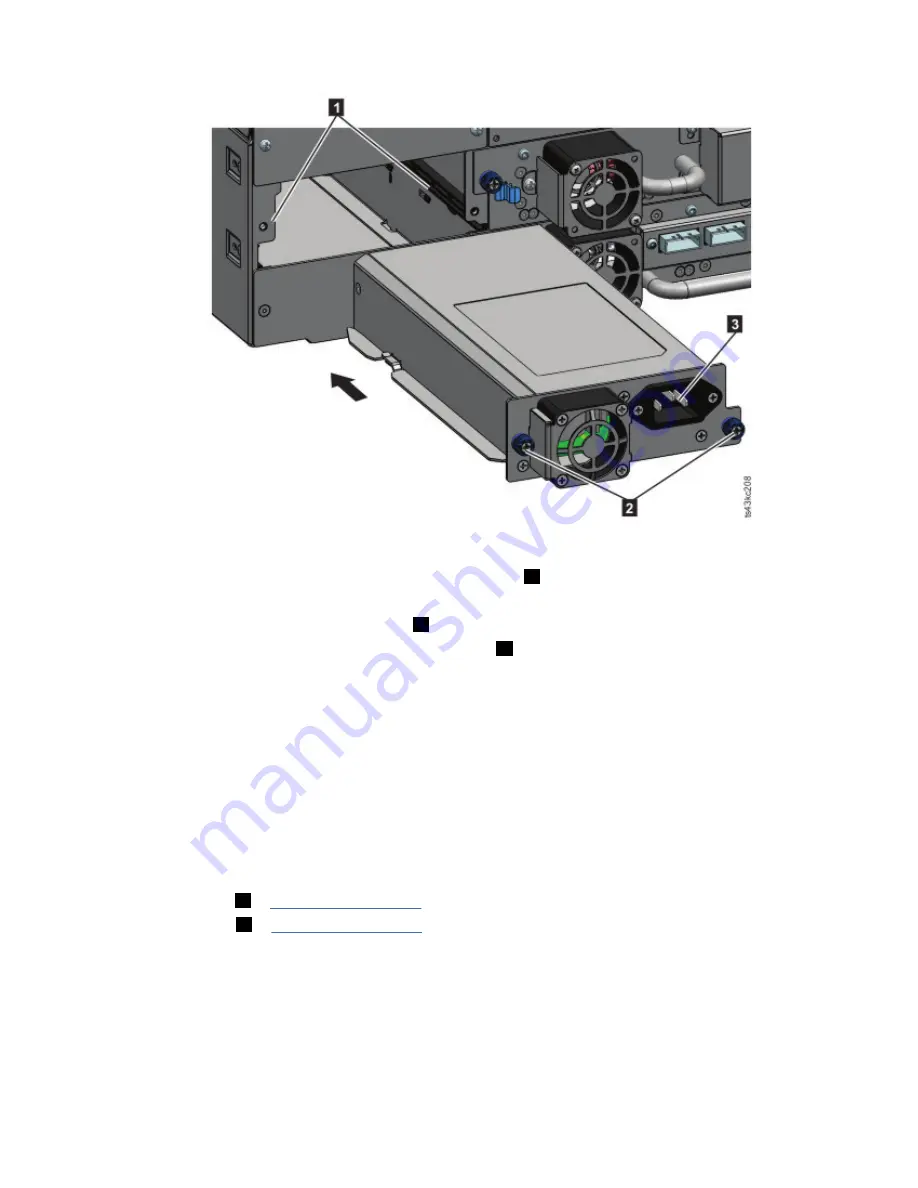
Figure 68. Sliding in the new power supply
1. Position the new power supply onto the alignment rails (
1
).
2. Slide the power supply into the module until it is flush with the back panel of the module.
3. Tighten the blue captive thumbscrews (
2
) with your fingers to secure it to the module.
4. Attach the AC power cord to the new power supply (
3
) and plug the power cord into an outlet.
Installing a secondary power supply
1. Position the secondary power supply onto the alignment rails. Note the positions of the primary versus
the secondary power supplies - top versus middle bay.
2. Slide the power supply into the module until it is flush with the back panel of the module.
3. Tighten the blue captive thumbscrews with your fingers to secure it to the module.
4. Attach the AC power cord to the new secondary power supply.
Verifying the power supply installation and operation
1. Verify that the new power supply is operating properly by checking the power supply LEDs.
• The white (
2
in Figure 67 on page 130) LED is lit.
• The green (
4
in Figure 67 on page 130) LED is unlit.
Note: If a second power supply is installed when the TS4300 is powered on (concurrent MES), the
green LED is lit.
With the Operator Panel or Management GUI, confirm that the power supply is operating correctly. The
event that indicated that the power supply was faulty is cleared.
2. If the UID LEDs are still illuminated, deactivate them by using the Operator Panel or Management GUI.
Chapter 6. Upgrading and servicing 131
Содержание TS4300 3555
Страница 1: ...IBM TS4300 Tape Library Machine Type 3555 User s Guide IBM SC27 4629 07...
Страница 66: ...Chapter 3 Installing 36 IBM TS4300 Tape Library Machine Type 3555 User s Guide...
Страница 77: ...Figure 38 Mounting the rails to the connectors Chapter 3 Installing 47...
Страница 175: ...Figure 81 Unlocked spooling mechanism enlarged view Chapter 6 Upgrading and servicing 145...
Страница 261: ......
Страница 262: ...IBM SC27 4629 07...


