background image

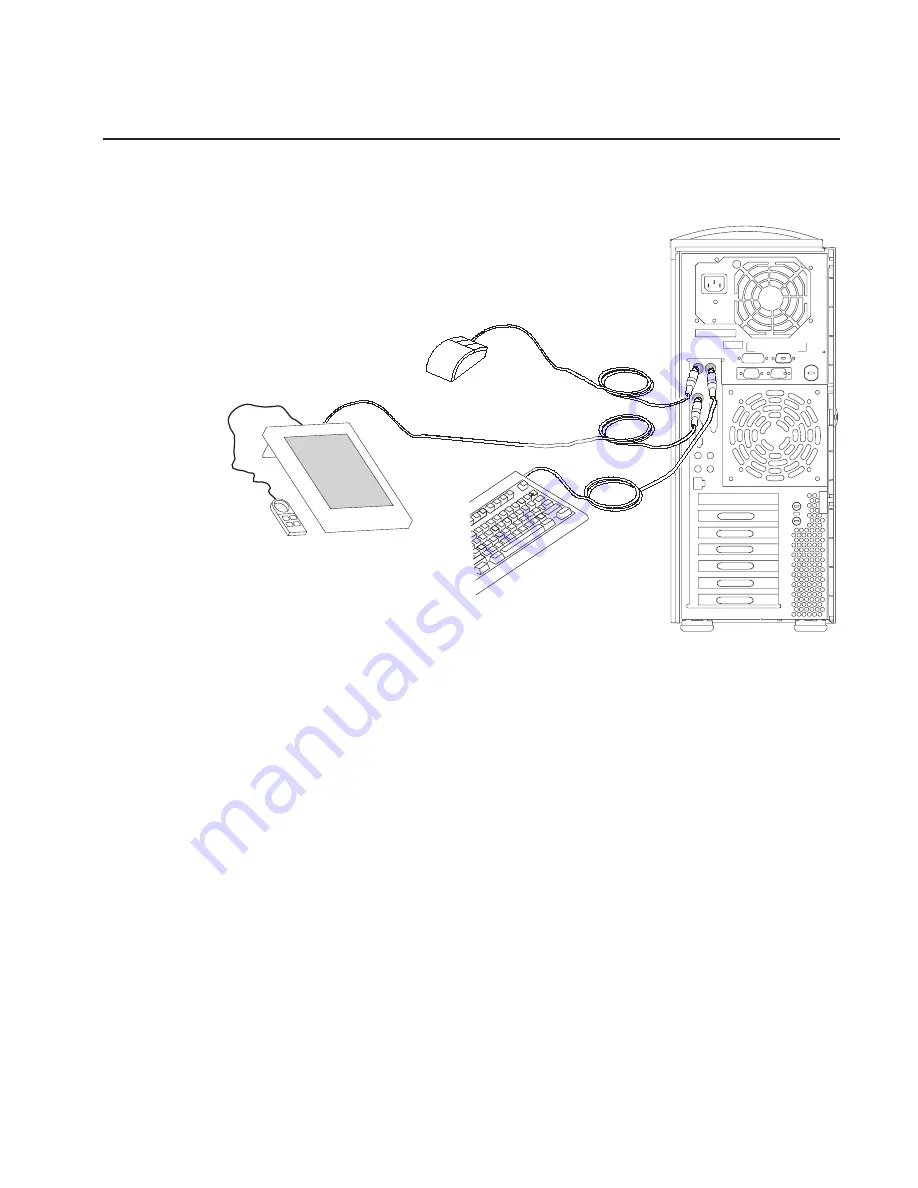
Step 13: Connect the Keyboard, Mouse, and Tablet

If you are using a keyboard, mouse, tablet, or other input device with your system unit,
connect them to the appropriate connectors.

If a wrist/palm rest was included with your keyboard and you want to attach it, refer to
the keyboard documentation for installation instructions.

Chapter 1. Setting Up the RS/6000 44P Series Model 170

9

Содержание RS/6000 44P 170

Страница 1: ...RS 6000 44P Series Model 170 Installation Guide SA38 0561 02 IBM ...

Страница 2: ...pendix B Environmental Notices on page 57 and Appendix C Notices on page 59 International Business Machines Corporation 1999 2000 All rights reserved Note to U S Government Users Documentation related to restricted rights Use duplication or disclosure is subject to the restrictions set forth in the GSA ADP Schedule Contract with IBM Corp ...

Страница 3: ... SCSI Device 6 Step 11 Connect Additional External SCSI Devices 7 Step 12 Connect the Serial and Parallel Devices 8 Step 13 Connect the Keyboard Mouse and Tablet 9 Step 14 Connect the Audio Cables 10 Step 15 Are You Using an Ethernet Connection 11 Step 16 Connect Twisted Pair Ethernet 12 Step 17 Connect Thick Ethernet 13 Step 18 Plug in the Power Cables 15 Step 19 Your System Unit Is Now Set Up 16...

Страница 4: ...ia Drives 45 Removing CD ROM Drives and Tape Drives 45 Installing Media Drives 45 Optional Media Usage 46 Preparing Optional Media 46 Installing Optional Media 48 Installing an Optional Disk Drive 48 Installing an Optional Media Fan Assembly 49 System Firmware Updates 51 Checking the Current Firmware Levels 51 Appendix A Communications Statements 53 Federal Communications Commission FCC Statement ...

Страница 5: ...Device Records 62 SCSI IDs and Bay Locations 63 Appendix E General Attributes Required When Using a TTY Terminal 65 Appendix F 67 Additional Communication Attributes 67 Additional Keyboard Attributes 68 Additional Printer Attributes 68 Index 69 Reader s Comments We d Like to Hear From You 71 Contents v ...

Страница 6: ...vi 44P Series Model 170 Installation Guide ...

Страница 7: ...ltage on metal parts of the system or the devices that attach to the system It is the responsibility of the customer to ensure that the outlet is correctly wired and grounded to prevent an electrical shock Before installing or removing signal cables ensure that the power cables for the system unit and all attached devices are unplugged When adding or removing any additional devices to or from the ...

Страница 8: ... laser products Elsewhere the drive is certified to conform to the requirements of the International Electrotechnical Commission IEC 825 1st edition 1984 and CENELEC EN 60 825 1991 for Class 1 laser products CAUTION A class 3 laser is contained in the device Do not attempt to operate the drive while it is disassembled Do not attempt to open the covers of the drive as it is not serviceable and is t...

Страница 9: ...ages or component failures must verify the accuracy of operations performed and data saved or transmitted by the system at or near the time of the outage or failure In addition users must establish procedures to ensure that there is independent data verification before relying on such data in sensitive or critical operations Users should periodically check the IBM support websites for updated info...

Страница 10: ...x 44P Series Model 170 Installation Guide ...

Страница 11: ...ies Model 170 Service Guide order number SA38 0560 contains reference information maintenance analysis procedures MAPs error codes removal and replacement procedured and a parts catalog v Diagnostic Information for Multiple Bus Systems order number SA38 0509 contains diagnostic information service request numbers SRNs and failing function codes FFCs v The IBM RS 6000 Adapters Devices and Cable Inf...

Страница 12: ...Other company product and service names may be trademarks or service marks of others xii 44P Series Model 170 Installation Guide ...

Страница 13: ...g less than two persons to move it can result in injury 1 Remove the top cover of the system unit carton 2 Lift the system unit out of the carton base Step 1 Check Your Inventory h Books CD ROM other media h About Your Machine document h System unit h Display and system unit power cables 2 h 9 pin to 25 pin serial converters 2 optional hSCSI converter cable optional hASCII terminal optional hKeybo...

Страница 14: ...you encounter difficulties while setting up your system unit contact your sales representative for assistance Step 4 Are All of the Internal Options Installed These instructions are for RS 6000 44P Series Model 170 systems that have internal options such as adapters disk drives or memory upgrades already installed If you have internal options that are not installed go to Chapter 3 Installing Optio...

Страница 15: ...tem unit to cool properly Blocking the air vents can cause overheating which might result in a malfunction or permanent damage to the system unit v Place the system unit in a location where it can safely and easily reach any necessary power outlets and network connections v Displays or ASCII terminals can weigh as much as 35 kg 77 pounds Use caution when lifting or moving the display or ASCII term...

Страница 16: ... an ASCII terminal you must connect it to the serial connector S1 but do not connect it at this time Wait until you reach Step 12 Connect the Serial and Parallel Devices on page 8 for instructions Step 8 Attach the Display Cable Toroid If the cable for your display does not include a toroid locate the toroid shipped with your system unit and follow the installation instructions included with the t...

Страница 17: ...e Adapter Cables If you are using any optional adapters such as Token Ring or 8 port EIA 232 connect the cables to the appropriate connectors in slots 1 through 6 Chapter 1 Setting Up the RS 6000 44P Series Model 170 5 ...

Страница 18: ...directly to the system unit 2 Connect the other end of the SCSI converter cable to one end of the SCSI device cable 3 Connect the other end of the SCSI device cable to the SCSI device 4 Connect the SCSI device terminator if this is the last device to be connected The last device on a SCSI bus must be terminated Note When a cable is not attached to the SCSI connector on the system unit the connecto...

Страница 19: ...ved the SCSI device terminator 3 Connect the other end of the SCSI cable to the new SCSI device 4 Connect the SCSI device terminator 5 Repeat the above steps for each additional SCSI device you attach 6 Refer to the SCSI device documentation to set the SCSI device address For future reference you can record the address in Appendix D System Records on page 61 Chapter 1 Setting Up the RS 6000 44P Se...

Страница 20: ...serial connector S1 If you have an ASCII terminal you must connect it to the serial connector S1 An additional serial device can be connected to the S2 connector Two 9 to 25 pin serial converters are optional with your system unit to increase serial device compatibility 1 3 2 1 S1 Serial Connector 2 S2 Serial Connector 3 Parallel Connector 8 44P Series Model 170 Installation Guide ...

Страница 21: ... or other input device with your system unit connect them to the appropriate connectors If a wrist palm rest was included with your keyboard and you want to attach it refer to the keyboard documentation for installation instructions Chapter 1 Setting Up the RS 6000 44P Series Model 170 9 ...

Страница 22: ...dio Cables If you are using earphones microphone or audio equipment connect the cables to the appropriate connector 1 2 4 3 1 Audio line in 2 Audio line out 3 Headphone 4 Microphone 10 44P Series Model 170 Installation Guide ...

Страница 23: ...ect the Adapter Cables on page 5 or if you are not using Ethernet go to Step 18 Plug in the Power Cables on page 15 To connect the Ethernet cable first determine which kind you have v For Twisted Pair RJ 45 10 100 Base T go to Step 16 Connect Twisted Pair Ethernet on page 12 v For Thick AUI 10 Base 5 go to Step 17 Connect Thick Ethernet on page 13 Chapter 1 Setting Up the RS 6000 44P Series Model ...

Страница 24: ...le with the IEEE 802 3 Ethernet network 10 Base T 100 Base TX links enabled 1 Connect the twisted pair cable to the twisted pair connector 2 The twisted pair Ethernet cable is now installed go to Step 18 Plug in the Power Cables on page 15 12 44P Series Model 170 Installation Guide ...

Страница 25: ...Step 17 Connect Thick Ethernet 1 Connect your thick Ethernet cable to the thick Ethernet connector Chapter 1 Setting Up the RS 6000 44P Series Model 170 13 ...

Страница 26: ...le to the Ethernet connector by sliding the Ethernet connector toward the large notch 3 The thick Ethernet cable is now installed Go to Step 18 Plug in the Power Cables on page 15 14 44P Series Model 170 Installation Guide ...

Страница 27: ...vices 3 Plug these power cables into electrical outlets CAUTION This product is equipped with a three wire power cable and plug for your safety Use this power cable with a properly grounded electrical outlet to avoid electrical shock 4 Wait for the operator panel to display OK Chapter 1 Setting Up the RS 6000 44P Series Model 170 15 ...

Страница 28: ...witch ensure that the power cord located at the back of the system unit is plugged into a grounded electrical outlet If this does not solve the problem go to the Hardware Problem Determination chapter in the RS 6000 44P Series Model 170 User s Guide order number SA38 0559 If the LED is not glowing and OK is not displayed in the display go to the Using the Stand alone and Online Diagnostics chapter...

Страница 29: ...n See the operator manual for your type of ASCII terminal to find the key sequences you need to respond to the diagnostics 3 If you need more information about diagnostics see Using the Stand alone and Online Diagnostics in the RS 6000 44P Series Model 170 User s Guide order number SA38 0559 Step 2 Loading the Diagnostics 1 Stop all application programs running on the operating system 2 Stop the o...

Страница 30: ...struct you to install wrap plugs to better isolate a problem 4 Select the System Verification option on the Diagnostic Mode Selection menu 5 If you want to run a general checkout of all installed resources select the All Resource option on the Diagnostic Selection menu If you want to check one particular resource select that resource on the Diagnostic Selection menu Step 4 Additional System Verifi...

Страница 31: ...cation Report the SRN if you received one to the service organization To do a normal boot turn off the system unit and wait 30 seconds and then set the power switch of the system unit to On Chapter 2 Verifying the Hardware Operation 19 ...

Страница 32: ...20 44P Series Model 170 Installation Guide ...

Страница 33: ...d When adding or removing any additional devices to or from the system ensure that the power cables for those devices are unplugged before the signal cables are connected If possible disconnect all power cables from the existing system before you add a device Use one hand when possible to connect or disconnect signal cables to prevent a possible shock from touching two surfaces with different elec...

Страница 34: ...istatic bag Before picking it up again touch the antistatic bag and the metal frame of the system unit at the same time v Handle the devices carefully in order to prevent permanent damage Stopping the System Unit Attention When using the shutdown procedure for your system follow the correct shutdown procedure before you stop the system unit Failure to do so can result in the loss of data 1 At a co...

Страница 35: ... described in Stopping the System Unit on page 22 2 Unplug the power cable 3 Turn the key lock on the rear cover of the system unit to the unlocked position 4 Place your index finger behind the left cover detent located toward the rear of the system unit Keylock Shown in the unlocked position Keylock Shown in the unlocked position Chapter 3 Installing Options for the RS 6000 44P Series Model 170 2...

Страница 36: ...ut away from the rear of the system unit then slide the cover toward the front of the machine This action releases the slide tabs that hold the cover to the chassis Cover Detent Cover Detent 24 44P Series Model 170 Installation Guide ...

Страница 37: ... into place ensuring that the remaining slide tabs are aligned and inserted 3 Slide the cover toward the rear of the chassis ensuring that the cover lays flat against the chassis The detent latches the cover keeping it from sliding toward the front of the machine 4 Rotate the keylock located on the back of the system into the locked position Chapter 3 Installing Options for the RS 6000 44P Series ...

Страница 38: ...nit on page 22 2 Unplug the system unit power cable from the electrical outlet 3 Remove the left side cover as described in Removing the Left Side Cover on page 23 4 Remove the screw securing the cover support bridge 5 Pivot the cover support bridge out from front to back and then remove from the system unit Replacing the Cover Support Bridge To replace the cover support bridge perform the removal...

Страница 39: ...ry connector is polarized do not attempt to reverse polarity Dispose of the battery according to local regulations Removing the Battery 1 Shut down the system unit as described in Stopping the System Unit on page 22 2 Unplug the power cable 3 Remove the left side cover as described in Removing the Left Side Cover on page 23 Note To prevent damage to your machine you can lay it on its side Do not k...

Страница 40: ... battery mount is damaged or removed System customizations such as passwords and time and date settings may be lost when the battery is removed Replacing the Battery Note If possible use a cloth or tissue to handle the new battery Body oils can cause early battery failure 1 Ensure that the battery polarity is correct With the positive side of the battery facing the memory module connectors insert ...

Страница 41: ...ed cables 8 Turn on the power 9 You may have to enter SMS to restore the bootlist in order to boot AIX The bootlist command may need to be run while you are logged in as root user This restores the custom bootlist and allows the option of Select Software under multiboot to start the operating system IP Internet Protocol parameters may also need to be rebuilt Refer to your AIX documentation for ins...

Страница 42: ...a Fan Assembly see page 49 v Performing System Firmware Updates see page 51 Memory Modules Before performing these procedures read Safety Notices on page vii Use the following steps when removing or installing memory modules Removing Memory Modules Note Memory modules are located on the system board You can want to lay the machine on its side for easier access to the modules 1 Shut down the system...

Страница 43: ... connector 8 Finish this procedure by pulling the card out of the connector and system unit Memory Modules Pair A Connector Locations Memory Modules Pair A Connector Locations Memory Modules Pair B Connector Locations Memory Modules Pair B Connector Locations J10 J2 J9 J1 J1 Pair A DIMM1 Pair B DIMM1 Pair A DIMM2 Pair B DIMM2 J9 J2 J10 Chapter 3 Installing Options for the RS 6000 44P Series Model ...

Страница 44: ...air and slots J9 and J10 are a pair Refer to the illustration in step 6 on page 31 2 If you are replacing one DIMM of a pair be sure to use the same FRU part number as the good DIMM If this is not possible replace the pair with a matched pair Push Locking Tabs Out to Release Memory Module 1 2 1 32 44P Series Model 170 Installation Guide ...

Страница 45: ...odule connector move back into the locked position 5 Ensure that the locking tabs are in the secure position Tabs are in the secure position when they are parallel to the side of the connector 6 If you have additional options to install refer to Option List on page 30 for the appropriate page number and skip to that section Otherwise continue with these steps 7 Replace the cover support bridge as ...

Страница 46: ...r to System Firmware Updates on page 51 1 Shut down the system as described in Stopping the System Unit on page 22 2 Unplug the power cable 3 Remove the left side cover described in Removing the Left Side Cover on page 23 4 Remove the cover support bridge as described in Removing the Cover Support Bridge on page 26 5 Unplug the power connector P11 from the processor card connector J8 6 Pull up on ...

Страница 47: ...stic handle to insert the processor card into the card connector Note Do not press on the snap buttons or voltage regulator while inserting the card into the connector 4 After the processor card is correctly seated into the connector press the snap buttons into their locking position The snap buttons make a clicking sound when securely fastened 5 Plug the power cable P11 into the processor card co...

Страница 48: ... the left side cover as described in Removing the Left Side Cover on page 23 4 Record the slot number and location of the adapter being removed Note Adapter slots are numbered from top to bottom one through six on the rear of the system unit Refer to Handling Static Sensitive Devices on page 21 for instructions on handling static sensitive devices 5 Label and disconnect all cables attached to the ...

Страница 49: ...step 8 on page 38 If you are not replace the expansion slot cover and screw if available 12 Replace the PCI shield with the pull tabs facing inside the system unit 13 If you have additional options to install refer to Option List on page 30 for the appropriate page number and skip to that section Otherwise continue with these steps Card Retention Bar Lever in the Opened Position Card Retention Bar...

Страница 50: ...ngth adapters then retract the adapter retention bar which is built into the lower front fan housing Refer to the illustration on page 37 8 Carefully grasp the adapter by the edges and align the adapter with the expansion slot connector 9 Press the adapter firmly into the expansion slot connector 10 Use the screw you removed earlier from the expansion slot cover to secure the adapter bracket to th...

Страница 51: ...ar Lever in the Opened Position Card Retention Bar Lever in the Opened Position Retention Bar Lever Retaining Clip Retention Bar Lever Retaining Clip Chapter 3 Installing Options for the RS 6000 44P Series Model 170 39 ...

Страница 52: ...nstallation and service than at any other time A fall of as little as 25 inch bumping or rough handling can cause latent failures v Media drives are particularly sensitive to electrostatic discharge Follow the electrostatic handling procedures before handling the media drive Refer to Handling Static Sensitive Devices on page 21 v Refer to the documentation provided with your drive to determine if ...

Страница 53: ...g 1 Log in as root user 2 Enter the smit command 3 Select Devices 4 Determine the type of disk drive you want to configure Select that type of drive from the menu 5 Select Add a drive type where drive type is the type of drive you are configuring 6 A list provides various models of the drive type you selected Select the specific type of drive you are adding Drive Unconfiguring 1 Log in as root use...

Страница 54: ... on page 23 5 Remove the cover support bridge as described in Removing the Cover Support Bridge on page 26 6 Locate the disk drive cage as shown in the following illustration 7 Disconnect the power and SCSI cables from the disk drives 8 Remove the retaining screw that secures the disk drive cage to the chassis 9 Remove the disk drive cage and disk drive s as a unit 10 Remove the four screws that s...

Страница 55: ...setting the SCSI address Refer to SCSI IDs and Bay Component Locations in the RS 6000 44P Series Model 170 Service Guide order number SA38 0560 for more information on SCSI addresses in your system unit 1 Follow steps 2 through 7 of Disk Drives on page 42 2 Remove or put any termination jumpers in the inactive position 3 With one hand touch any metal surface of the chassis to minimize static elect...

Страница 56: ...k drive into the disk drive carrier 7 Install the disk drive cage back into the system unit 8 Install the previously removed disk drive cage retaining screw 9 Reconnect all disk drive cables 10 If you have additional options to install refer to Option List on page 30 for the appropriate page number and skip to that section Otherwise continue with these steps 11 Replace the cover support bridge See...

Страница 57: ... the front of the system 7 Disconnect the power and data cables from the drive you are removing 8 If you are removing the upper CD ROM drive disconnect the audio cable from the rear of the CD ROM drive Installing Media Drives 1 The CD ROM drives and Tape drives are designed to have the cables connected and disconnected from the front of the system v Set the SCSI address jumpers at the rear of the ...

Страница 58: ...r and skip to that section Otherwise continue with these steps 7 Replace the left side cover as described in Replacing the Left Side Cover on page 25 8 Reconnect the power cable 9 Turn on the power Optional Media Usage The optional media bay can be used for media such as tape drives CD ROM drives or for a hard disk drive If you are installing a hard drive you will need the optional disk drive carr...

Страница 59: ...lling optional media go to Installing Optional Media on page 48 10 If you are installing optional DASD go to Installing an Optional Disk Drive on page 48 Optional Media Device Customer Purchased Option Optional Media Device Customer Purchased Option Bezel Blank Bezel Blank Chassis Blank Chassis Blank Optional Disk Drive Carrier Customer Purchased Option Optional Disk Drive Carrier Customer Purchas...

Страница 60: ... Be careful not to damage or unplug the media device cables while performing this procedure 3 Replace all removed screws 4 If you are installing an additional disk drive skip to Installing an Optional Disk Drive If not continue with these steps 5 Replace the air duct 6 Replace the side cover Installing an Optional Disk Drive Note If you have not already done so read Optional Media Usage on page 46...

Страница 61: ...do not remove the screws holding the existing air duct to the media bays see steps 1 through 5 of Removing CD ROM Drives and Tape Drives on page 45 Note Loosen the screws only enough to enable the air duct to slide forward to remove it 5 Remove the air duct located between the power supply and media bay 6 Discard the old air duct 7 If you are installing a new disk drive in the optional media bay d...

Страница 62: ...onal media fan assembly to the optional media bays 16 Replace the DASD cage removed in 9 on page 49 See steps 14 through 17 of Installing Disk Drives on page 43 17 Replace the left side cover as described in Replacing the Left Side Cover on page 25 18 Reconnect all cables 19 Turn on the power 50 44P Series Model 170 Installation Guide ...

Страница 63: ...s the last two digits of the year and yyy is the Julian date of the update file 4 After the update file has been written to the tmp fwupdate directory enter the following commands cd usr bin lpp diagnostics bin then update_flash f tmp fwupdate sxyyddd img Notes a Make sure that you include the periods in the commands shown above b AIX commands are case sensitive Type them exactly as shown You are ...

Страница 64: ...e is SPH00056 the last five characters of the ROM Level represent a date in a yyddd format where yy is the last two digits of the year and ddd is the Gregorian date of the firmware Check the RS 6000 support web site at http www rs6000 ibm com support micro for the latest level of downloadable firmware and update instructions If the version of system firmware installed on your system is newer than ...

Страница 65: ...e user is encouraged to try to correct the interference by one or more of the following measures v Reorient or relocate the receiving antenna v Increase the separation between the equipment and receiver v Connect the equipment into an outlet on a circuit different from that to which the receiver is connected v Consult an authorized dealer or service representative for help Properly shielded and gr...

Страница 66: ...inst interference with licensed communication devices International Electrotechnical Commission IEC Statement This product has been designed and built to comply with IEC Standard 950 United Kingdom Telecommunications Safety Requirements This equipment is manufactured to the International Safety Standard EN60950 and as such is approved in the UK under the General Approval Number NS G 1234 J 100003 ...

Страница 67: ...t and conforms to the standards set by the Voluntary Control Council for Interference by Information Technology Equipment VCCI This product is aimed to be used in a domestic environment When used near a radio or TV receiver it may becaome the cause of radio interference Read the instructions for correct handling Radio Protection for Germany Dieses Gerät ist berechtigt in Übereinstimmung mit dem de...

Страница 68: ...56 44P Series Model 170 Installation Guide ...

Страница 69: ...shed a collection process for reuse recycling or proper disposal of used sealed lead acid nickel cadmium and nickel metal hydride batteries and battery packs from IBM equipment For information on proper disposal of the nickel cadmium batteries in this product please contact IBM at 1 800 426 4333 For information on battery disposal outside the United States contact your local waste disposal facilit...

Страница 70: ...58 44P Series Model 170 Installation Guide ...

Страница 71: ...ountry where such provisions are inconsistent with local law THIS MANUAL IS PROVIDED AS IS WITHOUT WARRANTY OF ANY KIND EITHER EXPRESSED OR IMPLIED INCLUDING BUT NOT LIMITED TO THE IMPLIED WARRANTIES OF NON INFRINGEMENT MERCHANTABILITY OR FITNESS FOR A PARTICULAR PURPOSE Some states do not allow disclaimer of express or implied warranties in certain transactions therefore this statement may not ap...

Страница 72: ...60 44P Series Model 170 Installation Guide ...

Страница 73: ...n information Identification Numbers Record and retain the following information Product Name 44P Series Model 170 Serial Number Key Serial Number The system unit s identification numbers are located on the back of the machine as shown in the following illustration Serial Number Location 61 ...

Страница 74: ...Options Location Option Description Memory J1 J2 128MB h 256MB h 512MB h Memory J9 J10 128MB h 256MB h 512MB h Mouse Connector IBM Mouse h Other ____________________________ Keyboard Connector Space Saving h Enhanced h Other ______________ Expansion Slot 6 Expansion Slot 5 Expansion Slot 4 Expansion Slot 3 Expansion Slot 2 Expansion Slot 1 Parallel Port Serial Port 1 Serial Port 2 External SCSI Et...

Страница 75: ...Table 2 v Your model might have more preinstalled drives than are shown in this table Table 2 Internal Files and Devices Adapter Location SCSI ID Drive Description Integrated Bay 1 SCSI ID 1 CD ROM Drive Integrated Bay 2 SCSI ID 2 Media Device Integrated Bay 3 Non SCSI Diskette Drive Integrated Bay 4 SCSI ID 4 Disk Drive Integrated Bay 5 SCSI ID 5 Disk Drive Integrated Bay 6 SCSI ID 6 Disk Drive 1...

Страница 76: ...64 44P Series Model 170 Installation Guide ...

Страница 77: ...ibute descriptions with those of your terminal and set your attributes accordingly Generated Code Set ASCII Screen Normal Normal Uses the EIA 232 interface protocol Row and Column 24 x 80 24 x 80 Uses the EIA 232 interface protocol Scroll Jump Jump Jump When the last character on the bottom line is entered the screen moves down one line Auto LF Off Off Off For the On setting pressing the Return ke...

Страница 78: ...line in the page Forcing insert Off Off Tab Field Field Field The column tab stops are ignored and the tab operation depends on the field attribute character positions Trace All Both inbound data data to the system unit and outbound data data from the system unit to and from the main port can be transferred to the auxiliary port without disturbing communications with the system unit when the Trace...

Страница 79: ...y No No No Does not add a parity bit and is used together with the word length attribute to form the 8 bit data word byte Stop bit 1 1 1 Places a bit after a data word byte Turnaround character CR CR CR Selects the carriage return CR character as the line turnaround character Interface EIA 232 EIA 232 EIA 232 Uses the EIA 232 interface protocol Line control IPRTS IPRTS IPRTS Uses the permanent req...

Страница 80: ...ge The contents of the current page are sent to the system unit when the Send key is pressed Insert character Space Space Space A blank character is inserted when the Insert key is pressed Additional Printer Attributes The following printer attributes are for a printer attached to the 3151 3161 and 3164 terminals Printer Setup Attributes 3151 11 31 41 Settings 3151 51 61 Settings 3161 3164 Setting...

Страница 81: ...ii M media drives 45 optional media usage 46 removal and replacement 45 memory modules 30 memory modules 30 continued DIMMs 30 removal and replacement 30 N notices vii viii laser compliance statement viii safety notices vii O online publications xi option list 30 options 30 P preface xi processor card 34 removal and replacement 34 product disposal 57 publications online xi publications related xi ...

Страница 82: ...22 system verification procedure 17 T telephone line requirements for the United Kingdom vii trademarks xi TTY terminal attributes required for diagnostics general 65 U United Kingdom s telephone line requirements vii unpacking the system unit 1 using system verification procedure 17 70 44P Series Model 170 Installation Guide ...

Страница 83: ...ion in this book is Very Satisfied Satisfied Neutral Dissatisfied Very Dissatisfied Accurate h h h h h Complete h h h h h Easy to find h h h h h Easy to understand h h h h h Well organized h h h h h Applicable to your tasks h h h h h Please tell us how we can improve this book Thank you for your response May we contact you h Yes h No When you send comments to us you grant us a nonexclusive right t...

Страница 84: ...d and Tape Information Development Department H6DS 9561 11400 Burnet Road Austin TX 78758 3493 Cut or Fold Along Line Cut or Fold Along Line BUSINESS REPLY MAIL NO POSTAGE NECESSARY IF MAILED IN THE UNITED STATES POSTAGE WILL BE PAID BY ADDRESSEE 72 44P Series Model 170 Installation Guide ...

Страница 85: ......

Страница 86: ...IBMR Part Number 09P1528 Printed in the United States of America on recycled paper containing 10 recovered post consumer fiber October 2000 SA38 0561 02 1P P N 09P1528 ...

Отзывы: