background image

Argecy Computer Corporation 248-324-1800

43

b

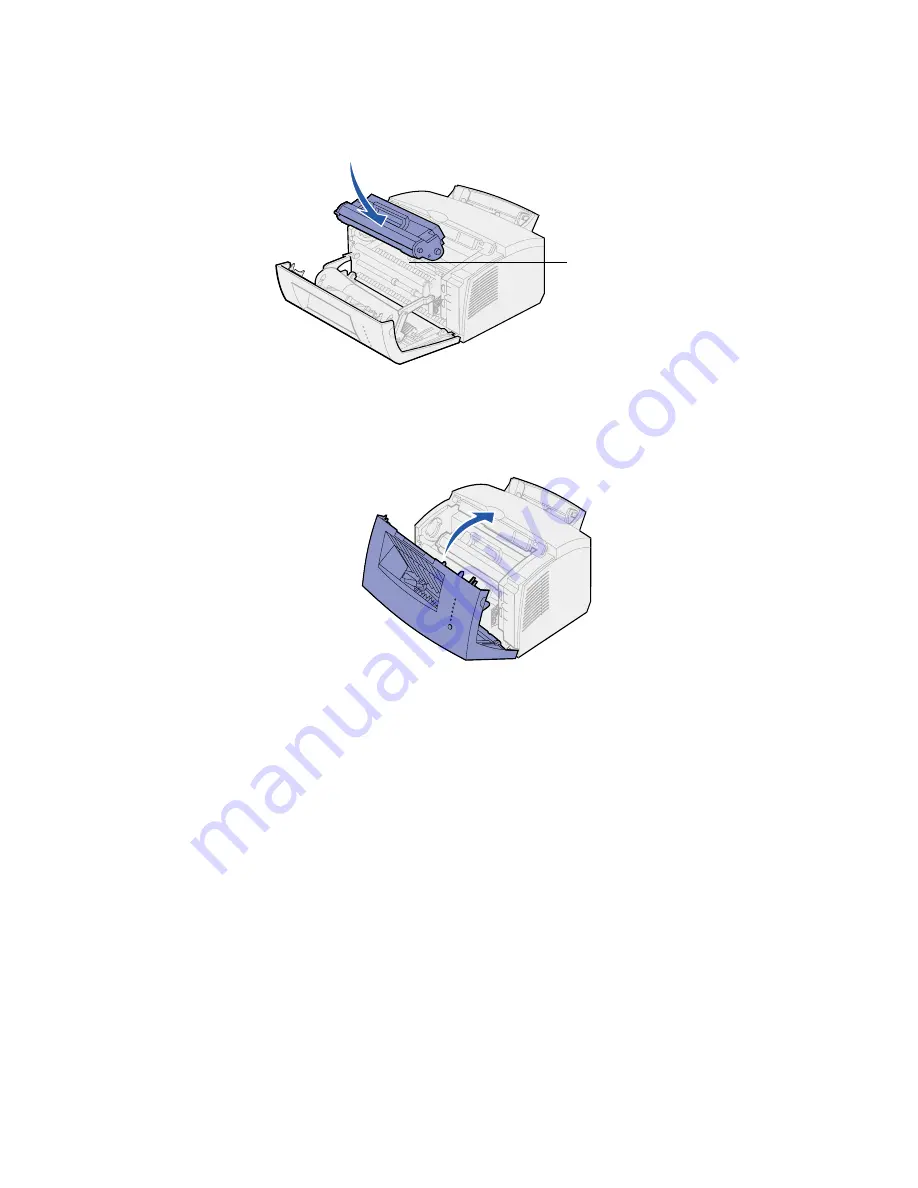
Holding the handle, tilt the cartridge down and guide it between the print cartridge 
grooves. 

c

Push down on the cartridge until it is firmly in place.

CAUTION:

Avoid touching the fuser, it may be hot!

5

Close the printer cover.

To get the maximum benefit from your print cartridge:

Do not remove the print cartridge from its packaging until you are ready to install it.

Store print cartridges in the same environment as the printer.

Do not remove the print cartridge from the printer except to replace it or to clear a paper jam.

Fuser

Содержание INFOPRINT 1116

Страница 1: ...Argecy Computer Corporation 248 324 1800 Infoprint 1116 User s Reference S510 2166 00...

Страница 2: ...Argecy Computer Corporation 248 324 1800...

Страница 3: ...Argecy Computer Corporation 248 324 1800 Infoprint 1116 User s Reference S510 2166 00...

Страница 4: ...Argecy Computer Corporation 248 324 1800...

Страница 5: ...rom a Macintosh computer 9 Chapter 4 Setting up a print job 10 Printing from a Windows environment 10 Printing from a Macintosh computer 12 Chapter 5 Choosing the right print media 13 Chapter 6 Printe...

Страница 6: ...ing the old print cartridge 41 Installing the new print cartridge 42 Chapter 15 Clearing jams 44 Chapter 16 Understanding the operator panel lights 49 Chapter 17 Solving print quality problems 70 Rese...

Страница 7: ...Corporation 248 324 1800 iii Notices 107 Edition notice 107 Trademarks 107 Safety information 108 Cautions and warnings 108 Electronic emission notices 109 German acoustics statement 110 Laser notice...

Страница 8: ...Argecy Computer Corporation 248 324 1800 iv...

Страница 9: ...approximately one second to restart the printer or display an error code Press the operator panel with a long button press hold until all the lights come on to reset the printer or to select a setting...

Страница 10: ...pport Support media in the top output bin Manual feed Load a single sheet of paper other media Use for transparencies labels envelopes and card stock Paper guides Adjust the width of the media in tray...

Страница 11: ...s data Ready Data light is blinking is busy receiving or processing data Toner Low light is on alerts you the toner is getting low Load Paper light is on prompts you to load media in tray 1 manual fee...

Страница 12: ...dicate different printer conditions such as printer status or the printer requires attention for example out of paper or the printer requires servicing For a complete list of light messages see Unders...

Страница 13: ...2 Double click the My Computer icon 3 Double click the Printer icon A list of available printers appears 4 Double click the printer you are using to print the job A list of print jobs appears 5 Select...

Страница 14: ...terhead paper and an envelope 1 Load letterhead with the top of the page pointing down facing you in tray 1 2 From your software application open the file you want to print 3 From the File menu select...

Страница 15: ...Print Setup box click Properties Options or Setup depending on the application and select the size envelope you want from the Paper Type setting 4 Change Orientation to Landscape 5 In the Print dialog...

Страница 16: ...ify the correct printer is selected in the dialog box 5 Select Letterhead from Paper and then click OK 6 Click Print from the File menu to send the job to print Now print the envelope 1 Load an envelo...

Страница 17: ...e from 75 to 105 g m2 20 to 28 lb bond paper To reduce paper jams do not use envelopes that Have excessive curl Are stuck together Are damaged in any way Contain windows holes perforations cutouts or...

Страница 18: ...s Manual feed 1 sheet Envelopes Minimum 3 875 x 8 875 in 98 mm x 225 mm Maximum 8 5 x 14 in 216 mm x 356 mm 16 43 lb 60 163 g m2 Tray 1 10 envelopes Manual feed 1 envelope Labels Minimum 3 875 x 5 9 i...

Страница 19: ...s Use the manual feed for a single piece of paper transparency envelope label or index card An exit output bin on top of the printer holds up to 100 sheets The single sheet front output door provides...

Страница 20: ...Argecy Computer Corporation 248 324 1800 16 To increase paper capacity you can purchase the optional tray 2 which holds up to 250 sheets of paper...

Страница 21: ...Argecy Computer Corporation 248 324 1800 17 7 Loading paper In tray 1 1 Extend the rear paper support until you hear a click 2 Flex the sheets back and forth to loosen them then fan them...

Страница 22: ...insert letterhead with the top of the page pointing down facing you Note Preprinted papers such as letterhead must be able to withstand temperatures up to 200 C 392 F without melting or releasing haz...

Страница 23: ...front paper support 6 Select the paper size and type from your software application 7 Start your print job In the manual feed Use the manual feed to print one sheet of paper at a time 1 Extend the fro...

Страница 24: ...lect the paper size and type from your software application 5 Start your print job 6 Briefly approximately one second push the operator panel button to start printing 7 When the Load Paper light blink...

Страница 25: ...the optional tray 2 1 Grasp the tabs on either side of the tray and pull it completely out of the printer 2 Before loading paper push down on the metal plate until it locks into place 3 If loading A4...

Страница 26: ...paper insert letterhead face down with the top of the page entering the printer first 6 Do not exceed the stack height indicator overfilling the tray may cause paper jams 7 Make sure the paper is und...

Страница 27: ...ration 248 324 1800 23 9 Reinstall the tray firmly into the printer If the tray is not pushed all the way in the paper may not feed properly 10 Select the paper size from your software application 11...

Страница 28: ...ansparencies When printing on transparencies use transparencies designed for laser printers In tray 1 1 Extend the rear paper support until you hear a click 2 To reduce curling or potential jams open...

Страница 29: ...10 transparencies with the side you want to print on facing you Note Transparencies must be able to withstand temperatures of 200 C 392 F without melting or releasing hazardous emissions 5 Slide the...

Страница 30: ...e curling or potential jams open the front output door for a straight through paper path 2 Slide the paper guides flush against the edges of the transparency 3 Select the paper size and type from your...

Страница 31: ...ter Corporation 248 324 1800 27 6 When the Load Paper light blinks and the Press Button light comes on place another transparency in the manual feed 7 Push the operator panel button to print another t...

Страница 32: ...00 28 9 Loading envelopes Load up to 10 envelopes in tray 1 or load envelopes one at a time in the manual feed In tray 1 1 Extend the rear paper support until you hear a click 2 Open the front output...

Страница 33: ...200 C 392 F without sealing excessive curling wrinkling or releasing hazardous emissions 4 Select the paper type from your software application 5 Start your print job In the manual feed Use the manua...

Страница 34: ...velope 3 Select the paper size and type from your software application 4 Start your print job 5 Briefly approximately one second push the operator panel button to start printing 6 When the Load Paper...

Страница 35: ...bels designed for laser printers You can load labels one at a time from the manual feed or you can load up to 10 sheets of labels in tray 1 In tray 1 1 Extend the rear paper support until you hear a c...

Страница 36: ...l sheets with the side you want to print on facing you Note Use labels with a pressure of 25 psi that can withstand temperatures of 200 C 392 F without releasing hazardous emissions 5 Slide the paper...

Страница 37: ...If you experience problems feeding labels in tray 1 try printing one sheet at a time from the manual feed 1 Extend the front paper support on the paper output bin until you hear a click 2 Open the fro...

Страница 38: ...ze and type from your software application 6 Start your print job 7 Briefly approximately one second push the operator panel button to start printing 8 When the Load Paper light blinks and the Press B...

Страница 39: ...k or one index card at a time in the manual feeder In tray 1 1 Extend the rear paper support until you hear a click 2 For best results open the front output door for a straight through paper path 3 Lo...

Страница 40: ...pplication 6 Start your print job In the manual feed Use the manual feed to print one sheet of card stock or one index card at a time If you experience problems feeding index cards in tray 1 try print...

Страница 41: ...nd type from your software application 5 Start your print job 6 Briefly approximately one second push the operator panel button to start printing 7 When the Load Paper light blinks and the Press Butto...

Страница 42: ...Button light blinks Follow the instructions from your driver s pop up menu to print the corresponding back side to each page Although you can use tray 1 or the optional tray 2 to print the first side...

Страница 43: ...Argecy Computer Corporation 248 324 1800 39 Short Edge means the pages are bound along the short edge of the page Back of sheet Front of sheet Back of sheet Front of sheet Landscape Portrait...

Страница 44: ...nting costs When printing drafts conserve toner by changing the Print Darkness setting in your printer driver The settings range from Very Light to Very Dark Selecting the Light setting conserves tone...

Страница 45: ...the print cartridge is getting low on toner Note On the entry model the Toner Low light does not come on if the standard 1 500 page print cartridge is installed Removing the print cartridge and shaki...

Страница 46: ...ty Print quality and printer reliability cannot be guaranteed if you do Installing the new print cartridge 1 Take the new print cartridge out of the bag 2 Pull off the plastic piece attached to the en...

Страница 47: ...in place CAUTION Avoid touching the fuser it may be hot 5 Close the printer cover To get the maximum benefit from your print cartridge Do not remove the print cartridge from its packaging until you ar...

Страница 48: ...jams in the printer the Paper Jam light prompts you to clear the paper path If media has just started to feed from tray 1 when the jam occurs 1 Pull the media straight up out of tray 1 2 Press the op...

Страница 49: ...t cartridge from the printer cover it or store it in a clean dark place 3 Gently pull out the media CAUTION Avoid touching the fuser it may be hot 4 If the media is jammed tightly behind the roller or...

Страница 50: ...anel button and print 10 or more menu settings pages The paper removes any remaining adhesive in or on the fuser Note Serious damage to your printer may occur if adhesive labels remain in the fuser Ca...

Страница 51: ...the jam 4 Align the printer with the front of the support unit and place it on top of the support unit 5 Turn on the printer and resend your print job If the jam occurs just after the paper feeds fro...

Страница 52: ...Argecy Computer Corporation 248 324 1800 48 3 Reinstall the tray and resume printing...

Страница 53: ...ecial function menu press the operator panel with a double button press press and release twice quickly to display additional error codes or to scroll through the Special Function menu settings Press...

Страница 54: ...page 58 Load tray 1 or the optional tray 2 and toner low page 58 Print side two of your duplex print job page 59 Jam page 59 Jam and toner low page 60 Top cover open or print cartridge is not install...

Страница 55: ...memory full page 62 Flash memory full and toner low page 62 Reset user defaults page 75 Solving print quality problems Secondary error code light sequences Ready Data Toner Low Load Paper Paper Jam E...

Страница 56: ...er page 68 Special function menu light sequences Ready Data Toner Low Load Paper Paper Jam Error Press Button Printer condition Go to page Restore factory defaults page 76 Solving print quality proble...

Страница 57: ...sequence means The printer is ready to receive and process data In addition the toner in the print cartridge is getting low What you can do Send a print job Print a test page by pushing the operator...

Страница 58: ...quence means The printer is busy receiving or processing data or printing a test page In addition the toner in the print cartridge is getting low What you can do Remove the print cartridge and shake i...

Страница 59: ...ence means The printer is waiting until a print timeout occurs or until it receives additional data In addition the toner in the print cartridge is getting low What you can do Print data stored in the...

Страница 60: ...quence means The printer is flushing corrupted print data In addition the toner in the print cartridge is getting low What you can do Wait until the operator panel returns to Ready Data to print other...

Страница 61: ...quence means The printer prompts you to load a single sheet of media in the manual feed In addition the toner in the print cartridge is getting low What you can do Load media with the side to be print...

Страница 62: ...come on to reset the printer What this light sequence means The printer is out of media or envelopes or the media did not feed properly In addition the toner in the print cartridge is getting low Wha...

Страница 63: ...do Re insert your print job in tray 1 using the instructions in the driver pop up menu to orient the pages correctly What this light sequence means The printer detects a paper jam What you can do Ope...

Страница 64: ...earing jams for more information Remove the print cartridge and shake it to extend the life of the cartridge Replace the print cartridge Note The Toner Low light does not come on if the standard 1 500...

Страница 65: ...ridge Remove the print cartridge and shake it to extend the life of the cartridge Replace the print cartridge Note The Toner Low light does not come on if the standard 1 500 page print cartridge is in...

Страница 66: ...quence means The printer flash memory is full In addition the toner in the print cartridge is getting low What you can do Print data without saving it in flash memory by pushing the operator panel but...

Страница 67: ...the host computer What you can do From the special function menu press the operator panel button with a double button press to display the specific error What this light sequence means The printer ha...

Страница 68: ...the cartridge Replace the print cartridge What this light sequence means when you press the operator panel button with a double button press from the special function menu The printer memory is full W...

Страница 69: ...set the printer What this light sequence means when you press the operator panel button with a double button press from the special function menu The paper length is too short to print the formatted d...

Страница 70: ...e Cancel the job Push the operator panel button until all the lights come on to reset the printer What this light sequence means when you press the operator panel button with a double button press fro...

Страница 71: ...operator panel button until all the lights come on to reset the printer What this light sequence means when you press the operator panel button with a double button press from the special function me...

Страница 72: ...sequence means when you press the operator panel button with a double button press from the special function menu The printer has an error communicating with the host computer This light sequence is...

Страница 73: ...g is disabled see Parallel port enabled or USB port enabled in Advanced Troubleshooting What this light sequence means when you press the operator panel button with a double button press from the spec...

Страница 74: ...may be getting low on toner 1 Remove the print cartridge 2 Shake it from side to side to redistribute the toner 3 Reinstall it Make sure you are using recommended print media see Media types and sizes...

Страница 75: ...rd 1 500 page print cartridge is installed in the printer Remove the print cartridge and shake it from side to side to redistribute the toner Replace the print cartridge The Toner Low light is on Remo...

Страница 76: ...e print cartridge is installed Make sure the parallel or USB cable is firmly plugged into the connector on the back of the printer Press the operator panel button with a brief button press to print a...

Страница 77: ...Make sure tray 1 is selected from the printer driver Do not overfill the tray The paper fails to feed from the optional tray 2 Make sure the optional tray 2 is selected from the printer driver Make s...

Страница 78: ...ge is installed Make sure the printer top cover is closed While in PostScript Level 2 emulation the printer is flushing data Ready Data and Error indicator lights are blinking Make sure you are using...

Страница 79: ...Using the special function menu Printer settings for solving print quality problems are found in the special function menu restore factory defaults Hex Trace print quality test pages and advanced tro...

Страница 80: ...s solves formatting problems 1 Enter the special function menu 2 Press and release the operator panel button twice quickly double button press until the Toner Low light comes on and the two bottom lig...

Страница 81: ...the operator panel button twice quickly double button press three times until the Paper Jam light comes on and the two bottom lights blink 3 Press the operator panel button with a long button press ho...

Страница 82: ...ghts come on to initiate Print Quality Test Pages Three pages print to help you evaluate print quality The first page has registration marks the second page is gray and the third page is black Once th...

Страница 83: ...the Special Function Menu 1 Turn off the printer 2 Open the top cover 3 Turn the printer back on 4 When the Error light comes on indicating the top cover is open press the operator panel button with a...

Страница 84: ...tom lights blink 7 Press the operator panel until all the lights come on to initiate the advanced troubleshooting mode When the printer is in the advanced troubleshooting mode the operator panel light...

Страница 85: ...factory default If your printer encounters a memory shortage when trying to print a job and you are not using the parallel port turn off Parallel Port Enabled to free up memory Press the operator pane...

Страница 86: ...try and standard models Parallel Protocol is set to Fastbytes the factory default When the protocol is set to Fastbytes the printer receives information at a much faster transmission rate provided the...

Страница 87: ...the factory default This setting determines if the parallel port data is sampled on the leading or trailing edge of strobe If Parallel Mode 2 is set to On the parallel port data is sampled on the lead...

Страница 88: ...ess to scroll to the next menu item USB Port Enabled Turn off the printer to exit the advanced troubleshooting mode USB Port Enabled is set to Auto the factory default The Universal Serial Bus USB cab...

Страница 89: ...to the first menu item PPDS Activated Turn off the printer to exit the advanced troubleshooting mode For standard and network models PPDS Activated is set to Off the factory default Turn PPDS Activate...

Страница 90: ...f Auto CR after LF is Off and Auto LF after CR is Off If the Press Button light is on Auto CR after LF is On and Auto LF after CR is Off If the Press Button light is blinking Auto CR after LF is Off a...

Страница 91: ...ks concurrently For example if a MarkNet XI physically attaches a printer to an Ethernet network then a NetWare client and an AppleTalk user can send print jobs to the printer simultaneously The print...

Страница 92: ...ding agent must be attached to the same IP subnet as the print server Make sure the DHCP server has scope defined for the subnet Ensure that the DHCP server provides the following options If you are u...

Страница 93: ...system For example on many UNIX computers you would type something similar to the following example arp s ether 157 184 8 231 00 04 00 30 00 44 If you need help and are using a UNIX system try the man...

Страница 94: ...8 231 which takes you to the MarkNet resident web page 7 If you have trouble printing from an application the problem might be the way your workstation or application is set up a Try printing from som...

Страница 95: ...model of the printer you want to install and then click Add 9 When the printer appears in the Selected Printers list click Next 10 On the Drivers and Bi Di support tabs modify any settings you want On...

Страница 96: ...he Printer Properties do the following a Click Start Settings Printers b Click File Properties c On the General tab click Print Test Page When a test page prints successfully client setup is complete...

Страница 97: ...hen Add Port 5 Click Network Printer Monitor and then OK 6 Enter the information to create the port a Assign a logical port name This can be any name that reminds you of the printer such as Printer_la...

Страница 98: ...r 7 When the list of software components is offered select all the options you want to install You need to at least select the following Printer Drivers to obtain a custom driver for your printer Netw...

Страница 99: ...operator panel button to print a network setup page and look under the TCP IP heading c Check the option to Set this protocol to be the default protocol d Click OK The new port is assigned to the pri...

Страница 100: ...then double click the host name 3 Right click the shared printer name and then click Install Wait a few minutes for the driver information to be copied from the server computer to the client computer...

Страница 101: ...the client and then click Finish 7 Print a test page to verify printer installation a Click Start Settings Printers b Click File Properties c On the General tab click Print Test Page When a test page...

Страница 102: ...e The Network Printer Utility automatically creates all the necessary NetWare objects print queue objects print server objects and printer objects Do the following from a Windows NT workstation runnin...

Страница 103: ...RPRINTER or in PSERVER How NPRINTER RPRINTER works A MarkNet print server configured in NPRINTER RPRINTER acts as a remote printer This remote printer receives print jobs from a NetWare print server T...

Страница 104: ...et size for data transmitted in SPX is 512 bytes In PSERVER NetWare uses IPX to transfer packets Packet size for data transmitted in IPX is up to 1 Kilobyte for Ethernet and up to 4 Kilobytes for Toke...

Страница 105: ...on the network may be significantly faster using PSERVER In NPRINTER RPRINTER NetWare uses SPX to transfer packets Packet size for data transmitted in SPX is 512 bytes In PSERVER NetWare uses IPX to...

Страница 106: ...ry printing from some other application If the job prints from the second application you ve narrowed the problem to the first application Make sure you are using the current version of the driver for...

Страница 107: ...window select it from the list and choose Adapter Settings 1 If you haven t already done so install MarkVision On the drivers CD click Install printer software Do a Custom Install and select MarkVisi...

Страница 108: ...ubleshooting If you are having trouble with your print server on an AppleTalk network EtherTalk TokenTalk or LocalTalk do these steps in the order shown before you call the place where you bought your...

Страница 109: ...b is active When the Test button is pressed a network setup page is sent from the print server to the printer A flash file is being downloaded over the network The print server is processing a Flash f...

Страница 110: ...r 0 25 sec binary x for 0 25 sec repeat continuously where x could be 0 1 2 3 4 5 6 7 8 or 9 POST error Power on self test error During start up a hardware failure was detected on the print server Pre...

Страница 111: ...e and documentation are provided with RESTRICTED RIGHTS Use duplication or disclosure by the Government is subject to restrictions as set forth in subparagraph c 1 ii of the Rights in Technical Data a...

Страница 112: ...nnected to an electrical outlet that is properly grounded The power cord must be connected to an electrical outlet that is near the product and easily accessible Refer service or repairs other than th...

Страница 113: ...television reception which can be determined by turning the equipment off and on the user is encouraged to try to correct the interference by one or more of the following measures Reorient or relocat...

Страница 114: ...e within certain voltage limits A declaration of conformity with the requirements of the directives has been signed by the Director of Manufacturing and Technical Support Lexmark International S A Boi...

Страница 115: ...to the requirements of IEC 825 Class I laser products are not considered to be hazardous The printer contains internally a Class IIIb 3b laser that is nominally a 5 milliwatt gallium arsenide laser o...

Страница 116: ...69 flushing data 56 memory full 62 print cartridge error 61 print cartridge not installed 60 61 printer top cover open 60 61 executive 19 loading 19 manual feed 19 tray 1 17 tray 2 21 F factory defaul...

Страница 117: ...ion 8 printer hardware updating 104 printing 102 AppleTalk network 102 PSERVER 99 Q queue based non NPDS printing 98 R Ready Data light 53 replacing the print cartridge 41 reset user defaults 75 Reset...

Страница 118: ...Argecy Computer Corporation 248 324 1800 114 U United Kingdom Telecommunications Act 1984 111 USB 85 NPA Mode 85 Port Enabled 84 user defaults resetting 75 W Waiting light 55...

Страница 119: ...Argecy Computer Corporation 248 324 1800...

Страница 120: ...Argecy Computer Corporation 248 324 1800 Part Number 53P9570 Printed in the United States of America on recycled paper containing 10 recovered post consumer fiber S510 2166 00 1P P N 53P9570...

Отзывы: