background image

© Copyright IBM Corp. 2010 

19

Chapter 4. Cabling the switch module and the SFP+ module

This chapter describes how to cable the switch module and its optional devices.

NOTE

The illustrations in this document might differ slightly from your hardware.

Connecting the USB console cable

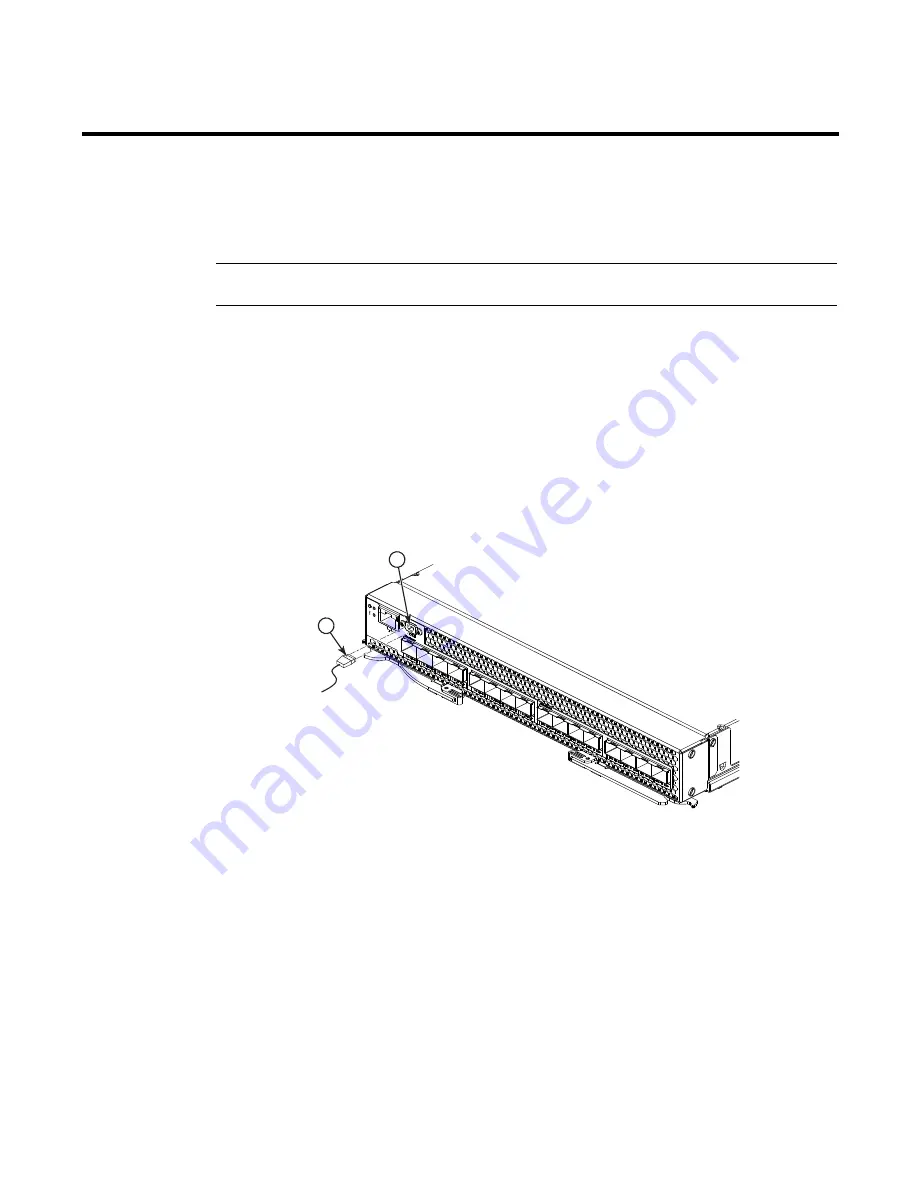
To connect the USB console cable to the switch module, connect the cable to the mini-USB console 
port of the switch module and the other end of the cable to the console device.

The USB console cable supplied with the Brocade FCoE Switch Module has a mini-USB connector 
for the switch module connection and a DB9 male connector to connect to your console device. 
Depending on your requirements to connect with the console device, you may need to use a DB9 to 
RJ45 adapter also supplied with the switch module. Both straight and crossover adapters are 
supplied. Additional cabling and adapters may also be required. 

FIGURE 8

USB cable connection

Disconnecting the USB console cable

To disconnect the USB console cable, grasp the connector and gently pull the cable from the switch 
module.

1

USB console cable

2

mini-USB console port

2

1

Содержание Brocade FCoE

Страница 1: ...Brocade FCoE Switch Module for IBM BladeCenter Installation and User s Guide ...

Страница 2: ......

Страница 3: ...Brocade FCoE Switch Module for IBM BladeCenter Installation and User Guide iii Brocade FCoE Switch Module for IBM BladeCenter Installation and User s Guide ...

Страница 4: ...ation in the IBM Warranty and Support Guide and the IBM Safety Information and the IBM Systems Environmental Notices and User Guide on the IBM Documentation CD First Edition April 2010 Copyright International Business Machines Corporation 2010 US Government Users Restricted Rights Use duplication or disclosure restricted by GSA ADP Schedule Contract with IBM Corp ...

Страница 5: ...tic sensitive devices 10 Installing a switch module 10 Removing or replacing a switch module 12 Chapter 3 Installing and removing an SFP module Handling an SFP module 15 Installing an SFP module 16 Removing an SFP module 17 Chapter 4 Cabling the switch module and the SFP module Connecting the USB console cable 19 Disconnecting the USB console cable 19 Connecting the SFP module cable 20 Disconnecti...

Страница 6: ...to the switch module 32 Configuring for FCoE 32 Backing up the configuration 33 Resetting the Brocade FCoE Switch Module to factory defaults 34 Chapter 7 Understanding Access Gateway Disabling and enabling Access Gateway mode 36 Chapter 8 Updating the firmware Determining the level of switch module firmware 39 Obtaining the latest level of switch firmware 39 Downloading the firmware 40 Resetting a...

Страница 7: ...telecommunications safety requirement 50 European Union EMC Directive conformance statement 50 Germany Electromagnetic Compatibility Directive 50 Japanese VCCI Class A statement 51 Korean Class A warning statement 51 Russia Electromagnetic Interference EMI Class A statement 52 People s Republic of China Class A warning statement 52 Taiwanese Class A warning statement 52 Appendix C Product Specific...

Страница 8: ...viii Brocade FCoE Switch Module for IBM BladeCenter Installation and User Guide ...

Страница 9: ...uin asennat tämän tuotteen lue turvaohjeet kohdasta Safety Information Avant d installer ce produit lisez les consignes de sécurité Vor der Installation dieses Produkts die Sicherheitshinweise lesen Prima di installare questo prodotto leggere le Informazioni sulla Sicurezza Les sikkerhetsinformasjonen Safety Information før du installerer dette produktet Antes de instalar este produto leia as Info...

Страница 10: ...ion document under Statement 1 Be sure to read all caution and danger statements in this document before you perform the procedures Read any additional safety information that comes with the server or optional device before you install the device This device is intended for use with UL Listed IBM BladeCenters Statement 1 DANGER Electrical current from power telephone and communication cables is ha...

Страница 11: ...tement 3 Never turn on any equipment when there is evidence of fire water or structural damage Disconnect the attached power cords telecommunications systems networks and modems before you open the device covers unless instructed otherwise in the installation and configuration procedures Connect and disconnect cables as described in the following table when installing moving or opening covers on t...

Страница 12: ...duct Laser Klasse 1 Laser Klass 1 Luokan 1 Laserlaite Appareil A Laser de Classe 1 Statement 8 CAUTION Never remove the cover on a power supply or any part that has the following label attached Some laser products contain an embedded Class 3A or Class 3B laser diode Note the following Laser radiation when open Do not stare into the beam do not view directly with optical instruments and avoid direc...

Страница 13: ...e current and energy levels are present inside any component that has this label attached There are no serviceable parts inside these components If you suspect a problem with one of these parts contact a service technician ...

Страница 14: ...xiv Brocade FCoE Switch Module for IBM BladeCenter Installation and User Guide ...

Страница 15: ...speed switch module might be referred to as a switch module or switch because the term switch module or switch appears on those screens 2 Unless otherwise stated references to the BladeCenter unit apply to all BladeCenter units that support the I O module As of the date of this document the following devices are examples of applicable BladeCenter units BladeCenter H unit BladeCenter HT unit 3 Unle...

Страница 16: ...ses can be purchased You can purchase the IBM POD upgrade option to license the additional 14 ports All internal and external ports will then be licensed and can be used NOTE The POD upgrade option actually includes a bundle of two POD licenses for eight and six ports for a total of 14 ports After installing the POD upgrade option if the user then performs a licenseShow command two POD licenses Si...

Страница 17: ... switch module on page 5 You will need this information when you register the switch module with IBM You can register the switch module at http www ibm com support mysupport Related documentation This Installation Guide contains setup and installation instructions for the switch module and general information about the switch module including getting started how to configure the switch module and ...

Страница 18: ...r s Guide Fabric Watch Administrator s Guide Fabric OS Administrator s Guide Fabric OS Command Reference Manual Fabric OS MIB Reference Manual Fabric OS System Error Message Reference Manual Web Tools Administrator s Guide End User License Agreement EULA Release Notes Readme files Instructions To obtain relevant Brocade documentation for device drivers the Advanced Web Tools program and other tool...

Страница 19: ...mportant tips guidance or advice Important These notices provide information or advice that might help you avoid inconvenient or problem situations Attention These notices indicate potential damage to programs devices or data An attention notice is placed just before the instruction or situation in which damage could occur Caution These statements indicate situations that can be potentially hazard...

Страница 20: ...odule for IBM BladeCenter Installation and User Guide FIGURE 1 Major components 1 RJ45 Ethernet port eth1 2 mini USB console port 3 Fibre Channel ports 4 10GbE FCoE CEE ports 5 Release latches 6 Release levers 4 3 6 6 5 5 1 2 ...

Страница 21: ...that can be installed in them that is specific to your BladeCenter unit type The following illustrations show examples of a BladeCenter H BCH chassis and a BladeCenter HT BCHT chassis with the high speed module HSSM bays identified In the BCH these bays are in the rear of the BladeCenter chassis In the BCHT these bays are in the front of the BladeCenter chassis NOTE The Brocade FCoE Switch Module ...

Страница 22: ...adeCenter unit supports a maximum of two Brocade FCoE Switch Modules The BladeCenter H chassis supports a maximum of 14 compatible expansion cards and the BladeCenter HT chassis supports a maximum of 12 compatible expansion cards Notes The blade servers or BladeCenter units that are described or shown in this document might be different from your blade server or BladeCenter unit For additional inf...

Страница 23: ...s on hot swap components See the instructions for removing or installing a specific hot swap component for any additional procedures that you might have to perform before you remove or install the component You do not have to turn off the BladeCenter unit to install or replace any of the hot swap modules on the front or rear of the BladeCenter unit When you install a switch module in the BladeCent...

Страница 24: ... surface of the BladeCenter unit chassis or an unpainted metal surface on any other grounded rack component in the rack that you are installing the device in for at least 2 seconds This drains static electricity from the package and from your body Remove the device from its package and install it directly into the BladeCenter unit without setting down the device If it is necessary to set down the ...

Страница 25: ... an unpainted metal surface on any other grounded rack component for at least 2 seconds 5 If you are installing the switch module in a BCH T chassis you must first install the upper and lower interposer trays and the gasket kit Please see the instructions shipped with the Interposer Kit for details Other wise skip to step 6 6 Remove the switch module from its static protective package 7 Make sure ...

Страница 26: ...SFP module on page 15 and the documentation that comes with the SFP module 13 Attach any cables that are required by the switch module For additional information about cabling the switch module see Chapter 4 Cabling the switch module and the SFP module on page 19 the documentation that comes with the cables and the optional network devices to which the cables have been connected For the locations ...

Страница 27: ... unit see the documentation that comes with the BladeCenter unit Then continue with step 3 3 Pull the release latches out from the switch module The switch module moves out of the bay approximately 0 6 cm 0 25 inch 4 Slide the switch module out of the bay and set it aside 5 Place either another switch module or a filler module in the bay Important Complete this step within 1 minute For more inform...

Страница 28: ...14 Brocade FCoE Switch Module for IBM BladeCenter Installation and User Guide ...

Страница 29: ...the module into the port can cause damage to the module or the module port You can insert or remove the module while the BladeCenter unit is turned on You must first insert the module into the port before you can connect the cables You must remove the cable from the SFP module before you remove the SFP module from the switch module Statement 3 CAUTION When laser products such as CD ROMs DVD drives...

Страница 30: ... unpainted metal surface of the BladeCenter chassis or an unpainted metal surface on any other grounded rack component in the rack in which you are installing the switch module for at least 2 seconds 3 Read the information in Handling an SFP module on page 15 4 Remove the SFP module from its static protective package 5 Remove the protective insert if one is installed from the port where you are in...

Страница 31: ...v and Installation guidelines on page 9 2 Read the information in Handling an SFP module on page 15 3 Remove the fiber optic cable from the SFP module that you want to replace For more information about removing the cable see Disconnecting the SFP module cable on page 21 ATTENTION To avoid damage to the cable or the SFP module make sure that you disconnect the fiber optic cable before you remove t...

Страница 32: ...and User Guide FIGURE 7 SFP removal 5 Grasp the wire tab on the SFP module and pull it out of the port 6 Replace the protective cap on the SFP module and the port 7 Place the SFP module into a static protective package 1 Protective cap 3 SFP module 2 Wire tab 3 2 1 ...

Страница 33: ...e USB console cable supplied with the Brocade FCoE Switch Module has a mini USB connector for the switch module connection and a DB9 male connector to connect to your console device Depending on your requirements to connect with the console device you may need to use a DB9 to RJ45 adapter also supplied with the switch module Both straight and crossover adapters are supplied Additional cabling and ...

Страница 34: ...nded or become pinched when the device is retracted Route the cable away from places where it can be snagged by other devices in the rack Do not overtighten the cable straps or bend the cables to a radius of less than 38 mm 1 5 in Do not put excess weight on the cable at the connection point Make sure that the cable is well supported To connect the SFP module cable complete the following steps 1 R...

Страница 35: ...SFP module cable To disconnect the SFP module cable complete the following steps 1 Squeeze the release tabs and gently pull the fiber optic cable from the SFP module 2 Replace the protective caps on the ends of the fiber optic cable Connecting the RJ 45 Ethernet cable The RJ 45 Ethernet cable can be connected to the RJ 45 port To connect the RJ 45 connector to the switch module push the connector ...

Страница 36: ...allation and User Guide FIGURE 11 RJ 45 cable connection Disconnecting the RJ 45 cable To disconnect the RJ 45 connector squeeze the release tab and gently pull the cable connector out of the switch module connector 1 RJ 45 cable 2 RJ 45 Ethernet port 2 1 ...

Страница 37: ...mponents LEDs that display the following information The status of the switch module and its network connection The status of the external connections to the switch module For further details about LEDs see Information LEDs on page 24 Eight FC SFP port connectors to attach SFP modules They are numbered 23 30 right to left Eight FCoE CEE SFP port connectors to attach SFP modules They are numbered 1...

Страница 38: ...enter unit is lit when a system error or event has occurred To identify the error or event check the BladeCenter Advanced Management Module event log or the switch system log An LED test occurs whenever the switch module is turned on All LEDs are lit and remain lit during POST and then all the LEDs except the OK LED turn off Any errors that are detected during POST are written to the system log Wh...

Страница 39: ...en a POST failure or critical alert Note When this LED is lit the system error LED on the BladeCenter unit is also lit Off The switch module is working correctly if the green power LED is on If the green LED is also off the switch module is off Power LED green Steady green The switch module is on Off When the amber switch module error LED is on it indicates a critical alert When the amber LED is a...

Страница 40: ...e Fabric OS Message Reference POST operation LED indications The system status LEDs flash in various patterns during boot POST or other diagnostic tests This is normal and does not indicate a problem unless the LEDs do not indicate a healthy state after all boot processes and diagnostic tests are complete During POST and some diagnostics both system status LEDs located at the top of the installed ...

Страница 41: ...he external SFP ports support both management traffic and BladeCenter application data traffic This mode enables the use of additional switch module IP addresses on different IP subnets than the management modules This is useful when the switch modules are to be managed and controlled as part of the overall network infrastructure while secure management of other BladeCenter subsystems is maintaine...

Страница 42: ...d Management Module which is the only type of management module that supports the switch module Throughout this document the management module Web based user interface is also known as the BladeCenter management module Web interface Throughout this document the user name is also known as the login name or user ID for logging on to interfaces or programs The screens that are described or referenced...

Страница 43: ... through the Telnet interface on page 30 for additional information Enabling management through external ports To access and manage the switch module through external interfaces you must enable the external ports and the ability to manage the switch through them Use the information in the following table to configure your ports To enable management through external ports complete the following ste...

Страница 44: ...sections describe how to use the Telnet interface to access the switch module change its settings and monitor its operation Connecting to the switch module If you know the IP address for the switch module and you have an existing network connection you can use the Telnet program from an external management station or the management module to access and control the switch module The management stat...

Страница 45: ...ion FIGURE 13 USB cable connection For additional information see Connecting the USB console cable on page 19 2 On the management station open a console window and make sure that the serial port is configured with the following settings 9600 baud 8 data bits No parity 1 stop bit No flow control 3 Type the user name and password The default user name is USERID The default password is PASSW0RD where...

Страница 46: ...faults the original configuration is restored Logging in to the switch module The switch module supports user based security that enables you to prevent unauthorized users from accessing the switch or changing its settings To log in to the switch module complete the following steps 1 At the prompt type your user ID and press Enter The default user ID is USERID 2 Type your password default is PASSW...

Страница 47: ... configuring switches for FCoE operation and the Converged Enhanced Ethernet Command Reference for more details on the commands Backing up the configuration Perform these steps to back up the switch module configuration to an FTP server 1 Open a Telnet or SSH session to the switch module 2 Enter configUpload You are then presented with a series of prompts 3 Follow the prompts to upload the configu...

Страница 48: ... module configuration If the high speed switch module is connected to an existing SAN disconnect the switch module from the SAN before restoring to factory defaults and then follow proper setup procedures before reconnecting Use the Management Module to reset the high speed switch module to factory defaults 1 Open the Management Module and log in with admin privileges 2 Select I O Module Tasks Con...

Страница 49: ..._Port to N_Port mappings or change this mapping using command line interface CLI or Web Tools after you configure an IP address AG simplifies SAN deployment by using N_Port ID Virtualization NPIV NPIV provides Fibre Channel switch functions that improve switch scalability manageability and interoperability For more information on AG refer to the following For general information and details on usi...

Страница 50: ... Refer to the See the Web Tools Administrator s Guide for more information Enabling Access Gateway mode Note the following when enabling AG mode After you enable AG mode some fabric information is erased such as the zone and security databases Enabling AG mode is disruptive because the switch is disabled and rebooted Ensure that no zoning or Admin Domain AD transaction buffers are active If any tr...

Страница 51: ...omes back online using the fabric switch configuration The Access Gateway parameters such as F_Port to N_Port mapping failover and failback are automatically removed When the switch reboots it starts in Fabric OS Native mode To re join the switch to the core fabric refer to the Brocade Access Gateway Administrator s Guide Use the following steps to disable Access Gateway mode using Fabric OS comma...

Страница 52: ...38 Brocade FCoE Switch Module for IBM BladeCenter Installation and User Guide ...

Страница 53: ...mware VPD area locate the number of the I O module bay that contains the switch module that you installed then note the corresponding level of the firmware for the switch module displayed under the Revision column Obtaining the latest level of switch firmware The switch module might have features that are not described in the documentation that comes with the switch and the documentation might be ...

Страница 54: ...nd restarting the switch module To activate the new image or images you must reset the switch module To reset the switch module complete the following steps 1 From the I O Module Tasks menu click Admin Power Restart The management module window opens 2 Select the I O module bay on which the firmware update was just installed 3 Click Power Off Module s 4 Select the I O module bay on which the firmw...

Страница 55: ...eable unit FRU FRUs must be installed only by trained service technicians For information about the terms of the warranty see the IBM Warranty and Support Information document on the IBM Documentation CD The replaceable components in the following table are Tier 1 CRUs If other BladeCenter components require replacement see the following documentation that comes with these devices BladeCenter Prob...

Страница 56: ...42 Brocade FCoE Switch Module for IBM BladeCenter Installation and User Guide ...

Страница 57: ... errors There are two types of errors noncritical and critical A noncritical error applies to one port and the switch module is operational You can continue to operate the switch module however you must replace it as soon as possible When critical errors occur the switch module does not operate To view POST results complete the following steps 1 Log on to the management module as described in the ...

Страница 58: ...7 Error listing Diagnostic indicator in hex Failing functional area Failure criticality 00 7F Base internal functions Critical 80 9F Internal interface failures Noncritical A0 AF External interface errors Noncritical B0 FE Reserved Noncritical FF Switch module good indicator Operation ...

Страница 59: ...thout outside assistance by following the troubleshooting procedures that IBM provides in the online help or in the documentation that is provided with your IBM product The documentation that comes with IBM systems also describes the diagnostic tests that you can perform Most systems operating systems and programs come with documentation that contains troubleshooting procedures and explanations of...

Страница 60: ...ation about which products are supported by Support Line in your country or region see http www ibm com services sl products For more information about Support Line and other IBM services see http www ibm com services or see http www ibm com planetwide for support telephone numbers In the U S and Canada call 1 800 IBM SERV 1 800 426 7378 Hardware service and support You can receive hardware servic...

Страница 61: ...tions therefore this statement may not apply to you This information could include technical inaccuracies or typographical errors Changes are periodically made to the information herein these changes will be incorporated in new editions of the publication IBM may make improvements and or changes in the product s and or the program s described in this publication at any time without notice Any refe...

Страница 62: ...ry and are often less than the possible maximum When referring to processor storage real and virtual storage or channel volume KB stands for 1024 bytes MB stands for 1 048 576 bytes and GB stands for 1 073 741 824 bytes When referring to hard disk drive capacity or communications volume MB stands for 1 000 000 bytes and GB stands for 1 000 000 000 bytes Total user accessible capacity can vary depe...

Страница 63: ...ications could void the user s authority to operate the equipment This device complies with Part 15 of the FCC Rules Operation is subject to the following two conditions 1 this device may not cause harmful interference and 2 this device must accept any interference received including interference that may cause undesired operation Industry Canada Class A emission compliance statement This Class A ...

Страница 64: ...IBM Allee 1 71137 Ehningen Germany Telephone 49 7032 15 2937 E mail tjahn de ibm com Germany Electromagnetic Compatibility Directive Deutschsprachiger EU Hinweis Hinweis für Geräte der Klasse A EU Richtlinie zur Elektromagnetischen Verträglichkeit Dieses Produkt entspricht den Schutzanforderungen der EU Richtlinie 2004 108 EG zur Angleichung der Rechtsvorschriften über die elektromagnetische Vertr...

Страница 65: ... 914 499 1900 De verantwortliche Ansprechpartner des Herstellers in der EU ist IBM Deutschland IBM Technical Regulations Department 456 IBM Allee 1 71137 Ehningen Germany Telephone 49 7032 15 2937 E mail tjahn de ibm com Generelle Informationen Das Gerät erfüllt die Schutzanforderungen nach EN 55024 und EN 55022 Klasse A Japanese VCCI Class A statement This is a Class A product based on the standa...

Страница 66: ...FCoE Switch Module for IBM BladeCenter Installation and User Guide Russia Electromagnetic Interference EMI Class A statement People s Republic of China Class A warning statement Taiwanese Class A warning statement ...

Страница 67: ...e switch power LED one switch status LED Dual fuse circuit One temperature sensor Weight and physical dimensions Table 8 lists the physical characteristics of the high speed switch module High speed switch module memory The memory installed in the high speed switch module is shown in Table 9 TABLE 8 Switch module specifications Characteristic Description Height 4 10 cm 1 61 inches Width 29 38 cm 1...

Страница 68: ...s or exceeds the Fibre Channel standards compliance performance and feature capabilities as defined in the following standards when in fabric mode TABLE 10 Environmental requirements Condition Operating Non operating Temperature low altitude 0 to 40 C 32 to 104 F 20 to 70 C 4 F to 158 F Humidity 10 to 90 RH non condensing at 29 C 5 to 95 RH non condensing at 38 C Altitude up to 3 048 km 10 000 ft ...

Страница 69: ...NCITS TR 39 2005 FC PI INCITS 352 2002 FC PI 2 INCITS 404 2005 FC FS 2 ANSI INCITS 424 2006 includes the following FC FS INCITS 372 2003 FC LS rev 1 51 under development FC BB 3 INCITS 414 2006 includes the following FC BB 2 INCITS 372 2003 FC SB 3 INCITS 374 2003 replaces FC SB ANSI X3 271 1996 FC SB 2 INCITS 374 2001 RFC 2625 IP and ARP over FC RFC 2837 Fabric Element MIB MIB FA INCITS TR 32 200...

Страница 70: ...56 Brocade FCoE Switch Module for IBM BladeCenter Installation and User Guide ...

Страница 71: ...ct flash 53 components switch 53 configUpload command 33 configuration backing up 33 default mode 27 FCoE 32 initial 32 remote management mode 27 resetting 34 switch 27 via mini USB port 31 via Web Tools 31 converged network adapter see CNA critical errors 43 D date and time setting 32 diagnostics 26 dimensions 53 disabling Access Gateway 37 documentation additional 3 4 Double POD license 2 DPOD 2...

Страница 72: ...connecting 20 disconnecting 21 Fibre Channel standards compliance 54 firmware determining level 39 downloading 40 obtaining latest 39 upgrading 39 flash 53 FTP server 33 G getting help 45 hardware support 46 IBM documentation 45 software support 46 World Wide Web 46 guidelines installation 9 reliability 9 static sensitive devices 10 H handling SFP 15 static sensitive devices 10 hardware support 46...

Страница 73: ...d time 32 shock 54 Single POD license 2 software support 46 SSH 33 standards Fibre Channel 54 static sensitive devices handling 10 switch configuring 27 introduction 1 reset and restart 40 switch components 5 53 switch management 2 via external ports 29 switch module front panel 23 installing 10 login 32 physical dimensions 53 removing or replacing 12 weight 53 switch status LEDs 24 switchShow com...

Страница 74: ...60 Brocade FCoE Switch Module for IBM BladeCenter Installation and User Guide ...

Страница 75: ...1 ...

Страница 76: ...2 Part Number 60Y1582 Printed in USA IP P N 60Y1582 60Y1582 ...

Отзывы: