


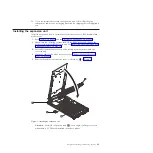


6.
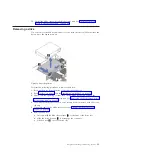
Lift the expansion unit above the blade server base unit and engage the
circular pivot bearings onto the cover pins (
2
) of the base unit.
The expansion unit of the JS43 blade server fits on top of the base unit, with
the DIMM slots and expansion card slots on top.
7.
Pivot the expansion unit on the cover pins of the base unit and lower the
expansion unit until it lies flat on the base unit.
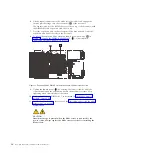
8.
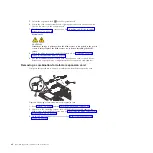
To access the expansion blade retention thumb screw (shown by
4
in
Figure 12), remove the DIMM in DIMM slot 1 (
5
), as described in
“Removing a memory module” on page 33.
9.
Tighten the thumb screw (
4
) by rotating the screw clockwise until the
connection between the expansion unit and the base unit is secure. Stop
tightening when firm resistance is detected.
10.
Replace the DIMM in DIMM slot 1, as described in “Installing a memory
module” on page 34.
11.
Install and close the blade server cover. See “Installing and closing the blade
server cover” on page 43.
Statement 21
CAUTION:
Hazardous energy is present when the blade server is connected to the
power source. Always replace the blade server cover before installing the
blade server.
5
4
Figure 12. Expansion blade DIMM 1 slot and the expansion blade retention screw
30
JS23/JS43 Type 7778: Installation and User’s Guide
Содержание BladeCenter JS23
Страница 3: ...BladeCenter JS23 and BladeCenter JS43 Type 7778 Installation and User s Guide ...
Страница 6: ...iv JS23 JS43 Type 7778 Installation and User s Guide ...
Страница 24: ...12 JS23 JS43 Type 7778 Installation and User s Guide ...
Страница 86: ...74 JS23 JS43 Type 7778 Installation and User s Guide ...
Страница 87: ......
Страница 88: ... Part Number 44R5338 Printed in USA 1P P N 44R5338 ...


