Chapter 5. Installing options
49
•
Inspect the drive tray for any signs of damage.
•
Ensure that the drive is installed properly in the tray.
•
To maintain proper system cooling, do not operate the server for more than two
minutes without either a drive or a filler panel installed in each bay.
•
If your server has a ServeRAID adapter installed; refer to the documentation
provided with the ServeRAID adapter for information about adding a drive.
•
Read the safety precautions listed in “Safety information” on page 107, “Handling
electrostatic discharge-sensitive devices” on page 110.
•
Check the instructions that come with the drive for more information about
installing the drive.
Installing or replacing a hard disk drive
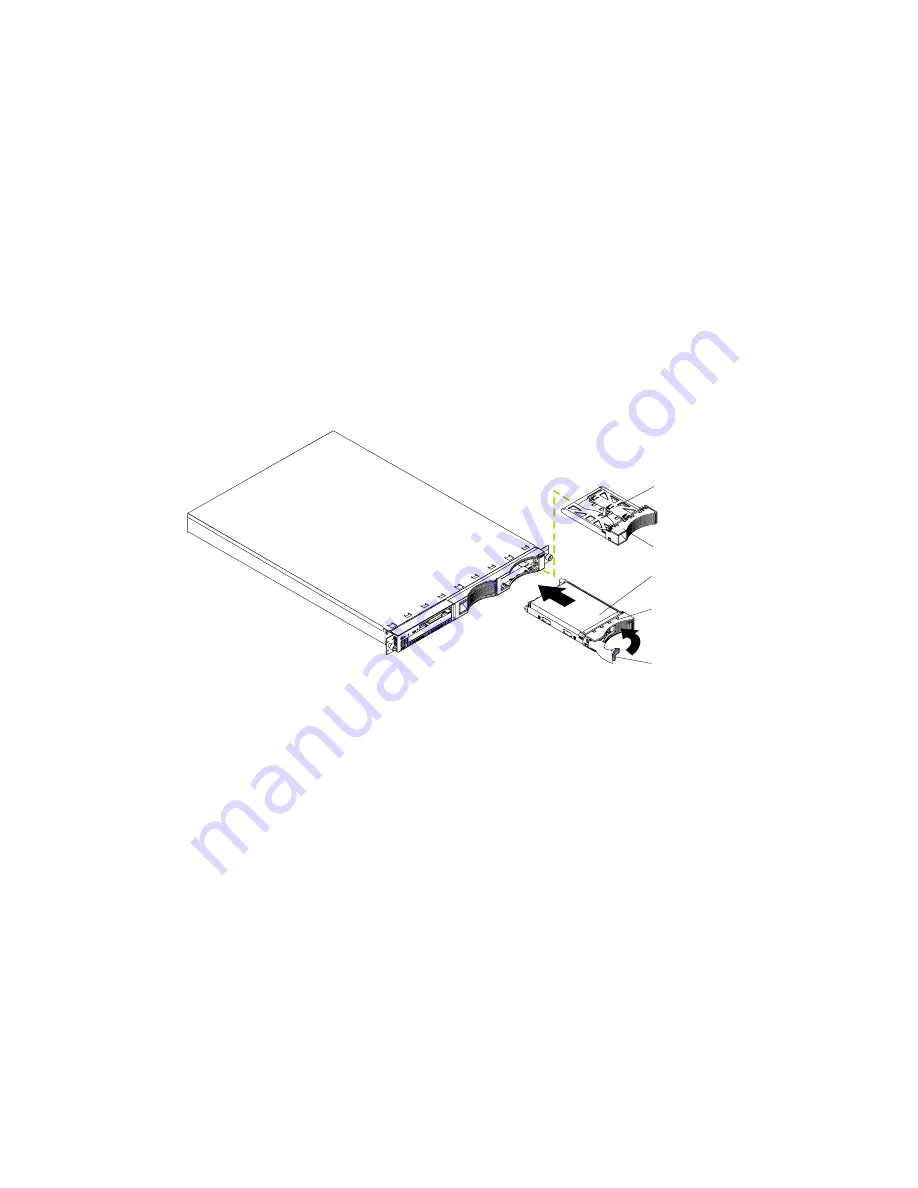
Refer to the following illustration to install a hard disk drive:
Note:
The illustrations in this document might differ slightly from your hardware.
Attention:
•
When you handle electrostatic discharge (ESD) sensitive devices, take precautions
to avoid damage from static electricity. For details on handling these devices,
refer to “Handling electrostatic discharge-sensitive devices” on page 110.
1.
Review the information in “Before you begin” on page 42.
2.
Turn off the server and all attached devices, and disconnect all external cables and
power cords.
3.
Remove the filler panel or defective hard drive from one of the hard disk drive
bays.
4.
Install the new hard disk drive in the drive bay:
a.
Ensure the tray handle is open (that is, perpendicular to the drive).
b. Align the rails on the drive assembly with the guide rails in the drive bay.
c.
Gently push the drive assembly into the bay until the drive connects to the
backplane.
d. Push the tray handle toward the closed position until it locks the drive in
place.
5.
Reconnect the external cables and power cords; then, turn on the server.
Slim filler
Filler panel
Hard disk drive
Drive tray
Drive tray handle
(in open position)
Содержание 8654 - Eserver xSeries 330
Страница 1: ...IBM Hardware Maintenance Manual xSeries 330 ...
Страница 2: ......
Страница 3: ...IBM Hardware Maintenance Manual xSeries 330 ...
Страница 18: ...10 Hardware Maintenance Manual xSeries 330 ...
Страница 36: ...28 Hardware Maintenance Manual xSeries 330 ...
Страница 84: ...76 Hardware Maintenance Manual xSeries 330 ...
Страница 90: ...82 Hardware Maintenance Manual xSeries 330 ...
Страница 108: ...100 Hardware Maintenance Manual xSeries 330 ...
Страница 113: ...Chapter 8 Parts listing 105 United States of America 6952301 110 1838574 220 36L8886 220V 15A Power cord FRU No ...
Страница 114: ...106 Hardware Maintenance Manual xSeries 330 ...
Страница 127: ...Chapter 9 Related service information 119 ...
Страница 128: ...120 Hardware Maintenance Manual xSeries 330 ...
Страница 129: ...Chapter 9 Related service information 121 ...
Страница 130: ...122 Hardware Maintenance Manual xSeries 330 ...
Страница 131: ...Chapter 9 Related service information 123 ...
Страница 132: ...124 Hardware Maintenance Manual xSeries 330 ...
Страница 133: ...Chapter 9 Related service information 125 ...
Страница 134: ...126 Hardware Maintenance Manual xSeries 330 ...
Страница 147: ...Chapter 9 Related service information 139 ...
Страница 148: ...140 Hardware Maintenance Manual xSeries 330 ...
Страница 149: ...Chapter 9 Related service information 141 ...
Страница 157: ......


