background image

2


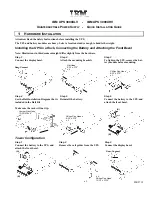
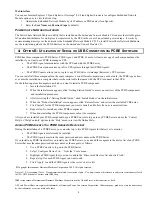
Step 4 

Rotate and attach the display bezel.


Step 5 

Attach the top panels and mounting stabiliz-
ers.


Step 6 

Rotate the unit to tower posi-
tion.


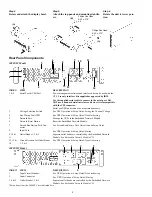
Rear Panel Components 


3000XLV Model  


INDEX ITEM 

DESCRIPTION 

1 & 2 

Serial Port & USB Port 


Power management software and interface kits can be used with the 
UPS. 

Use only interface kits supplied or approved by IBM.


Use the supplied serial cable to connect to the serial port. DO 
NOT use a standard serial interface cable since it is incompatible 
with the UPS connector. 

Serial 

and

 USB ports cannot be used simultaneously. 

Voltage Selection Switch 

See UPS 

Operation & Setup Guide

/

Setting the Nominal Voltage.


Site Wiring Fault LED 

See UPS 

Operation & Setup Guide

/

Troubleshooting.


Network Port 

Manage the UPS via the Embedded Network Module. 

Network Reset Button 

Reset the Embedded Network Module. 

Extend Run Battery Pack Con-
nector 

See 

Extend Run Battery Pack Operation and Setup Guide.


8 Input 

Cord 

See UPS 

Operation & Setup Guide

/

Startup.


9, 10 & 
11 

Outlet Banks 1, 2 & 3 

Separate outlet banks are controlled by the Embedded Network 
Module. See 

Embedded Network Module CD.


12, 13 & 
14 

Circuit Breakers for Outlet Banks 
1, 2 & 3 

See UPS 

Operation & Setup Guide

/

Troubleshooting.


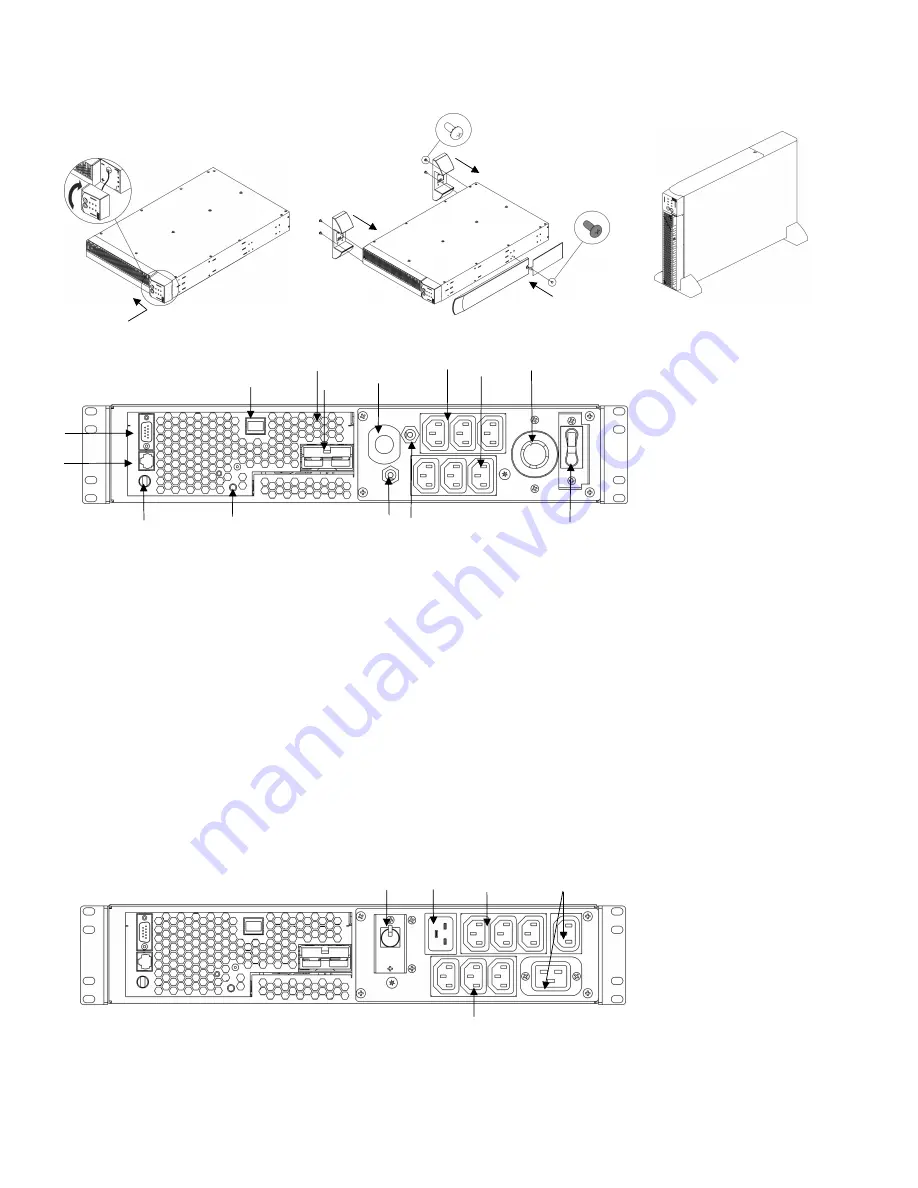
3000XHV Model  


INDEX* ITEM 

DESCRIPTION 

Input Circuit Breaker 

See UPS 

Operation & Setup Guide

/

Troubleshooting.


2 Input 

Connector 

See


UPS


Operation & Setup Guide

Startup.


3, 4 & 5 

Outlet Banks 1, 2 & 3 

Separate outlet banks are controlled by the Embedded Network 
Module. See 

Embedded Network Module


CD

*Exceptions from the 3000XLV are indicated here.  

(A) 

(B) 

(A) 

(B) 

2

3

5

4

12 

13

10 

11 

14 

Philips Pan Head  
8-32 x .375”  
x 4 

Philips Pan Head  
8-32 x .375”  
x 1 

Содержание 3000XLV

Страница 1: ...ttach the mounting brackets Step 3 To lighten the UPS remove the bat tery module before mounting Step 4 Step 5 Step 6 See the Rail Installation Diagram that is included in the Rail Kit Make sure the rack will not tip Reinstall the battery Connect the battery to the UPS and attach the front bezel Tower Configuration Step 1 Connect the battery to the UPS and attach the front bezel Step 2 Remove the ...

Страница 2: ...ort Manage the UPS via the Embedded Network Module 6 Network Reset Button Reset the Embedded Network Module 7 Extend Run Battery Pack Con nector See Extend Run Battery Pack Operation and Setup Guide 8 Input Cord See UPS Operation Setup Guide Startup 9 10 11 Outlet Banks 1 2 3 Separate outlet banks are controlled by the Embedded Network Module See Embedded Network Module CD 12 13 14 Circuit Breaker...

Страница 3: ...ides graceful unattended shutdown for multiple servers in the event of an extended power outage via the Pow erChute Network Shutdown utility included on the Embedded Network Module CD Provides an event log which is accessible by Telnet FTP or a Web browser Generates Email notifications for UPS or system events Limits SNMP traps and Email notifications based on the severity level of the events To i...

Страница 4: ... Windows 2000 or Windows XP com puter to configure the Embedded Network Module If a different operating system is being used refer to the Embedded Network Module CD 1 Obtain an IP address subnet mask and default gateway from your Network administrator before proceeding 2 Follow the on screen instructions to install the Wizard from the Embedded Network Module CD 3 Launch the Wizard when prompted or...

Страница 5: ... reviewing the Getting Started Guide click Install Product on the initial screen 4 When the Product Installation screen appears click Release Notes and review the available PCBE notes 5 Click Install for the PCBE component you want to install and follow the on screen instructions 6 Repeat step 5 to install any other PCBE component 7 When done installing the PCBE components reboot the computer Afte...

Отзывы: