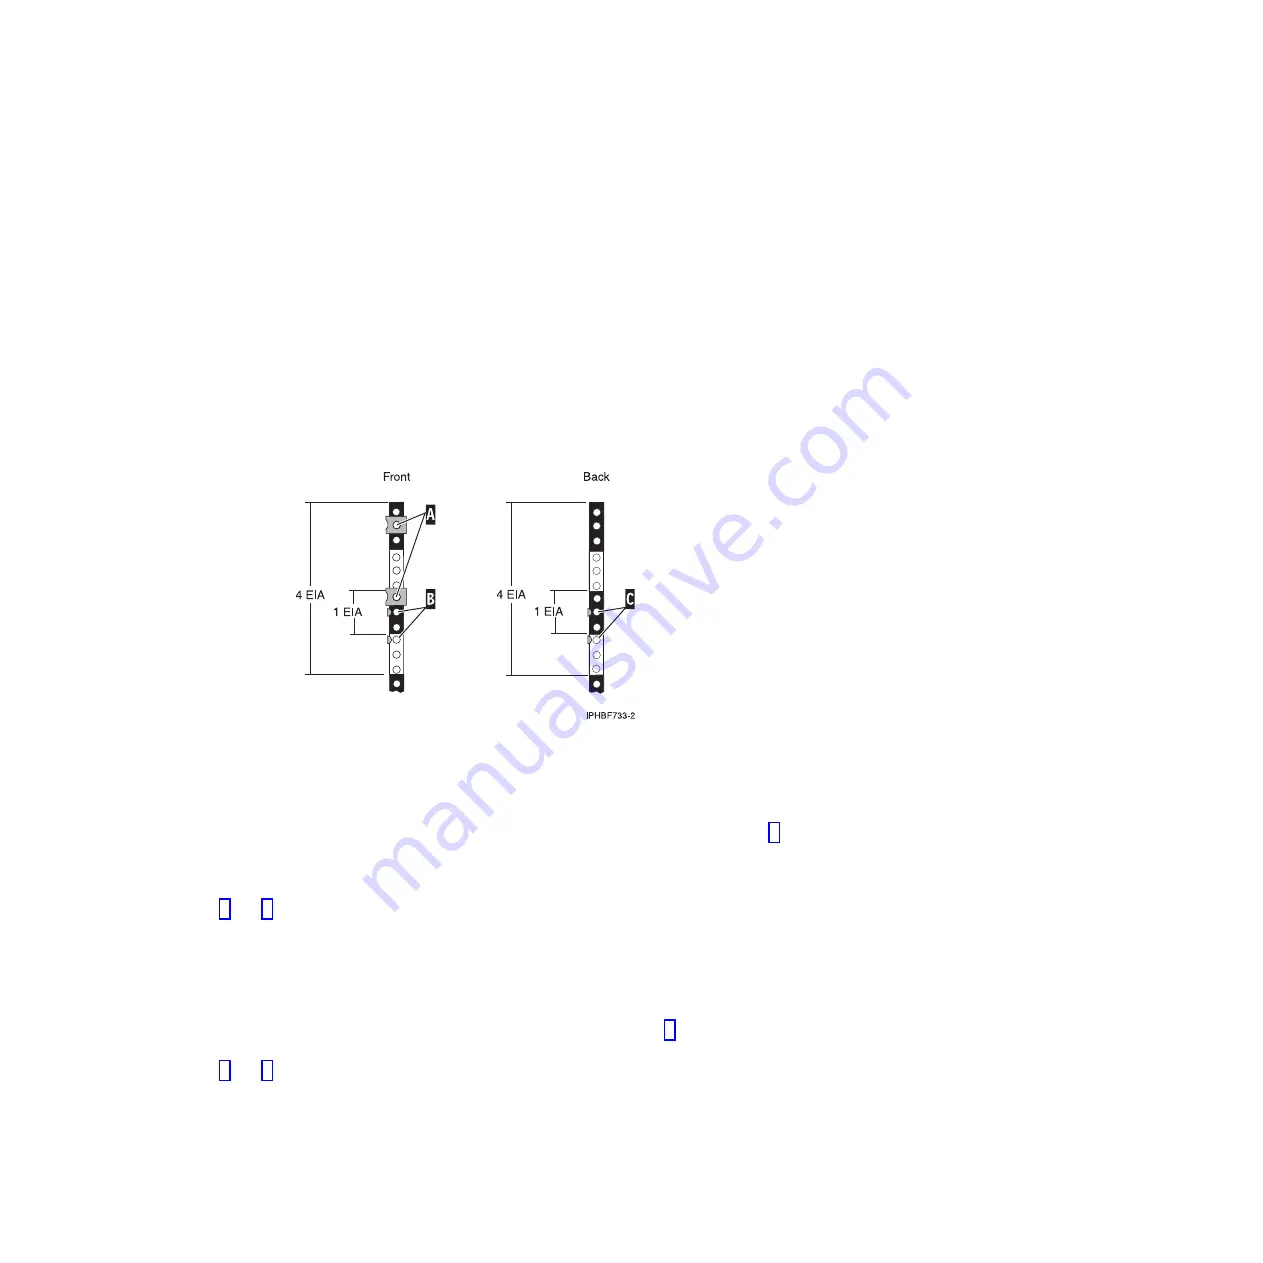
Marking the location without a rack-mounting template
You might need to mark the location without a template. Use the procedure in this section to perform
this task.
To mark the installation location and install the nut clips into a rack without using the rack-mounting
template, complete these steps:
1.
Determine where in the rack to place the unit and make note of the location numbers. This unit is
four Electronic Industries Alliance (EIA) units high. An EIA unit is 1.75 in. (44.45 mm) in height. The
rack contains three mounting holes for each EIA unit of height. This unit therefore is 7 in. (177.8 mm)
high and covers 12 mounting holes in the rack.
2.
Facing the front of the rack and working from the left side, locate the lowest EIA unit that your unit
will use and make a note of the EIA location. Place a supplied self-adhesive dot next to the top
mounting hole
(B)
of this EIA unit and wrap the dot around the rail, or mark the rack so that the
mark can be seen from the rear of the rack.
Note:
The self-adhesive dots are used to aid in identifying locations on the rack. If do not have any of
the dots, use some other form of marking tool to aid you in identifying hole locations (for example,
tape, a marker, or pencil).
3.
On the left rail, count up two mounting holes from where you placed the dot or mark in step 2 and
place another self-adhesive dot or mark next to that mounting hole
(B)
. Wrap the dot around the rail
or mark the rack so that the mark can be seen from the rear of the rack. You now have two dots or
marks on the rack, with one mounting hole between the dots.
4.
Repeat steps 2 and 3 to place two adhesive dots or marks on the corresponding mounting holes on
the front-right rail.
5.
Go to the back of the rack. On the left side, find the EIA unit that corresponds to the lowest EIA unit
marked on the front of the rack.
6.
Place a self-adhesive dot at the top hole
(C)
of the lowest EIA unit. Wrap the dot around the rail or
mark the rack so that the mark can be seen from the rear of the rack.
7.
Count up two mounting holes from where you placed the dot or mark in step 6 and place another
self-adhesive dot or mark next to that mounting hole
(C)
.
8.
Repeat steps 6 and 7 to place two adhesive dots or marks on the corresponding mounting holes on
the rear-right rail.
Marking the location using rack-mounting template
You may want to mark the installation location by using a rack-mounting template. This section guides
you through using the rack-mounting template as a tool to perform this task.
Figure 96. Marking the installation locations
Chapter 3. Installing a system or expansion unit into a rack
95
Содержание 0551
Страница 1: ...Power Systems Rack rack features and installing systems or expansion units into a rack ...
Страница 2: ......
Страница 3: ...Power Systems Rack rack features and installing systems or expansion units into a rack ...
Страница 8: ...vi Installing into a rack ...
Страница 12: ...2 Installing into a rack ...
Страница 34: ...24 Installing into a rack ...
Страница 118: ...108 Installing into a rack ...
Страница 126: ...116 Installing into a rack ...
Страница 130: ...120 Installing into a rack ...
Страница 136: ...4 Remove the latch bracket from the system unit Figure 124 Removing the retaining screws 126 Installing into a rack ...
Страница 148: ...138 Installing into a rack ...
Страница 164: ...154 Installing into a rack ...
Страница 174: ...3 Close the front rack door 164 Installing into a rack ...
Страница 181: ......
Страница 182: ... Printed in USA ...


