background image

MANUAL - LYRA400

3

www.ibiza-light.com

Charging the battery

Prior to using the unit for the first time, fully charge the built-in battery. Plug de DC connector of the supplied 

mains adaptor into the input socket (5) on top of the unit and the other end into an appropriate mains outlet. 

The built-in battery will start charging, no matter if the speaker is on or off. On the display, the battery charging 

symbol will run from 1 to 3 cells.
Once the battery is fully charged, it will display steadily 3 cells

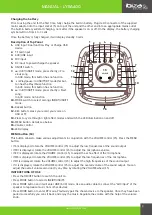
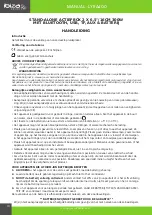
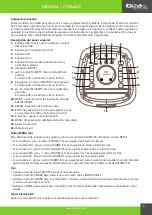
Description of Top Panel

1. 

USB input: Dual function- Play or Charge USB 

device

2. 

TF card input

3. 

AUX/LINE input

4. 

MIC input

5. 

DC input to power/charge the speaker

6. 

ON/OFF switch

7. 


: In BT/USB/TF mode: press shortly =Pre-

vious song  

In AUX mode, this button has no function

8. 




Play/pause: In USB/TF/BT mode this but-

ton has the Play/Pause function  

In AUX mode, this button has no function

9. 


: In BT/USB/TF mode: press shortly = Next 

song;  

In AUX mode: no function

10. 

MODE switch to select among LINE/BT/USB/TF 

mode. 

11. 

Repeat button

12. 

REC button: press you record your voice on 

USB or TF

13. 

Press to cycle through 3 light effect modes and switch the LED illumination on and off

14. 

MENU button: details see below

15. 

Volume control

16. 

LED display

MENU button (14)

This button allows to make various adjustments in conjunction with the VOLUME control (15). Press the MENU 

button:
• If b is displayed, rotate the VOLUME control (15) to adjust the low frequencies of the sound output 
• If MU is displayed, rotate the VOLUME control (15) to adjust the microphone volume
• 

If EC is displayed, rotate the VOLUME control (15) to adjust the echo effect of the microphone

• If Mb is displayed, rotate the VOLUME control (15) to adjust the low frequencies of the microphone
• If Mt is displayed, rotate the VOLUME control (15) to adjust the high frequencies of the sound output
• If U is displayed, rotate the VOLUME control (15) to adjust the overall volume of the sound output. You can 

adjust the overall volume also directly any time by rotating the VOLUME wheel (15)

INSTRUCTIONS OF USE 

• Press the ON/OFF button to switch the unit on. 
• Press MODE button to select LINE/BT/USB/TF.
• Press MODE button and it will enter LINE (AUX) mode. Use an audio cable to connect the "AUX input" of the 

speaker to reproduce music from other devices. 

• Press MODE button to enter BT mode. Previously pair the chosen device to the speaker. Once they have been 

paired successfully you can sit back and enjoy the music. Regulate the volume with the help of the volume 

knob.

1 2

3

4

5

6

7

8

9

10

11

12

13

14

15

16

USB

REPEAT

REC

VOLUME

LIGHT

+

MENU

PREV

NEXT

MODE

Micro-SD

AUX

MIC IN

DC IN

OFF/ON

Play & Charge

Содержание LYRA400

Страница 1: ...il Une question sur ce produit RDV sur la communaut SAV Darty https sav darty com D j 1 2 million de solutions gr ce l avis des utilisateurs IBIZA COEUR CHAINE MINI LYRA 400 EXCLUSIVIT FNAC DARTY MANU...

Страница 2: ...NUEL D UTILISATION p 6 NL HANDLEIDING p 10 ES MANUAL DE USO p 14 DE BEDIENUNGSANLEITUNG S 18 RECHARGEABLE HIGH POWER PARTY BOX 2 x 6 5 16cm 300W WITH BLUETOOTH USB MICRO SD AUX LIGHT EFFECT Ref LYRA40...

Страница 3: ...climates A minimum distance of 0 5m around the unit must be kept to ensure sufficient ventilation and avoid overhea ting All safety instructions and warnings must be adhered to They are part of the m...

Страница 4: ...ontrol 16 LED display MENU button 14 This button allows to make various adjustments in conjunction with the VOLUME control 15 Press the MENU button If b is displayed rotate the VOLUME control 15 to ad...

Страница 5: ...ect any other mode on either one of the speakers LINE IN MODE Connect an audio lead from the Line output of your audio device to the AUX input on the unit Press MODE button until LINE is displayed Whe...

Страница 6: ...to the speaker 4 Keep mobile away from the speaker during calls 5 Too close to the equipment which interferes with the speaker 5 Keep the speaker away from other sources of interference Blue connect F...

Страница 7: ...e L appareil ne contient aucune pi ce rempla able par l utili sateur Uniquement pour utilisation l int rieur Tenir l abri de flammes ouvertes telles que des bougies Ne pas utiliser dans un climat trop...

Страница 8: ...ineuse 14 MENU voir d tail des fonctions ci apr s 15 R glage de volume 16 Afficheur LED Utilisation Appuyez sur l interrupteur Marche Arr t pour mettre l enceinte sous tension Appuyez sur le bouton MO...

Страница 9: ...inte ma tre cessera de clignoter 7 Pour dissocier les enceintes s lectionnez un autre mode sur l une des deux enceintes MODE LINE IN Branchez un cordon audio de la sortie Ligne de votre quipement audi...

Страница 10: ...utilis 3 Le volume micro est trop fort 3 R duisez le volume du micro 4 T l phone portable trop pr s du haut parleur 4 Gardez le t l phone mobile distance pendant des appels 5 Trop pr s d un quipement...

Страница 11: ...5 C 35 C Het apparaat mag niet worden blootgesteld aan sterke trillingen of zware mechanische belasting Plaats geen ontvangers gevuld met vloeistoffen zoals glazen of vazen op of direct naast het app...

Страница 12: ...rlichting in en uit 14 MENU toets zie verklaring verder beneden 15 Volume controle 16 LED display MENU knop 14 Met deze knop kunt u verschillende aanpassingen maken in combinatie met de VOLUME regelaa...

Страница 13: ...terkanaal fungeert Ga naar de Bluetooth interface van je telefoon en selecteer LYRA400 in de lijst met beschikbare apparaten Als het koppelen is gelukt stopt het woord BLUE op de master unit met knipp...

Страница 14: ...urt van de spreker tijdens gesprekken 5 Te dicht bij de apparatuur die de luidspreker hindert 5 Houd de luidspreker uit de buurt van andere storingsbronnen Blue connect Failure 1 Blue connect Disconne...

Страница 15: ...objetos encima o cerca del equipo Corre el riesgo de que se introduzcan dentro del equipo y puede producir da os al equipo y riego de descarga el ctrica a personas Si un objeto penetra dentro del equi...

Страница 16: ...SD 13 Enciende y apaga la iluminaci n LED 14 MENU Ver explicaci n detallada del bot n m s abajo 15 Ajuste de volumen 16 Pantalla de led Bot n MEN 14 Este bot n permite realizar varios ajustes junto co...

Страница 17: ...UX Conecte un cable de audio de la salida de l nea de su dispositivo externo a la entrada AUX del altavoz Cuando se conecta esta clavija cualquier otra fuente de sonido es desactivada en el equipo EN...

Страница 18: ...alejado del equi po durante las llamadas 5 Muy cercano a un equipo que provoca interferencias 5 Mantenga el altavoz alejado de otras fuentes de interferencias Mantenga el equipo alejado de esos equi p...

Страница 19: ...ngen Es besteht Feuer und Stromschlaggefahr Falls doch einmal Fl ssigkeiten oder Gegenst nde ins Ger t dringen sollten ziehen Sie sofort den Netzstecker ab und benachrichtigen Sie einen Fachmann Nur f...

Страница 20: ...teriefach nicht richtig schlie t darf das Ger t nicht mehr benutzt und muss au erhalb der Reichweite von Kindern aufbewahrt werden MEN Taste 14 Mit dieser Taste k nnen Sie verschiedene Einstellungen i...

Страница 21: ...kt BLUE nicht mehr auf dem Master Ger t 7 Zum Abkoppeln der Boxen stellen Sie eine der Boxen auf eine andere Betriebsart ein LINE IN BETRIEB Die MODE Taste auf der Fernbedienung oder dem Ger t dr cken...

Страница 22: ...dicht am Lautsprecher 4 Handy w hrend Anrufen nicht in Lauts prechern he lassen 5 St rger usche verursachende Ger te befinden sich in der N he des Lautspre chers 5 Lautsprecher nicht in der N he von...

Страница 23: ...A Av Z Gramme 9 B 1480 Saintes Company reg no SIRET 75110090000016 Brand Marque IBIZA Model Mod le QD 0901300V Input voltage Tension d entr e 100 240V Input AC frequency Fr quence CA d entr e 50 60 Hz...

Страница 24: ...rec ve and the Commission Delegated Direc ve EU 2015 863 Based on the following speci ca ons applied EN 62368 1 2014 A11 2017 EN 62311 2020 EN 50665 2017 ETSI EN301 489 1 V2 2 3 2019 11 ETSI EN301 489...

Страница 25: ...78 2009 la direc ve RoHS 2011 65 EU et la direc ve d l gu e UE N 2015 863 Les produits sont en conformit avec les normes et ou autres documents norma fs suivants EN 62368 1 2014 A11 2017 EN 62311 2020...

Отзывы: