


MANUAL - LYRA400
11
www.ibiza-light.com
De batterij opladen
Voordat u het toestel voor de eerste keer gebruikt, moet u de ingebouwde batterij volledig opladen. Sluit de
DC-connector van de meegeleverde kabel aan op de ingang (5) aan de bovenkant van het apparaat en het
andere uiteinde op een geschikte stopcontactdoos.
Het laadniveau van de batterij verschijnt op de 3-segmentindicator op het display (16).
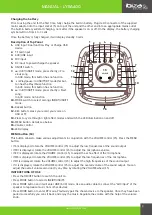
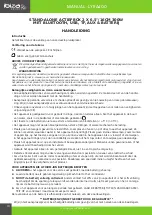
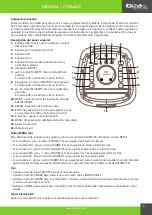
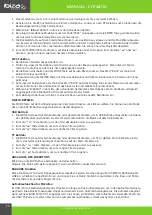
Omschrijving van het bovenpaneel
1.
USB ingang met dubbele functie: Bestanden van een USB stick aflezen of de batterij van uw smartphone
opladen
2.
MicroSD kaartje ingang
3.
AUX/Lijn ingang
4.
MICROFOON ingang
5.
DC ingang om het toestel te voeden en de ingebouwde batterij op te laden
1 2
3
4
5
6
7
8
9
10
11
12
13
14
15
16
USB
REPEAT
REC
VOLUME
LIGHT
+
MENU
PREV
NEXT
MODE
Micro-SD
AUX
MIC IN
DC IN
OFF/ON
Play & Charge
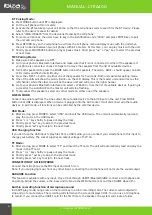
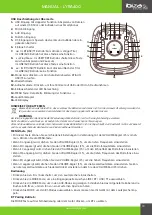
6.
Aan/uit schakelaar:
7.
: In BT/USB/TF modus: kort drukken
vorige song
In AUX modus heft deze knop geen functie
8.
Play/pauze: In USB/TF/BT modus schakelt deze knop
tussen afspelen en pauze om
In LINE modus heft deze knop geen functie
9.
: In BT/USB/TF modus: kort drukken
naaste song;
In LIJN/AUX mode: geen functie.
10.
MODE toets schakelt tussen AUX/BT/USB/TF modus
11.
Herhaal toets
12.
Opnametoets: drukken om uw stem op USB of micro-
-SD op te nemen
13.
Schakelt de LED-verlichting in en uit
14.
MENU toets (zie verklaring verder beneden)
15.
Volume controle
16.
LED display
MENU-knop (14)
Met deze knop kunt u verschillende aanpassingen maken
in combinatie met de VOLUME-regelaar (15). Druk op de
MENU-knop:
• Als b wordt weergegeven, draai aan de VOLUME-regelaar (15) om de lage frequenties aan te passen
• Als MU wordt weergegeven, draai aan de VOLUME-regelaar (15) om het microfoonvolume aan te passen
•
Als EC wordt weergegeven, draai aan de VOLUME-regelaar (15) om het echo-effect van de microfoon aan te
passen
• Als Mb wordt weergegeven, draai aan de VOLUME-regelaar (15) om de lage frequenties van de microfoon aan
te passen
• Als Mt wordt weergegeven, draai aan de VOLUME-regelaar (15) om de hoge frequenties aan te passen
• Als U wordt weergegeven, draai dan aan de VOLUME-regelaar (15) om het algehele volume aan te passen. U
kunt het algehele volume ook op elk moment direct aanpassen door aan het VOLUME-wiel te draaien (15)
Gebruik
• Druk op de Aan / Uit-schakelaar om de luidspreker in te schakelen.
• Druk op de MODE knop om een ingangsbron te selecteren tussen AUX / BT / USB / TF.
• Druk op de knop MODE om naar de AUX-modus te gaan. Sluit het meegeleverde snoer aan op de AUX IN-aan-
sluiting om naar het geluid van een externe bron te luisteren.
• Druk op MODE om de BT-modus te selecteren. Voorheen moet je het apparaat koppelen met de luidspreker.
Als ze eenmaal succesvol zijn gekoppeld, kunt u achterover leunen en genieten van de muziek. Regel het
volume met behulp van de volumeknop.