Ibiza sound COMBO208-VHF Скачать руководство пользователя страница 3

COMBO208-VHF 


3


GB – PORTABLE SOUND SYSTEM COMBO208-VHF 


Welcome 

Welcome to the family of discerning sound equipment users who have selected Professional speakers. 

This Owner's Manual contains important information that will help you get the most from your speakers so please take a 

few moments to read it and be sure to keep it in a safe place for future reference. 


Before You Begin 

Important Information 

Before using your sound system, please review the following for important information on safety and protection of your 

investment in quality loudspeakers.

 Keep the manual and the safety instructions for further reference. 

The box shall not be exposed to dripping or splashing and no objects filled with liquids such as vases shall be placed 

on the box. 

No naked flame sources such as lighted candles, should be placed on the box 

Use the box only in a dry environment. 

This item must be grounded. 


Stand mounting 

The COMBO208-VHF includes a receptacle cup with a thump screw to facilitate mounting on tripod stands with a 35 mm 

pole. When using these stands, be sure to observe the following precautions: 


Check the stand specification to be certain it is designed to support the weight of the speaker. 


Observe all safety precautions specified by the stand manufacturer. 


Always verify that the stand is placed on a flat, level, and stable surface. 


Route cables so that performers, crew, and audience will not trip over them and pull the speaker over. 


Be sure to fully extend the legs of tripod type stands. 


Position the stand so that the legs do not present a trip hazard. 


Do not attempt to place more than one speaker on a stand. 


Always be cautious in windy, outdoor conditions. It may be necessary to place additional weight (i.e. sandbags) on the 

base of stand to improve stability. 


Disconnection from the mains 

a)


Where the MAINS plug or an appliance couples is used as the disconnect device, the disconnect device shall remain 

readily accessible. 

b)


If a switch is used to disconnect the device, the switch and its function must be clearly identified and remain easily 

accessible. 


Fuse replacement 

Disconnect the power cord before replacing a fuse. Always replace with the same type of fuse. 

With your hands, unscrew the fuseholder from its housing, remove the damaged fuse from its holder and replace it with 

exactly the same type of fuse. Screw the fuse holder back into place and reconnect power. 


Cooling 

A minimum distance around the unit must be kept to ensure sufficient ventilation. 

The ventilation should not be impeded by covering the ventilation openings with items such as newspapers, table-cloths, 

curtains, etc. 


Exposure to moisture, outdoor applications 

While loudspeakers will work great for outdoor sound reinforcement they are not weather-proof and are not intended for 

continuous exposure to  extremes of humidity, temperature, salt air, or UV rays. Exposure to outdoor  environmental 

conditions may result in premature failure of components as well as degradation to appearance. 
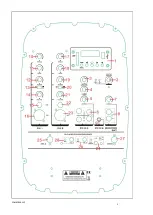
 

Features 


Handy, versatile and compact, this set is composed of 2x boxes one of which contains a detachable amplified 6-channel 

mixer and the other a storage compartment for the supplied leads. Perfect in all situations where portability and ease of 

use are of equal importance as sound quality and flexibility. 

•  High efficiency woofer 8"/20cm  

•  Titanium compression HF driver 1"/25mm 

•  Amplified 6-channel mixer  

•  USB-MP3/WMA/SD input 


Содержание COMBO208-VHF

Страница 1: ...revendeur sur la fa on de les recycler WICHTIGER HINWEIS Elektroger te geh ren nicht in den Hausm ll Sie m ssen in speziellen Betrieben recycelt werden Bringen Sie sie zu einer speziellen Entsorgungs...

Страница 2: ...COMBO208 VHF 2...

Страница 3: ...ne speaker on a stand Always be cautious in windy outdoor conditions It may be necessary to place additional weight i e sandbags on the base of stand to improve stability Disconnection from the mains...

Страница 4: ...nd listen to the sound CONNECTION OF A MICROPHONE a Turn down the MASTER VOLUME b Connect the microphone to the microphone cable and insert the male end into a MIC socket c Turn down the TREBLE and th...

Страница 5: ...17 TREBLE to control the high frequencies CH2 18 Bass to control the low frequencies CH2 19 Reverb function of Channel 2 20 ON OFF switch to control the reverb function of Channel 2 21 Volume to cont...

Страница 6: ...Too much treble Reduce the treble control Not enough bass Increase the bass control Wrong speaker connection Check of all speakers are properly connected Sound is deep toned and booming Not enough tr...

Страница 7: ...support Le COMBO208 VHF comporte un insert avec une vis pour faciliter le montage sur des tr pieds quip s d une embase de 36mm Si vous utilisez ce type de support observez les pr cautions suivantes V...

Страница 8: ...canal 1 ou 2 c R glez les contr les TREBLE BASS et ECHO sur le minimum d Tout en parlant normalement dans le microphone augmentez le volume du canal jusqu au volume d sir e Augmentez doucement le volu...

Страница 9: ...nal 1 16 Entr e pour micro filaire du canal 1 17 TREBLE Contr le les hautes fr quences CH2 18 Bass Contr le les hautes fr quences CH2 19 Fonction Echo du canal 2 20 Interrupteur M A pour la function c...

Страница 10: ...sez le r glage des aigus Pas assez de graves Augmentez le r glage de graves Mauvaise connexion des enceintes V rifiez si toutes les enceintes sont correctement branch es Le son est profond et sourd Pa...

Страница 11: ...ftung zu gew hrleisten Die Bel ftung darf nicht durch Verstopfen der Bel ftungs ffnungen durch Zeitungen Tischt cher Gardinen u behindert werden Keine Hitzequelle oder offene Flamme wie z B eine Kerze...

Страница 12: ...us Schalter auf EIN stellen Nun k nnen Sie eine Audioquelle anschlie en und die Musik genie en ANSCHLUSS EINES MIKROFONS a Den MASTER VOLUME Regler ganz herunterfahren b Das Mikrofonkabel ans Mikrofon...

Страница 13: ...s MONITOR Ausgangs 8 Monitor Ausgang 9 Stereo Eingang von Kanal 5 6 10 TREBLE Stellt die hohen Freqenzen ein CH1 11 Bass Stellt die tiefen Freqenzen ein CH1 12 Echo Regler von Kanal 1 13 Ein Aus Schal...

Страница 14: ...Regler herunterfahren Zu wenig Bass Bass Regler hochfahren Falsche LS Anschl sse Alle LS Anschl sse berpr fen Ton klingt dumpf und tief Zu wenig Treble Treble Regler hochfahren Zuviel Bass Bass Regler...

Страница 15: ...vuur zoals kaarsen op de luidspreker plaatsen Gebruik alleen in gematigd klimaten Ontkoppeling van het net a Indien het toestel via het stopcontact wordt uitgeschakeld moet de contactdoos altijd gemak...

Страница 16: ...m b Sluit de uitgang van de player via een 3 5mm stereo jack aan de CH5 6 ingang van het mengpaneel aan c Indien uw player een uitgangsregelaar of een volume controle heeft zet deze controle op 7 Verh...

Страница 17: ...van de VHF functie 25 Antenne voor de draadloze microfoon A 26 Indicatie led van de draadloze microfoon A Volume controle van de draadloze microfoon A 27 Indicatie led van de draadloze microfoon B Vol...

Страница 18: ...zijn Het geluid is diep en dof Niet voldoende trebel Verhoog de treble controle Te veel bassen Verminder de bas controle Bromruis Foute aardaansluiting Stek alle netkabels in hetzelfde stopcontactdoos...

Страница 19: ...vidni v vetrovnih zunanjih pogojih Morda je potrebno da dodatno obte ite spodnji del stojala za izbolj anje stabilnosti Odklop iz omre ja a e se vtika uporablja za odklop naprave dostop do njega mora...

Страница 20: ...c Zni ajte TREBLE in BASS kontrole d Zni ajte REVERB kontrolo e Medtem ko govorite glasno v mikrofon nastavite glasnost kanala do elene ravni f Po asi zvi ajte MASTER VOLUME do elene glasnosti POVEZAV...

Страница 21: ...nala 2 21 Glasnost Kontrola glasnosti za kanal 2 22 LINE vhod za kanal 2 23 Vhod i nega mikrofona za kanal 2 24 ON OFF stikalo VHF funkcije 25 Antena za brez i ni mikrofon A 26 Indikator za brez i ni...

Страница 22: ...lno priklju eni Zvok je deep toned in booming Ni dovolj visokih tonov Pove ajte visoke tone Preve nizkih tonov Zmanj ajte nizke tone Bren anje Slaba ozemljitev Priklopite vse omre ne kable v isto vti...

Страница 23: ...quipados con un vastago de 36mm Si usted utiliza este tipo de soporte observe las precauciones siguientes Verifique las especificaciones del tripode con el fin de comprobar que puede soportar el peso...

Страница 24: ...el micr fono en la clavija MIC 16 23 en el canal 1 o 2 c Ajuste los controles TREBLE BASS y ECO al m nimo d Hablando normalmente en el microfono aumente el volumen de canal hasta el nivel deseado e A...

Страница 25: ...nal 1 15 Entrada Linea de canal 1 16 Entrada para micro de cable de canal 1 17 TREBLE Controla las altas frecuencias CH2 18 BASS Controla las bajas frecuencias CH2 19 Funci n Eco del canal 2 20 Interr...

Страница 26: ...Baje el ajuste de agudos Sin Graves Aumente el ajuste de los graves Mal conexionado de los altavoces Verifique que los bafles est n bien conectados El sonido es profundo y pesado Sin Agudos Aumente e...

Страница 27: ...in care este necesara deconectarea de urgenta de la reteaua de alimentare priza si cablul de alimentare trebuie sa fie usor accesibile d Daca se utilizeaza un comutator pentru alimentarea aparatului a...

Страница 28: ...inim controalele pentru sunet TREBLE si BASS d Reduceti la minim ecoul REVERB e Vorbiti in microfon si reglati in acelasi timp volumul pentru microfon la nivelul dorit f Reglati MASTER VOLUME la nivel...

Страница 29: ...joase CH2 19 Functie ecou canal 2 20 ON OFF comutator ecou pentru functia ecou pentru canalul 2 21 Volum control volum canal 2 22 Intrare linie canal 2 23 Intrare microfon cu fir canal 2 24 ON OFF com...

Страница 30: ...orsionat Prea putine frecvente inalte Cresteti frecventele inalte Prea multe frecvente joase Reduceti frecventele joase Zumzet Pamntare gresita Conectati alimentarea la aceeasi priza Cabluri prea lung...

Страница 31: ...TH WIRELESS MICROPHONES Type or model COMBO208 VHF Conforms with the essential requirements of LVD directive 2006 95 CE RTTE directive 1999 5 EC Based on the following standards applied EN60065 2002 A...

Страница 32: ...MBO208 VHF Auxquels se r f re cette d claration sont conformes aux exigences essentielles et aux autres dispositions pertinentes de Directive LVD 2006 95 CE Directive R TTE 1999 5 CE Les produits sont...

Отзывы: