


- 8 -
Connecting your iameco
™
monitor
Follow these steps to set up your monitor.
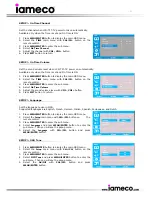
Step 1:
Plug the AC power cable into the power adapter and the other end
into a 3-pin socket.
Step 2:
Connect the signal cable to the 15-pin, D-Type sub connector on
the back of the monitor and to the VGA port in the computer.
(If you are using an Apple computer, connect the cable to a DVI
connector, and set the pins on your adapter (Adapter not included). PC-
compatible computers do not need an adapter.)
Step 3:
Press the Power button to turn on the monitor and turn on your
computer. When your monitor displays an image, the installation is
complete.
Note:
To set up the monitor, please ensure that the power of the monitor,
computer system, and other attached devices are turned off before
proceeding with the above steps. Also please read the safety information
(discussed on page 27) before you plug your monitor into a wall socket.
Power ON/OFF Mains
switch power cable
Scart 1
Scart 2
For better display
1. Connect the power cable for the monitor to the power port on the back of the monitor; Plug the power
cable for the monitor into a nearby power socket.
2. Adjust computer resolution and screen injection rate (refresh rate) in the control panel of the
computer as described below to enjoy the best quality of picture. You can have an uneven quality of
picture in the screen if the best quality of picture is not provided in TFT-LCD.
Resolution: 1024 × 768 and Vertical frequency (refresh rate): 60 Hz
3. TFT LCD panel manufactured by using advanced semiconductor technology with precision of 99.999%
above is used for this product. But the pixels of RED, GREEN, BLUE and WHITE colour seem to be
bright sometimes or some black pixels can be seen. This is not bad quality pixels and can be used
without difficulty. For example, the number of TFT LCD pixels that is contained in the 15" is
2,359,296.
When you clean the monitor and the panel outside, please apply the recommended small amount of
cleaner by using a soft and dry cloth. The LCD area should not be forced or scrubbed harshly. If excessive
force is applied, you can damage the screen and surround
.
iameco
™
32”, 40” , 46”
monitor control buttons
Front control buttons
1.
Source/Exit button:
Choose the input source or exit the
OSD menu.
2.
Volume button:
Decrease and increase the audio
volume or navigate the OSD menu.
3.
Power indicator:
When the light is red the monitor is on
standby mode. It glows green during normal operation.
4.
On/Off button:
Use this button to turn the monitor on
and off.
Control panel from front of monitor
5. IR button:
Remote control receiver.
6. CH button:
Zap the channels or navigate the On Screen Display (OSD) menu.
7. Select/Menu button:
Use this button to Exit the active menu or the OSD.


