background image

IOM9SE4 Installation and Instructions for Use 


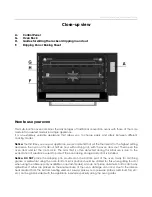
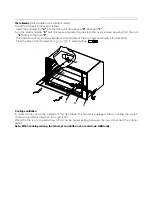
Close-up view 


A.


   Control Panel  

G.    Oven Rack 

H.      Guides for sliding the racks or dripping in and out 
F.        Dripping Pan or Baking Sheet                                             


How to use your oven 
 

This multi-function oven combines the advantages of traditional convection ovens with those of the more 

modern fan assisted models in a single appliance. 
It is an extremely versatile appliance that allows you to choose easily and safely between different 
cooking modes. 
   

Notice: 

The first time you use your appliance, we recommend that set the thermostat to the highest setting 

and leave the oven on for about half an hour with nothing in it, with the oven door shut. Then open the 
oven door and let the room air in. The odor that is often detected during this initial use is due to the 

evaporation of substances used to protect the oven during storage and until it is installed. 


Notice: DO NOT 

place the dripping pan provided on the bottom part of the oven cavity for catching 

grease or spills whilst using the oven. Bottom rack position should be utilized for this when grilling food or 

when using the rotisserie (only available on certain models). Also do not place aluminium foil to catch any 
spills either. If either are placed on the enamel base of the oven, damage can occur due to the intense 

heat created from the bottom heating element. Always place your cookware (dishes, aluminum foil, etc. 
etc.) on the grid provided with the appliance inserted especially along the oven guides.   

Содержание IOM9SE4

Страница 1: ...MODEL IOM9SE4 900mm Built In Oven Manual Installation and Operation ...

Страница 2: ...mbly available from the manufacturer or an authorised service agent Electrical leads and cables should not be allowed to touch the oven The oven should be connected to the mains power supply by means of an approved circuit breaker or fuse Never use multiple plug adapters or extension leads The rating label is located either on the right side of the door or affixed to the bottom of side of the cavi...

Страница 3: ...ed while oven is hot do not let potholder contact the heating elements Always use dry potholders Moist or damp potholders on hot surfaces may result in burns from steam Do not let potholder touch hot heating elements Do not use a towel or other bulky cloth Child safety WARNING Accessible parts may become hot during use Children should be kept away Children and pets should not be left alone or unat...

Страница 4: ... with a soft cloth or microfiber cloth and a mild window cleaning detegent Oven interior Do not use coarse scouring pads or cleaning sponges To avoid damaging the enameled oven surfaces use commercially available oven cleaners To remove stubborn soil use a special oven cleaner Oven door glass The oven door is equipped with three sheets of glass placed against each other The inner middle sheets can...

Страница 5: ...id applied with a soft nylon brush Allow to dry in drainer or out in the sun Due to the surface not being smooth do not attempt to dry liners with a cloth as material fibres may remain on the surface of the liner Do not use abrasive cleaning agents hard brushes scouring pads or cloths steel wool knives or other abrasive materials DO NOT use oven sprays on catalytic enamel as the chemicals used in ...

Страница 6: ... with the oven door shut Then open the oven door and let the room air in The odor that is often detected during this initial use is due to the evaporation of substances used to protect the oven during storage and until it is installed Notice DO NOT place the dripping pan provided on the bottom part of the oven cavity for catching grease or spills whilst using the oven Bottom rack position should b...

Страница 7: ...ed in test mode for testing or performing all operating steps The oven will not heat up during the test Switching on the test mode 1 Switch off the appliance using the On Off button 2 Press and hold and buttons at the same time until an acoustic signal is heard and d lights up in the display Switching off the test mode 1 Switch off the appliance using the On Off button 2 Press and hold and buttons...

Страница 8: ...rm Up is working Changing the oven function To change the oven function Press the or button repeatedly until the desired oven function is displayed Switching off the oven Switch off the appliance using the On Off button Speed cook After an oven function is selected with the use of the additional function Speed cook the empty oven can be pre heated in a relatively short time Important Do not put th...

Страница 9: ...t for Cook time and End time begins to count down after the selected function starts Countdown 1 Press the Clock Functions button repeatedly until the symbol for Countdown flashes 2 Set the desired Countdown time using the or button max 59 00minutes After approx 5 seconds the display shows the time remaining The symbol for Countdown lights up When the time set has elapsed an audible signal sounds ...

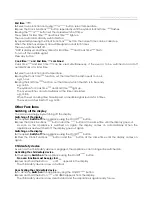
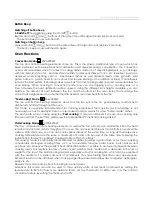
Страница 10: ...3 05 When the set cooking time has elapsed an audible signal sounds for 3 times The oven switches itself off e g 14 05 Other Functions Switching off the display You can save energy by switching off the display Switching off the display 1 If required Switch off the appliance using the On Off button 2 press the Clock Functions button and the button at the same time until the display goes out As soon...

Страница 11: ...is especially recommended for cooking prepacked food quickly as pre heating is not necessary such as for example frozen or pre cooked food as well as for a few home made dishes The best results when cooking using the Fast cooking mode are obtained if you use one cooking only the second from the bottom please see the table entitled Practical Cooking Advice Multi Cooking Mode 2733 3278W The top circ...

Страница 12: ...vice paragraph Fan Assisted Grill 2953 3400W The top central heating elements and the fan come on This combination of features increases the effectiveness of the unidirectional thermal radiation of the heating elements through forced circulation of the air throughout the oven This helps prevent food from burning on the surface allowing the heat to penetrate right into the food Excellent results ar...

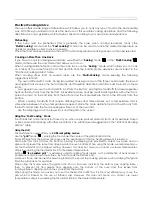
Страница 13: ... the hole F The rotisserie rack must always be fitted in the middle of the oven second position from bottom Press the Oven function selection or to select setting Cooling ventilation In order to cool down the exterior of the appliance this model is equipped with a cooling fan which comes on automatically when the oven is hot When the fan is on a normal flow of air can be heard exiting between the ...

Страница 14: ...ch guarantees its perfect functioning Check the condition of this seal on a regular basis If necessary clean it and avoid using abrasive products or objects to do so Should it become damaged please contact you re nearest After sales Service Center We recommend you avoid using the oven until it has been repaired never line the oven bottom with aluminum foil as the consequent accumulation of heat co...

Страница 15: ...eratures set a temperature that is somewhere between the two temperatures required place the more delicate food on the 4th rack from the bottom and take the food requiring less time out of the oven first Use the dripping pan on the lower rack and the grid on the upper Using the Fast Cooking Mode Functional fast and practical for those of you who use pre packed products such as for example frozen o...

Страница 16: ...the racks at the same time Cooking Pizza For best results when cooking pizza use the Pizza Mode Preheat the oven for at least 10 minutes Use a light aluminum pizza pan placing it on the grid supplied with the oven If the dripping pan is used this will extend the cooking time making it difficult to get a crispy crust Do not open the oven door frequently while the pizza is cooking If the pizza has a...

Страница 17: ...ttlefish Squid and prawn kebabs Cod filet Grilled vegetables Veal steak Cutlets Hamburgers Mackerels Toasted sandwiches 1 1 1 1 1 1 1 1 4 4 4 3 4 4 4 4 4 4 5 5 5 5 5 5 5 5 5 Max Max Max Max Max Max Max Max Max 8 10 6 8 10 10 15 15 20 15 20 7 10 15 20 2 3 With rotisserie where prevent Veal on the spit Chicken on the spit Lamb on the spit 1 0 1 5 1 0 5 5 5 Max Max Max 80 90 70 80 70 80 6 Fan Assiste...

Страница 18: ...emoved The manufacturer declines all responsibility for improper installation which may harm persons and animals and damage property Important The power supply to the appliance must be cut off before any adjustments or maintenance work is done on it Air duct is supposed to use in Ventilation Installation of Built in Ovens In order to ensure that the built in appliance functions properly the cabine...

Страница 19: ...y insulation sleeping having an appropriate rating Before making the connection check that The electrical safety of this appliance can only be guaranteed if the cooker is correctly and efficiently earthed in compliance with regulations on electrical safety Always ensure that the earthling is efficient if you have any doubts call in a qualified technician to check the system The manufacturer declin...

Страница 20: ...ties Contact your local government for information regarding the collection systems available If electrical appliances are disposed of in landfills or dumbs hazardous substances can leak into the groundwater and get into the food chain damaging your health and well being When replacing old appliances with new ones the retailer is legally obliged to take back your old appliance for disposals at lea...

Отзывы: