i3-TECHNOLOGIES L3403FHD Скачать руководство пользователя страница 20

Installation


20 


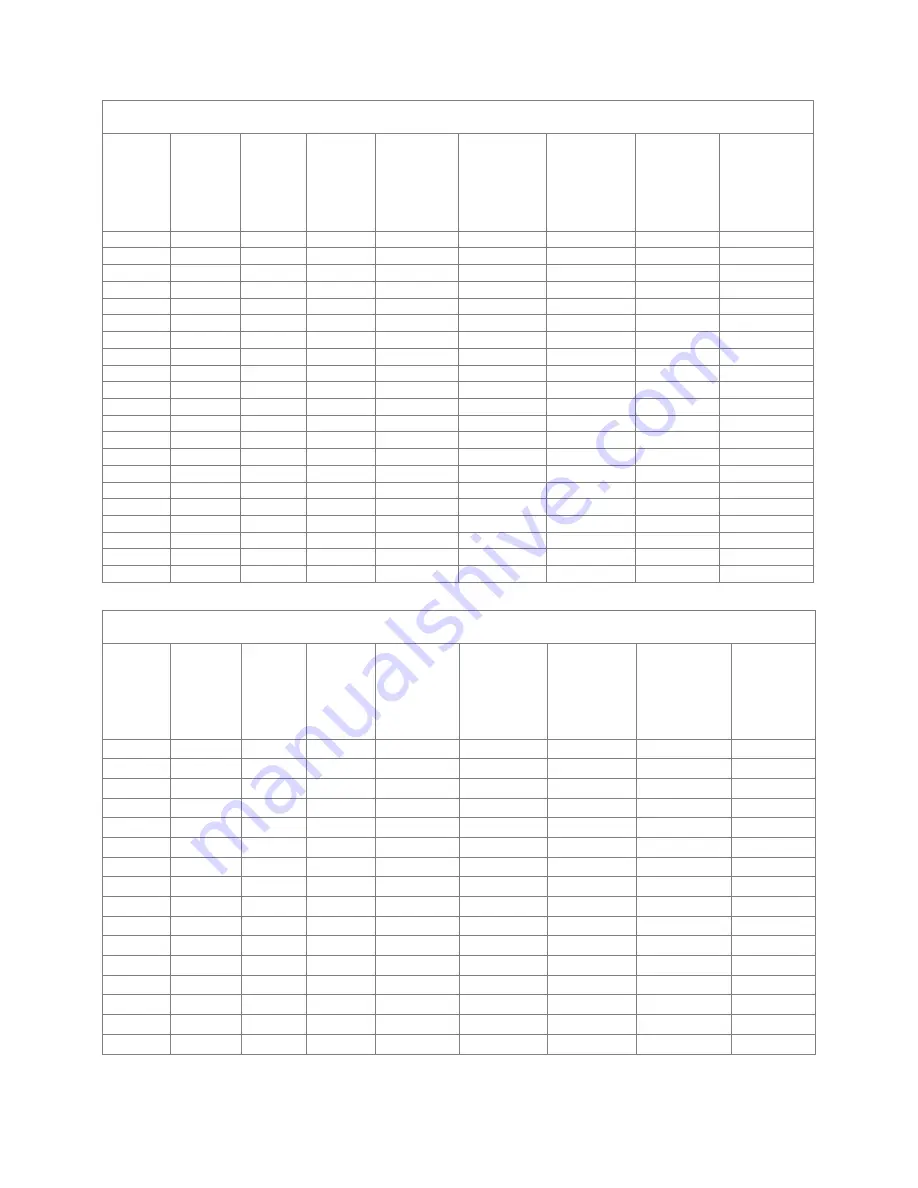
Ultra Wide (16:6) Wall mount installation measurement chart


Diagonal 

image size 

(S) in inch 


Diagonal 

image size 

(S) in mm 


Image 

width 

(W) in mm 


Image 

height 

(H) in mm 

Distance from 

surface of 

whiteboard to 

center of 

projector 

mount 

(T) in mm 

Distance from 

surface of 

whiteboard to 

back of 

projector (T1) 

in mm 


Distance from 

top of image 

to top of wall 

plate 

(O) in mm 


Distance from 

top of image 

to top of 

interface boss 

(O1) in mm 


Distance from 

top of image to 

top of projector 

(O2) in mm 

120 

3048 

2854 

1070 

604 

467 

462 

386 

366 

121 

3073 

2878 

1079 

610 

473 

465 

389 

369 

122 

3099 

2901 

1088 

616 

479 

467 

391 

371 

123 

3124 

2925 

1097 

622 

485 

470 

394 

374 

124 

3150 

2949 

1106 

628 

491 

473 

397 

377 

125 

3175 

2973 

1115 

634 

497 

476 

400 

380 

126 

3200 

2997 

1124 

640 

503 

478 

402 

382 

127 

3226 

3020 

1133 

646 

509 

481 

405 

385 

128 

3251 

3044 

1141 

652 

515 

484 

408 

388 

129 

3277 

3068 

1150 

658 

521 

486 

410 

390 

130 

3302 

3092 

1159 

664 

527 

489 

413 

393 

131 

3327 

3115 

1168 

670 

533 

492 

416 

396 

132 

3353 

3139 

1177 

676 

539 

494 

418 

398 

133 

3378 

3163 

1186 

682 

545 

497 

421 

401 

134 

3404 

3187 

1195 

688 

551 

500 

424 

404 

135 

3429 

3211 

1204 

694 

557 

502 

426 

406 

136 

3454 

3234 

1213 

700 

563 

505 

429 

409 

137 

3480 

3258 

1222 

706 

569 

508 

432 

412 

138 

3505 

3282 

1231 

712 

575 

511 

435 

415 

139 

3531 

3306 

1240 

718 

581 

513 

437 

417 

140 

3556 

3329 

1249 

724 

587 

516 

440 

420 


1080P (16:9) Wall mount installation measurement chart 


Diagonal 

image size 

(S) in inch 


Diagonal 

image size 

(S) in mm 


Image 

width 

(W) in mm 


Image 

height 

(H) in mm 

Distance from 

surface of 

whiteboard to 

center of 

projector 

mount 

(T) in mm 

Distance from 

surface of 

whiteboard to 

back of 

projector (T1) 

in mm 


Distance from 

top of image to 

top of wall 

plate 

(O) in mm 


Distance from 

top of image to 

top of interface 

boss (O1) in mm 


Distance from 

top of image 

to top of 

projector (O2) 

in mm 

87 

2210 

1926 

1083 

370 

233 

364 

288 

268 

88 

2235 

1948 

1096 

376 

239 

367 

291 

271 

89 

2261 

1970 

1108 

382 

245 

370 

294 

274 

90 

2286 

1992 

1121 

387 

250 

372 

296 

276 

91 

2311 

2015 

1133 

393 

256 

375 

299 

279 

92 

2337 

2037 

1146 

398 

261 

377 

301 

281 

93 

2362 

2059 

1158 

404 

267 

380 

304 

284 

94 

2388 

2081 

1171 

409 

272 

383 

307 

287 

95 

2413 

2103 

1183 

415 

278 

385 

309 

289 

96 

2438 

2125 

1196 

421 

284 

388 

312 

292 

97 

2464 

2147 

1208 

426 

289 

390 

314 

294 

98 

2489 

2170 

1220 

432 

295 

393 

317 

297 

99 

2515 

2192 

1233 

437 

300 

396 

320 

300 

100 

2540 

2214 

1245 

443 

306 

398 

322 

302 

101 

2565 

2236 

1258 

448 

311 

401 

325 

305 

102 

2591 

2258 

1270 

454 

317 

403 

327 

307 

Содержание L3403FHD

Страница 1: ...i3Projector User s Manual L3503W L3403FHD L3403UW...

Страница 2: ...nect to Video Sources 13 3 2 Powering the Projector On Off 13 A Powering On the Projector 14 B Powering Off the Projector 15 C Warning Indicator 15 D LED Lighting Message 16 3 3 Adjusting the projecte...

Страница 3: ...60 A How to access Multimedia Mode 60 6 Appendices 65 6 1 Installing and cleaning the dust filters 65 6 2 Compatibility Modes 66 A VGA Analog 66 B HDMI Digital 67 6 3 RS232 Commands and Protocol Func...

Страница 4: ...4 Clean only with dry cloth 5 Only use attachments accessories specified by the manufacturer 6 Do not use the unit if it has been physically damaged or abused Physical damage abuse would be but not l...

Страница 5: ...cleaning the product Use a soft dry cloth with mild detergent to clean the display housing Disconnect the power plug from AC outlet if the product is not being used for a long period of time Don t Bl...

Страница 6: ...arts listed below are in the box If something is missing please contact your nearest customer service centre Due to different applications in each country some regions may have different accessories O...

Страница 7: ...t overview A Main Unit 1 Control panel 2 Focus switch 3 Ventilation inlet 4 IR Receiver 5 Ventilation Outlet 6 Speaker 7 Power Socket 8 Input output Connections 9 Lens Note The interface is subject to...

Страница 8: ...Introduction 8 B Control Panel 1 Power LED 2 Enter 3 Temp LED 4 Lamp LED 5 Menu 6 Input 7 Four Directional Select Keys 8 Power Standby button 9 IR Receiver...

Страница 9: ...Socket 8 Interactive connector 3 5mm mini jack Optional 9 VGA Out VGA2 in connector 10 RS 232 Connector 9 pin DIN Type 11 Composite Video Input Connector 12 Composite Audio input right connector 13 Co...

Страница 10: ...Power ON OFF 4 OK 5 Four Directional Select Keys 6 Menu 7 Exit 8 Zoom in 9 Reset 10 Auto 11 Source 12 Zoom out 13 Volume 14 Keystone 15 Image 16 Black screen 17 Aspect ratio 18 VGA1 19 HDMI1 20 VGA2...

Страница 11: ...e Decoration strip in grey Dimension L x 150 5mm L x 23mm Diameter Pen tip User Replaceable two spare tips as default Body material Plastic Weight 39g with battery LED Indicator State Power Switch LED...

Страница 12: ...S232 Cable 2 VGA Cable 3 HDMI Cable 4 USB Cable 5 Audio Cable RCA 6 RJ45 Cable 7 Power Cord 8 VGA Output Cable 9 DC to DC Cable 10 Audio Output Cable 11 Audio Input Cable Note Due to the difference in...

Страница 13: ...r 2 HDMI Cable 3 Audio Cable RCA 4 Audio Cable 5 Power Cord 6 Composite Video Cable 7 Audio Cable RCA 8 Audio Input Cable Note Due to the difference in applications for each country some regions may h...

Страница 14: ...saving mode 3 Turn on and connect the source that you want to display on the screen computer notebook video player etc The projector will detect the source automatically If not push menu button and go...

Страница 15: ...ctor has completed the cooling cycle and has entered standby mode Once in standby mode simply press button to restart the projector 3 Disconnect the power cord from the electrical outlet and the proje...

Страница 16: ...ower LED Temp_LED Lamp_LED Red Blue Red Red Standby State Input Power cord Power on Warning Up Flashing State Flashing Flashing Burn in ON Flashing Flashing Burn in OFF Power NG Fan Lock Flashing slow...

Страница 17: ...jector is equipped with adjustable feet for adjusting the image height position 1 Locate the foot you want to adjust on the underside of the projector 2 Turn the adjustable foot counter clockwise to m...

Страница 18: ...ge is clear 1080p series The projector will focus at distances lens to wall from 1 59 1 87 feet 0 49 0 57 meters Ultra Wide series The projector will focus at distances lens to wall from 2 36 2 75 fee...

Страница 19: ...mage Size from 87 to 102 2 21 to 2 59 meters Ultra Wide series Projection Image Size from 120 to 140 3 05 to 3 56 meters WXGA series Projection Image Size from 85 to 115 2 16 to 2 92 meters Projector...

Страница 20: ...694 557 502 426 406 136 3454 3234 1213 700 563 505 429 409 137 3480 3258 1222 706 569 508 432 412 138 3505 3282 1231 712 575 511 435 415 139 3531 3306 1240 718 581 513 437 417 140 3556 3329 1249 724 5...

Страница 21: ...280 260 92 2337 1982 1239 410 273 358 282 262 93 2362 2003 1252 416 279 361 285 265 94 2388 2025 1265 422 285 363 287 267 95 2413 2046 1279 427 290 365 289 269 96 2438 2068 1292 433 296 368 292 272 97...

Страница 22: ...2854 1070 467 389 121 3073 2878 1079 473 392 122 3099 2901 1088 479 394 123 3124 2925 1097 485 397 124 3150 2949 1106 491 400 125 3175 2973 1115 497 403 126 3200 2997 1124 503 405 127 3226 3020 1133 5...

Страница 23: ...age size S in mm Image width W in mm Image height H in mm Distance from surface of whiteboard to back of projector T1 in mm Distance from bottom of image to top of table O3 in mm 85 2159 1831 1144 233...

Страница 24: ...Step 2 Vertical horizontal and size adjustment Adjust the image vertically by turning the hexagon screw head Adjust the image horizontally by loosening the screws and moving the projector Adjust the...

Страница 25: ...INPUT to select an input signal MENU Press MENU to launch the on screen display OSD menu Toexit OSD press MENU again Four Directional Select Keys Use to select items or make adjustments to your selec...

Страница 26: ...tory default values except for laser counter Zoom out Zoom out the projector display OK Confirm your item selection Source Press Source to select an input signal Auto Automatically synchronizes the pr...

Страница 27: ...r Aspect Use this function to choose your de sired aspect ratio VGA1 Press VGA1 to choose VGA IN 1 connector Freeze Pause the screen image Press again to resume the screen image HDMI1 Press HDMI1 to c...

Страница 28: ...layed use the keys to select any item in the main menu While making a selection on a particular page press the or Enter key to enter sub menu 3 Use the keys to select the desired item and adjust the s...

Страница 29: ...color You can select from White Light Yellow Light Blue Pink and Dark Green Brightness Adjust the brightness of the image Press the button to darken image Press the button to darken image Contrast Th...

Страница 30: ...in the image Press the button to increase the amount of red in the image Note Sharpness Saturation and Hue functions are only supported under video mode Gamma This allows you to adjust the gamma valu...

Страница 31: ...e image using a 16 6 ratio only for Ultrawide Phase Synchronize the signal timing of the display with the graphic card If the image appears to be unstable or flickers use this function to correct it C...

Страница 32: ...in upside down position D Settings Language Choose the multilingual OSD menu Press the or button into the sub menu and then use the or button to select your preferred language Press on the remote con...

Страница 33: ...powered on Test Pattern Display a test pattern Reset Choose Yes to return the parameters on all menus to the factory default settings E Volume Speaker Choose On to enable the speaker Choose Off to di...

Страница 34: ...ault startup screen User Use stored picture from Logo Capture function Logo Capture Press button to capture an image of the picture currently displayed on screen Note For successful logo capture pleas...

Страница 35: ...g the projector at altitudes above 2500 feet 762 meters or higher Off The built in fans automatically run at a variable speed ac cording to the internal temperature Filters Remind Hour Filters Remind...

Страница 36: ...or laser diode which will lower power consumption and extend the laser diode life H 3D 3D Auto When a HDMI 1 4a 3D timing identification signal is detected the 3D image is selected automatically Choos...

Страница 37: ...e Sequential is supported the DLP Link 3D input signals from VGA HDMI connector Frame Sequential Field Sequential are sup ported the HQFS 3D input signals from Composite S Video connector Frame Packin...

Страница 38: ...and projector Connect before using the interactive function After you complete the Interactive Settings in OSD use the Mini USB cable to connect a NB desktop to the projector IR Pen Usage Notice Plea...

Страница 39: ...on func tion Please specify that the Interaction func tion is only for interactive model The Interaction function is not available in the Non interactive model STEP 1 INSTALL UTILITY SOFTWARE System r...

Страница 40: ...sing the LCT optional accessory Select Active Pen Mode when using the IR pen Note Only single point touch is available for Mac OSX STEP 3 TOUCH AREA SETTING a Select Audio Touch Area Setting Note Quit...

Страница 41: ...e a Touch Area window will pop up If the captured image is not clear enough please re select Ambient light mode selection from Auto to Bright or Dim according to actual ambient light condition Remark...

Страница 42: ...ly overlaps the projected white frame If not fine adjust again When the Touch Area is correctly located click to exit STEP 4 CALIBRATION a Select Auto Calibration Note If the fail message pops up foll...

Страница 43: ...ter accuracy STEP 5 TOUCH SENSITIVITY When touch function is unresponsive or writing is intermittent You can adjust the sensitivity by adjusting Touch Sensitivity level Note Touch Sensitivity is not a...

Страница 44: ...ay interfere with touch performance The troubleshooting viewer shows real time images for debugging purposes Any light interference is marked in green If green obstacles appear within image area remov...

Страница 45: ...0 25 UST projector 80 100 WXGA co operate with TR0 25 UST projector 80 100 1080P co operate with TR0 25 UST projector 120 140 16 6 ultra wide co operate with TR0 25 UST projector Display mode Support...

Страница 46: ...bnet Mask Gateway and DNS configuration manually IP Address Display an IP address Subnet Mask Display the subnet mask number Gateway Display the default gateway of the network connected to the project...

Страница 47: ...apply and press button to complete the configuration process Step 3 Find the IP Address from the LAN function of the projector as below 1 Connect to LAN with DHCP server please select DHCP ON and go t...

Страница 48: ...User Controls 48...

Страница 49: ...P mode If you want to connect via a WiFi network client mode you must connect the projector and the wireless device to a common WiFi network and ensure that the network allows connected units to see e...

Страница 50: ...gement Page in AP mode Open your web browser and type in the IP address 192 168 111 1 in the URL then press Enter Projector Information User can retrieve the Projector Information in this page and sel...

Страница 51: ...er can configure LAN parameters and edit the projector information in this page Wi Fi User can install EZView for different platforms and operating systems Projector Status and Control User can contro...

Страница 52: ...User Controls 52 E mail Alert User can assign the email address and categorize alert notice...

Страница 53: ...aser Panel projector There is a limitation to what you can do via the APP whilst using the software has no other limitation than a maximum resolution of 720p EZView APP features Support local photo do...

Страница 54: ...op Step 1 Connect your PC Laptop to the projector AP mode or connect both the PC Laptop and the projector to a common WiFi or LAN network Client mode Step 2 Start EZView on the device by clicking belo...

Страница 55: ...1 4 1 2 or 1 1 of screen 2 Mirror Mode Display 3 Extension Mode Display 4 Link to Web management page AP mode and client mode via LAN network only 5 Exit 6 Display Mode Video or Graphic 7 Compatible...

Страница 56: ...nd the projector to a common WiFi or LAN network Client mode Step 2 Start EZView on the device by clicking below icon on tablet or smart phone Step 3 Start EZView APP and go to multimedia mobile table...

Страница 57: ...ist space and the other punctuation key included Category Item Input Length characters Crestron Control IP Address 15 IP ID 2 Port 5 Projector Projector Name 10 Location 9 Assigned To 9 Network Config...

Страница 58: ...h projector including projector s online status system power lamp life network setting and hardware faults plus any custom attribute as defined by the Administrator The Administrator can add delete or...

Страница 59: ...User Controls c Edit Attribute d Edit Event For further information please visit http www crestron com www crestron com getroomview...

Страница 60: ...files stored on your mobile phone tablet PC notebook or desktop 2 Via USB flash drive directly access the media files stored on the device A How to access Multimedia Mode 1 Plug a wireless dongle or...

Страница 61: ...for your operating system 3 Enable your mobile device or tablet PC WiFi function and search the AP name listed in the Wi Fi network list 4 On the initial connection you will be prompted to enter a pa...

Страница 62: ...web browser and enter the IP address displayed on the screen Then select WiFi on the left side of the screen and install the EZView application for your operation system 3 Launch the EZView applicatio...

Страница 63: ...edia USB Storage Display To access the media files stored on your USB flash drive do the following 1 In the Multimedia menu select USB Disk 2 Use the keys to select the file category and press the Ent...

Страница 64: ...lect this option to view the firmware version and update firmware Video Select this option to change the display ratio and set the repeat mode Photo Select this option to change the display ratio slid...

Страница 65: ...proper maintenance will prevent overheating and projector malfunctions The specific interfaces are selected in terms of the specifications of types Air Filters Cleaning Procedure 1 Switch off the powe...

Страница 66: ...5 53 7 Apple MAC II 832x624 75 49 1 XGA 1024x768 60 48 4 1024x768 70 56 5 1024x768 75 60 0 1024x768 85 68 7 1024x768 120 99 0 Apple MAC II 1152x870 75 68 7 SXGA 1280x1024 60 64 0 1280x1024 72 77 0 128...

Страница 67: ...0 1920x1080 60 67 5 1920x1080 50 56 3 B HDMI Digital a PC signal Modes Resolution V Frequency Hz H Frequency KHz VGA 640x480 60 31 5 640x480 67 35 0 640x480 72 37 9 640x480 75 37 5 640x480 85 43 3 IBM...

Страница 68: ...80 59 94 60 31 5 480i 720x480 1440x480 59 94 29 97 15 7 576i 720x576 1440x576 50 25 15 6 480p 720x480 59 94 31 5 576p 720x576 50 31 3 720p 1280x720 60 45 0 1280x720 50 37 5 1080i 1920x1080 60 30 33 8...

Страница 69: ...Appendices C Video Compatibility NTSC M J 3 58 MHz 4 43 MHz PAL B D G H I M N 4 43 MHz SECAM B D G K K1 L 4 25 4 4 MHz SDTV 480i 480p HDTV 720p 50 60Hz 1080i 50 60Hz 1080p 50 60 Hz...

Страница 70: ...tocol Function List A RS232 Port Settings Items Method Communication Method Asynchronous Communication Bits per seconds 19200 Data bits 8 bits Parity None Stop bits 1 Flow control None B RS232 Signals...

Страница 71: ...n 0 Off 1 On Freeze 0004 n 0 Unfreeze 1 Freeze Input Source 0005 n 1 VGA 1 2 VGA 2 3 HDMI 1 4 HDMI 2 5 Video 6 Multimedia Color Mode 0010 n 1 Bright 2 PC 3 Movie 4 Game 5 User Brightness 0011 n 0 100...

Страница 72: ...Off 1 On Volume 0041 n 0 30 Microphone Volume 0042 n 0 30 Auto Power Off min 0050 n 0 120 Step 5 High Altitude 0051 n 0 Off 1 On Color Mode Read 00110 1 Okn n 1 2 3 4 5 Bright PC Movie Game User Aspec...

Страница 73: ...ons Screw type M4 4 Minimum screw length 10mm Note Please note that damage resulting from incorrect installation will void the warranty BC0130 BC0140 Note Warning 1 If you buy a ceiling mount from ano...

Страница 74: ...te the receiving antenna Increase the separation between the device and receiver Connect the device into an outlet on a circuit different from that to which the receiver is connected Consult the deale...

Страница 75: ...ve 2006 95 EC R TTE Directive 1999 5 EC if product has RF function Safety Notice Series Model Ultra Wide 1080P WXGA Ultra Wide 1080 WXGA Disposal instructions Do not throw this electronic device into...

Страница 76: ...risk of hazardous laser radiation exposure Do not open or disassemble the projector as this may cause damage by the exposure of laser radiation Do not stare into beam when the projector is on The bri...

Отзывы: